User Manual. ARGUS EstateMaster IA July-2018
|
|
|
- Shana McDaniel
- 5 years ago
- Views:
Transcription
1 User Manual IA 3.50 July-2018
2 User Manual Table of Contents 4 Part I Introduction 1 2 Program Integrity... 5 System... Requirements 6 7 Part II Introduction to Investment Appraisal Capitalisation of Net Income... 8 DCF Analysis... 8 Discount Rate Glossary of Terms Part III Starting the Application 1 2 The Application Launchpad Regional Settings Product Tabs Part IV Navigation Quick... Start 20 Opening and Closing Files Navigation Keyboard Shortcuts Menus... and Toolbars 27 Status... Bar 33 Dashboard Goal Seek Resizing the Model Data Validation ing Files Exporting to Excel Part V Preferences 1 2 General Calculations Financing Part VI Step-By-Step Instructions Set Preferences Inputting Data Project Introduction Setup Tenants Outgoings Capital... Expenditure 82 Taxes... & Duties 83 DCF Analysis Investment Analysis Part VII Custom Worksheets 2
3 User Manual 1 2 Names Exporting Data to the Enterprise Database Part VIII Application Templates Selecting a Template Folder Creating a Template Using... a Template 98 Managing Templates Part IX Integration with Microsoft Excel and Word 1 2 Part X Valuation and Investment Reporting Linking to Excel Files Linking to Word Files Executive Summary Capitalisation Summary DCF Investment Cash Flow Charts Part XI Printing Reports 1 Part XII Using the Enterprise Database Custom Worksheets Introduction to the Enterprise Database Preparing Data for Exporting Exporting to the Database Importing from the Database
4 Part I
5 Introduction 1 Introduction IA is a cash flow program designed for property valuation and investment analysis. It calculates property sale and purchase prices, and investment returns including internal rate of return and net present value based on a comprehensive set of inputs. The Program can be used to: Financially appraise a property s purchase price using the industry standard Capitalisation and DCF approaches; Estimate the property value for acquisition purposes based on monthly discounted cash flows; and Assess the feasibility of a property investment based on key performance indicators. 1.1 Program Integrity Every effort has been made to provide a quality product that is simple, flexible and detailed in its analysis. The IA program has been sealed to safeguard the integrity of the program and formulae. If the seal is broken the validity of the formulae and program calculations cannot be guaranteed any more. Therefore, we recommend that the authors be notified of any problems rather than the user attempting to rectify the problem by removing the protection facility. To this end any modifications to the IA program are prohibited without the express written approval of the authors EstateMaster Pty Ltd. Also, we cannot guarantee that the program is or will remain error free for every possible input permutation. To retain the integrity of the programs we recommend you audit the models on a regular basis with manual reality checks on the output results. Furthermore the program assumes certain tax assumptions such as rates of stamp duty. These may change in time and it is important for the user to keep abreast of such changes and know how they effect the model's assumptions. 5
6 Introduction 1.2 System Requirements To install and operate IA efficiently, the following is recommended: PC with an Intel Pentium 4 2.4GHz minimum processor (or equivalent). Microsoft Windows Vista SP2 Pro or later -or- Windows Server 2008 or later Microsoft.Net Framework or higher.. 4Gb RAM or higher. Internet connection (for downloading files and activating licences). Note to Apple Mac Users: EstateMaster can only run on Mac's via a Windows Virtualization tool such as VMWare or Parallels. 6
7 Part II
8 Introduction to Investment Appraisal 2 Introduction to Investment Appraisal 2.1 Capitalisation of Net Income The Capitalisation of Net Income (or Income Capitalisation) approach to property investment appraisal involves assessing the net rental income of the property and capitalising this in perpetuity to derive a capital value. As well as being used to value income-producing assets such as retail, commercial and industrial properties, the Income Capitalisation approach is also often used to value specialised incomegenerating 'going concern' properties (such as hotels), where the net operating income can be capitalised. Capitalised Value = Net Income Cap Rate The Capitalisation Rate used to capitalise the net rental income is market-derived and reflects the investor's desired return for that particular type of investment in the market. It can also be seen as the income from an investment expressed as a percentage of the investment's Capital Value. Cap Rate = Net Income Market Value/Price x 100 The Capitalisation Rate is the simplest measure of return calculated as the net income divided by price or value. As the Capitalisation Rate is often based on the net income when the property is sold, it is often based on and referred to as the Initial Yield although technically, the Capitalisation Rate and Yield are not the same thing. Yield is a return on the investment/value while the Capitalisation Rate is the rate used to capitalise net income to determine value/price. In the U.K., the term Capitalisation Rate is often used synonymously with the Discount Rate for any analysis that does not project annual cash flows over a holding period; various yields are used to measure property performance, the terms all risks yield and initial yield often used to describe the cap rate. In the U.S. it appears that the terms Capitalisation Rate, Overall Rate and Overall Cap Rate are used interchangeably to mean the above described. 2.2 DCF Analysis Discounted Cash Flow (DCF) is a method of financial performance analysis that attempts to determine the current value of a financial investment by computing all future cash flows associated with an investment and reducing them to their present financial values. It does this by taking into account the time value of money, given the expectation of a given rate of return on funds per period of time. By reducing future cash flows by the expected rate of return the value of an asset can be determined based on the present value of its expected future cash flows. Property value has been defined as the present value of all future rental income. This definition would be useful in a perfect market, but property investment involves a complexity of costs and revenues that makes simple analysis problematic. Over time actual investment properties suffer obsolescence that affects their yields and vacancy expectations, and they require intermittent capital expenditures to keep the building in optimum condition. The capitalisation method of valuing income producing property computes capital value from rent but it relies on assumptions imbedded in the selection of the capitalisation rate to overcome its evident simplicity in approach. The DCF approach overcomes the shortcomings of the capitalisation method by making explicit all assumptions about the future costs and revenues associated with the property. It therefore offers the attraction of precision in forecasting the financial performance of property investments. DCF versus Capitalisation 8
9 Introduction to Investment Appraisal At first sight DCF analysis would appear to be superior to valuation using capitalisation. However, this must be balanced against the fact that virtually all quantities entered into a cash flow model are forecasts of future events, and this reliance on forecasting introduces a significant risk to the precision of the result. The capitalisation method relies on market facts, current rentals and current comparable capitalisation rates. If it can be accepted that the market is rational in setting capitalisation rates and does so with some consideration of the future events likely to impact on the property, then the explicit detail of the DCF approach may be implicit in the market determination of the capitalisation rate. Moreover, since the capitalisation rate is a public fact in the market that results from the commercial decision of a large number of persons, then the capitalisation rate may be a better estimate of future events than the individual DCF analysis. For these reasons the selection between the two methods is not clear cut. If robust market evidence is available then the capitalisation method should be adopted as the most direct approach. However, often properties often display characteristics that make adoption of a local capitalisation rate difficult. This is especially difficult for complex properties in thin markets. In these cases DCF analysis becomes more attractive. In order to understand DCF analysis it is necessary to consider the notion of the time value of money and the mathematics of discounting. It is also important to be cognisant of the conventions applicable to the use of DCF for property analysis. Time Value of Money To demonstrate the time value of money, consider the case in which an individual receives a sum of $1,000 and invests it at a return of 10% per annum compounded in Government Bonds. The $1,000 will grow to $1,100 at the end of year 1 and $1,210 at the end of year 2 and so on. It is assumed that this 10% return represents the best use for the funds at a risk free rate. In this example, the investor should value $1,100 in a years time or $1,210 in two years time as equivalent to $1,000 now (ie. its present value). The reduction of future dollars to its equivalent value in money today is known as discounting. Discounting is the reciprocal of compounding and is expressed in the following formula: PV= FV (1+i)n Where: PV = Present Value; FV = Future Value (predicted amount); i = Discount Rate per period of time; and n = number of periods. The first requirement of DCF analysis is to create a tabulation of money and time with cash flow items along one axis and time on the other axis. In other words the same cash items used in the traditional approach (except interest on finance), are tabulated against equal time periods (months, quarters or years) and the values of those cash items are recorded in the time period are forecasted. Interest is excluded because this is incorporated in the discount rate as demonstrated above. The value of all cash items are totalled for each time period (with cost items being negative and revenue items being positive) resulting in a net cash flow range through time. This range of net cash flows is discounted to present value. The resultant net present value (NPV) measures the difference between the discounted revenues and the discounted costs. This is the first and perhaps the most important performance indicator. A positive NPV implies that the present value of incomes exceeds the present value of costs and the project/investment is therefore feasible. The other primary indicator is the internal rate of return (IRR). This is the discount rate at which the net present value equals zero. Possibly a better way to understand its meaning is to express it as the maximum interest rate that can be charged to a fully funded project/investment before the project/investment would show a net loss. 9
10 Introduction to Investment Appraisal Time Period A reasonable time period is necessary for DCF analysis of property. It is necessary to adopt a consistent time period to avoid possible comparative errors due to the impact of differing time periods. 10 years is usually adopted as a balance between reasonable investment length and forecast reliability. 2.3 Discount Rate Discount Rate (or Target IRR) is the DESIRED RETURN on funds invested. For discounted cash flow analysis the discount rate is the rate at which future cash flows are discounted to present value. For a property to be feasible the discounted value of future cash flows (Net Present Value) must be greater than zero. A feasible investment will have an internal rate of return (FORECAST RETURN) greater than the discount rate (DESIRED RETURN). A simple and popular method for choosing a discount rate in discounted cash flow analysis is an 'Opportunity Cost of Capital' rate, which is given, in the following formula: Discount Rate = Inflation + Risk Free Rate of Return (Cost of Capital) + Risk Premium The risk free rate of return or cost of capital reflects the opportunity cost in not proceeding with the development. It may be defined by the current 5-10 year Government Bond rate. Note this includes an expectation of long-term inflation. If a zero inflation model is adopted then a medium term market forecast of inflation should be subtracted from the Government Bond rate to calculate the real risk free rate of return. Risk Premium Risk Premium is the level of discounting over and above the risk free rate (or cost of capital), which reflects the level of risk in the project. Weighted Average Cost of Capital A more sophisticated method of calculating the discount rate is the WACC which is the weighted required rate of return on debt and equity funding. The formula is as follows: WACC = D (D+E) * RD + E (D+E) * RE Where: D = Total Debt E = Total Equity R = Cost of Debt (risk free rate of return plus debt premium based on the credit rating of the company); and D R = Cost of Equity (required return on equity) E A popular method of calculating the required return on equity is the capital asset pricing model (CAPM). The formula is: RE = RF + ß * (RM - RF ) Where: R = expected return on equity; E R = risk free rate of return (10 year Commonw ealth Bond rate); F ß = sensitivity of an investment's return to the return on the hypothetical market portfolio of shares; R = expected nominal return on the market portfolio (approximated by the yield on the market portfolio of common equity M shares); and (R - R ) = the market risk premium, or additional return demand by investors for holding risky assets. M F 10
11 Introduction to Investment Appraisal 2.4 Glossary of Terms Valuation Terms Capital Expenditure (CAPEX): Capital expenditure (CAPEX) is payment made for capital improvements in the property. It is treated differently to repairs and maintenance for taxation purposes. Capex consists of single payments, sometimes spread over a period of time that increases the capital value of the property and in some cases can be depreciated. Capitalisation Rate The capitalisation rate is expressed as follows: Net Income Market Value/Price x 100 The capitalisation rate is the measure of total return on a property, and varies with the type of investment and from period of time to another. A risk-return profile on a property can be formulated when deciding on an appropriate rate to use. Generally speaking, higher capitalisation rates are used when the net income is more risky (or more speculative/less secure) or when higher inflation is anticipated. The converse is true when using low capitalisation rates for properties generating a more secure, less risky net income, good income growth and/or when significant inflation is not anticipated. It is acknowledged that yields and cap rates are separate and distinct concepts, although they are often discussed together. In Australia 'yield' is often referred to as the 'capitalisation rate'. Discount Rate A certain interest rate that is used to bring a series of future cash flows to their present value in order to state them in current, or today's dollars. Use of a discount rate removes the time value of money from future cash flows. The discount rate is typically chosen from either the cost of funds, the opportunity cost or the investor s target rate, reflecting the level of associated risk and uncertainty. Effective Rent Effective rent is the face rent adjusted and annualised for the impact of lease incentives. The two common lease incentives are initial rent free periods and the provision of fit out or other tenancy expenses associated with taking up a lease. Net Present Value Is the sum of the present values of all project cash inflows and outflows over the life of the project. A positive NPV infers an Internal Rate of Return (IRR) greater than the discount rate. Interest on borrowings and interest received on re-investment of surplus funds and equity is ignored since this is incorporated in the discount rate. The formula is: n=t FV NPV = (1 + i) n n=0 Where: [ ] PV = Present Value; FV = Future Value (predicted amount); i = Discount Rate per period of time; and n = number of periods. 11
12 Introduction to Investment Appraisal Internal Rate of Return (IRR) Is the discount rate at which the sum of the discounted negative cash flows equals the discounted positive cash flows, i.e. the discount rate at which the NPV equals zero. Simplistically the IRR represents the ACTUAL RETURN on funds invested. Interest on borrowings is ignored since this is incorporated in the discount rate. Yields Yield is broadly defined as the derived percentage return of a property assessed from the net income and market value or price, calculated by dividing the net income by the market value or price. Property yields and bond yields are often compared; the total yield from real estate investments generally expected to be above the bond rate reflecting the riskier nature of the investment. All Risks Yield (ARY): The resultant rate of return from a net income/value relationship a general concept. It reflects potential for future rental grown, strength of the covenant, likely performance in an inflationary economy, etc. Initial Yield: Is the yield (net passing income / purchase price) shown upon purchase. The purchase price is based upon the passing income capitalised value. No allowance is made for future rent growth. Reversionary Yield: Is the yield the property would show if all rents were current market rents. Equivalent Yield: The weighted average rate of return on stepped incomes without specific allowance for future income growth. This yield acknowledges reversionary income (based on current market conditions) but ignores future changes in incomes or values due to inflationary or real value changes. Equated Yield: The internal rate of return (IRR) with specific allowance for income/rental growth (at an annualised rate). The discount rate applied to the projected rental income from an investment so that sum of all income discounted = initial capital outlay. The equated yield is the IRR, where income is assumed to vary over time as a result of inflation and/or real income in values. When income is constant over time, IRR = ARY Finance Terms Capitalisation Loan A loan where the interest is not paid by period but added to the principal thereby increasing it. In a capitalising loan the periodic debt servicing payment is minimised and the compounded interest is paid out at the end of the loan period. Interest Only Loan A loan where the interest is paid by period thereby keeping the principal constant. Where interest is a tax deduction, the whole of the debt servicing payment can be deducted. Principal and Interest Loan A loan where the debt servicing payment includes interest and principle computed so that the loan is paid out over a specified period or term. Where interest is a tax deduction, only that part of the repayment that represents interest can be deducted. 12
13 Part III
14 Starting the Application 3 Starting the Application 3.1 The Application Launchpad The entire software suite now operates from a central launcher that is loaded from a single shortcut within Windows: Once loaded, you can select your installed applications, and it will display a list of files recently opened and saved by the user. There are also shortcuts to our extensive Sample File Library, Operations Manual and Training Courses Booking page on our website. For those applications not yet installed on the machine, there is information to learn more about them and even links to downloading a free trial. Live web content at the bottom also displays frequently updated update alerts, important news and other items of interest, such as the release of new training courses or tutorial videos. Starting 1. In Windows go to the [Start] è [Programs] è [EstateMaster] è and click on 'EstateMaster' 2. The Application Launchpad will appear. If this is the first time you have come to this screen, it will provide you with a quick demonstration on how it works. 14

15 Starting the Application 3. At the end of the demonstration, it will prompt you to replay the demo or go to the Settings (e.g. Regional Settings, Chart of Accounts, Database Management). 4. If you elect to do neither and press the [Close X] at the bottom right: a. The demo will not appear again for that usa small pop-up reminder will appear to configure your settings.this will stop appearing either once the regional settings are set, or the user presses [X] in the pop-up.er (it will appear for other users that start the Application Launchpad on that machine) b. A small pop-up reminder will appear to set the regional settings.this will stop appearing either once the regional settings are set, or the user presses [X] in the op-up 3.2 Regional Settings The Regional Settings wizard is a helpful tool to control common settings across all products in the suite, including currency, taxation, stamp duty / land transfer taxes, etc. Once set, any new file started will adopt these settings, saving you time in configuring files for your region. It is only compatible for the following versions: DF/DF Lite/DM: ver 6.10 and above. IA: ver 3.33 and above. HF: ver 2.10 and above. To set the Regional Settings: 15
![Starting the Application 1. Either click on the [Go to Settings] link at the end of the initial Application Launchpad demo, or click on the gear icon at the top-left of the Application Launchpad. 2.](/docs-images/89/99830304/images/16-0.jpg "Using the 'Country' drop-down list, select the country/region where your projects will be mainly located in.")

16 Starting the Application 1. Either click on the [Go to Settings] link at the end of the initial Application Launchpad demo, or click on the gear icon at the top-left of the Application Launchpad. 2. Using the 'Country' drop-down list, select the country/region where your projects will be mainly located in. If you work on projects in many countries/regions, just choose the most common one (you can edit these settings on a file-by-file basis later) Note: The country setting automatically defaults to the 'Region and Language' Format setting in Windows 3. Default settings will be loaded for that country, and you can adjust/override them if required. At any point in time, you can reset any manual overrides back to their defaults by pressing the [Reset] button. 4. Once the settings have been defined, press [OK], and it will save them on the active machine. 5. From that point onwards, any *new* file started in any application on that machine will adopt these settings.it will not apply these settings when: a. An existing file is 'Opened' b. A template is opened from the 'New File from Template' option (settings applied within the Template take precedence) 6. Once a new file is started, you are able to adjust any of these settings on a file-by-file basis, just by go to the application's Preferences and changing the related setting there. Sharing Regional Settings with other Users Since these settings are machine-specific, you may want to share these settings with other ARGUS EstateMaster users in your organisation. To do so: 1. Ensure you have set and saved the settings you desire. It is advised you start an ARGUS EstateMaster application to ensure the settings are behaving as desired. 16
\estate Master\" on a 64-bit OS) 4. Copy the file RegionalSettings.ini 5.")
17 Starting the Application 2. Close the Application Launchpad. 3. Browse to the following directory on the machine: "C:\Program Files\Estate Master" (or "C: \Program Files (x86)\estate Master" on a 64-bit OS) 4. Copy the file RegionalSettings.ini 5. Send it to other users, with the instruction to place it in the same folder on their machine (overwrite any existing file if it exists) 3.3 Product Tabs The tabs for each product will display different information, depending on whether it is installed on the active machine or not. To customise the experience for each user, each time the Application Launchpad is started, it will always revert to the last tab selected by that user on that machine. Software is Installed When the software is installed on the active machine, the following will be displayed on the product tab: A list of 'Recent Files' opened or saved by the active user (a list is stored for each user on the machine). To open one of these files, either double-click on it, or select it to expand the file details and then click the [Open] button. A list of 'Sample Files' provided to demonstrate the use of the software in different scenarios. These are automatically sourced from our online Sample Files Library, so an internet connection is required for them to appear on the Application Launchpad and always be up-to-date with the latest samples. A [Browse] button to manually search for and open an IA file. A [Run] button to start the IA application with a blank new file. Links to view the Training Course online booking site and open the User Manual (PDF). Recent Files List 17

18 Starting the Application Sam ple Files List Software is not Installed When the software is not installed on the active machine, the following will be displayed on the product tab: A brief summary of the product, with links to a demonstration video, software data sheet and contact details. A link to download a 14-day free trial of the software. 18
19 Part IV
20 Navigation 4 Navigation 4.1 Quick Start 1. Run the IA program from the Application Launchpad. 2. Open an existing IA data file command (*.emia) using the [File] è [Open], or start inputting data to create a new data file. 3. Enter preliminary data into 'Intro' sheet, such as Property Name, Valuation Date, Instructions, etc. Please note that many of the fields on this sheet are mandatory, and you will not be able to save a file if they haven't been entered. 4. Set Preferences by running the 'Preferences' function by pressing [F12]). from the Ribbon Menu (or 5. Navigate around the program by selecting the relevant worksheet tabs. 6. Enter data into input cells with a font colour of blue or purple. Fixed cells (non input) have a black font colour. The worksheets are locked, so the program will only allow you to enter data into the relevant input cells. Input Cells Blue Font Cells: Cells with blue font are the main input cells in the program. Purple Font Cells: Cells with purple font relate to inputs that are entered via a list selector. When selecting the cell, a drop-down arrow will appear. Click the arrow and a list of options for that input cell will be displayed. 7. Check for any data input issues, such as input cells with red backgrounds or error warnings. This indicates that the wrong type of data has been entered (e.g. text in a number field) or the value is not allowed (e.g. a negative value in a positive-only field). Run on the Validate function Circular References. on the Ribbon Menu to check for other issues, such as 8. When data input is complete, you may run the 'Calculate Price' and the 'Adopted Value' report. and 'Sensitivity Analysis' function on the DCF sheet functions on the Executive Summary 20

21 Navigation 9. When you are satisfied that the information has been entered correctly you may select the Print Report Options on the Ribbon Menu to print the reports. 10. Save your changes using the [File] Ribbon Menu. 4.2 è [Save/Save As] command on the Opening and Closing Files Opening a New IA Data File 1. Click [Run] in the IA tab of the Application Launchpad. 2. Use the [New] command to load a new blank workbook window. 3. Click on the [New File from Template] button in the 'Templates' menu (if any Templates have been created). Note: You can open up to 4 new workbook windows in the IA application. Opening an Existing IA Data File 1. Open an existing IA data file ( *.emia) either by: a) Double-click a file in the 'Recent Files' list or click [Browse] to find another file, in the IA tab of the Application Launchpad. b) Using the [Open] command to browse to and open the file. c) Browsing Windows Explorer and double-clicking on a data file to open it. 2. If the file was previously saved with a password, then it will prompt you to enter the password before opening it. Note: You can open up to 4 new workbook windows in the IA application. Saving and Closing an IA Data File 1. After using the program, save the file if required by one of many different buttons on the Toolbar. 2. Please note that many of the fields on the 'Intro' sheet are mandatory, and you will not be able to save a file if they haven't been entered. 3. If you have elected to save files with a password in the Preferences, then it will prompt you to enter the password and confirm it before saving. 21
22 Navigation 4. Close the currently active IA file by using the [Close File] command 22
23 Navigation Exiting from IA 1. When finished, close the application either by: a) clicking on [X] in the top right corner of the application window, b) double clicking the IA icon in the top left corner or c) selecting [Exit] from the Application Menu. Saving to File vs Exporting to Database In addition to saving an IA datafile (*.emia), the user can also save (export) the IA data to the ARGUS EstateMaster Enterprise Database. This database must be set up by an IT Administrator before attempting to Export/Import IA data. The Save function only saves the IA data to a standalone file (useful for sharing data amongst other users), however using the Import/Export functions, the user can also export all their IA data to the central database for archiving, retrieval and advanced reporting using the CC software. 23
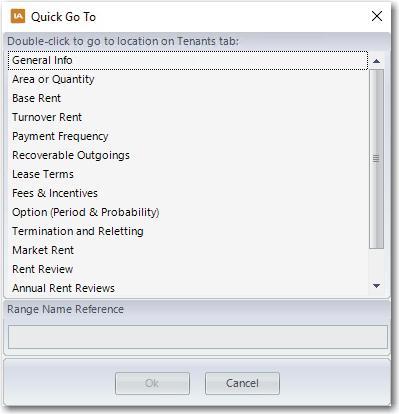
24 Navigation 4.3 Navigation The IA program is subdivided into a series of worksheets.to navigate around the IA program, click on the relevant worksheet tabs (below or above workbook area). Intro Introduction page - Enter the general property and valuation details. Setup Preliminary data input sheet. This is where the major assumptions regarding dates, costs, capitalisation rates and discount rates are entered. Tenants Tenancy Schedule input sheet. This is where the rents, recoveries, leasing details, incentives, market reviews and escalations are entered. Outgoings Outgoings input sheet. This is where all the outgoings details are input, such as the amount, payment frequency and escalations. Capex Capital Expenditure input sheet. This is where the capital expenditure details such as the amount, start and span are entered. Exec Summary Executive Summary sheet. This sheet displays all key information and also includes the sensitivity analysis and the ability to change the adopted valuation. Cap Summary Capitalisation Summary sheet. This sheet displays the breakdown of the capitalisation valuations. DCF Contains the detailed cash flow. This is also where a purchase price can be nominated or calculated. Investment Investment Analysis sheet. This allows the user to apply debt and equity funding on the property investment and calculated distributions to investors. Taxes & Duties The adjustable stamp duty and lax tax calculation tables. Quick Go To To assist with navigating to specific input and reporting areas of the IA program, a Quick Go To navigation tool is provided via the F5 keyboard shortcut. The Quick Go To dialog will allow you to: Go to one of the defined input or reporting areas that exist in the active tab, just by double-clicking an item in the list, or selecting it and pressing [OK] Go to a defined range name in the application, by entering its name in the 'Range Name Reference' field, and press [OK]. This is helpful if you wish to navigate to a range (visible ones only) that is being referenced in a formula. 24
25 Navigation 25
26 Navigation 4.4 Keyboard Shortcuts The following are some keyboard shortcuts to assist in navigation, data entry and working with cells and worksheets. Files Ctrl + N Ctrl + O Ctrl + S Ctrl + W Ctrl + P Start a new file Open an existing data file Save the current model to a data file Close the application Load the printing menu Navigation Page Down / Page Up Tab / Shift+Tab Ctrl+Arrow Keys Home Ctrl+Home End Ctrl+End Ctrl+f F5 Move one screen down / one screen up in a worksheet Move one cell to the right / to the left in a worksheet Move to the edge of next data region (cells that contains data) Move to the beginning of a row in a worksheet Move to the beginning of a worksheet Move to the end of a row in a worksheet Move to the last cell with content on a worksheet Display the Find and Replace dialog box Display the 'Go To' dialog box to navigate to defined range names Working with Cells Shift+Space Ctrl+Space Shift+Arrow Keys Ctrl+Shift+Arrow Key Shift+Page Down / Shift+Page Up Shift+Home Ctrl+Shift+Home Ctrl+Shift+End Select the entire row Select the entire column Extend the selection by one cell Extend the selection to the last cell with content in row or column Extend the selection down one screen /up one screen Extend the selection to the beginning of the row Extend the selection to the beginning of the worksheet Extend the selection to the last used cell on the worksheet (lower-right corner) Insert and Edit Data Ctrl+z Ctrl+y Ctrl-c Ctrl+x Ctrl-v F2 Alt+Enter Enter Shift+Enter Tab / Shift+Tab Ctrl+d Ctrl+r Undo last action (on the active worksheet) Redo last action (on the active worksheet) Copy contents of selected cells Cut contents of selected cells (custom worksheets only) On standard worksheets: Paste 'Values' from clipboard into selected cell On custom worksheets: Paste 'Formulae and Formatting' from clipboard into selected cell Edit the active cell with cursor at end of the line Start a new line in the same cell Complete a cell entry and move down in the selection Complete a cell entry and move up in the selection Complete a cell entry and move to the right / to the left in the selection Fill complete cell down (copy above cell) Fill complete cell to the right (copy cell from the left) Formatting (Custom Worksheets only) 26


27 Navigation Ctrl+b Ctrl+i Ctrl+u Apply or remove bold formatting Apply or remove italic formatting Apply or remove an underline Other F1 F Load the IA Help File Load the IA Preferences Form Menus and Toolbars There are 4 main menus and toolbars in the ARGUS EstateMaster IA application for the user: 1. The Ribbon Menu 2. The Quick Access Toolbar 3. The Application Menu 4. Sheet Context Menus Ribbon Menu The Ribbon Menu is located at the top of the application window and provides the user with the functions available in the program, and in particular, the functions related to specific sheets. The Ribbon Menu has 2 definable parts: 1. Functions that apply to all worksheets: These are common functions that can be used on all worksheet and are replicated on all worksheet tabs. If any of these functions are greyed-out (disabled), then they are not applicable to the active worksheet. 2. Functions that apply to the currently selected worksheet: These appear when a different tab/worksheet is selected. They are identified by an aqua coloured menu button. 27
28 Navigation File Menu New Opens a IA blank workbook in a new window.. Open Prompts the user to opens an existing IA data file (*.emia) in a new window. Save Saves the current IA model to a data file. 'Saving' a file is different to 'exporting' it to the Enterprise Database. Save As Saves the current IA model to a data file with a new file name. Print Loads the IA Print Menu to allow the user to select what reports to print. Close File Closes the current IA model window. Templates Create, use and edit IA template files. Edit Menu Undo Undo the last action. Redo Redo the last action. Copy Copy the select range to the clipboard. Paste Pastes the contents of the clipboard into the selected range. When the active sheet is standard sheet, then only values are pasted. Fill There are 3 options in this menu: 1. Fill Down: Copies the top cell of a selected range downwards. 2. Fill Right: Copies the left cell of a selected range rightwards. 3. Fill Series: Fills a series in a selected range based on a particular sequence of data. Reset Inputs This will clear all the inputs in the standard worksheets to the default. It will not remove user-inserted worksheets. Clear * There are 3 options in this menu: 1. Clear All: Clears cell contents and formatting from the select range of cells. 2. Clear Formats: Clears cell formatting only from the select range of cells. 3. Clear Contents: Clears cell contents only from the select range of cells. * These options are only available in user-inserted custom w orksheets. Tools Menu Preferences Opens the form for the user to select their data Preferences. These should be set before any data is entered but can be changed at any time. Goal Seek This is an analysis feature that finds the value for a selected cell that would produce a given result from a calculation. Validate Runs the Data Validation process to check for data integrity issues (e.g. such as Circular References) caused by user's inputs. 28
29 Navigation Office Links Menu Excel Loads the dialog where you can create and edit links to external Excel files. Word Loads the dialog where you can create and edit links to external Word files. Refresh Updates the values for all linked Excel and Word files. Sheets Menu Add Add a custom worksheet to the workbook. Rename Rename the currently selected custom worksheet. Delete Delete the currently selected custom worksheet. Move Rearrange the order of the custom worksheets. Data Menu Import from Database Import IA input data from the Enterprise Database. Export to Database Export IA input data to the Enterprise Database. This is different to 'saving' an IA datafile (*.emia) Export to Excel Export the entire file to Excel, either as a standalone file or appended to an existing file. Windows Menu Zoom Allows the user to set the zoom of the worksheets with the following options: Default Zoom (Active Sheet): Resets the active sheet to the default zoom. The 'default zoom' is determined by the monitor size and resolution settings of the PC/Server running the application. Default Zoom (All Sheets): Resets all worksheets to their default zoom. Custom Zoom: Allows the user to set their own zoom for the active worksheet. These settings are saved to the PC/Server that the ARGUS EstateMaster IA is installed on and will apply to all users running the application from that PC/Server. Cascade / Tile / Minimize Allows the user to change the layout of the windows. File Listing Displays a list of IA files that are currently open and the user can switch to. 29
30 Navigation Customising the Ribbon Menu To minimise the Ribbon: Click on the arrow icon and select [Minimize the Ribbon], or double click on any of the menu tabs. Once the Ribbon is minimised, it will only pop up when one of the tabs is selected, then hide again when deselected Quick Access Tool Bar The Quick Access Toolbar is located in the top-left corner of the application window and provides the user with shortcuts to the various functions available in the program. By default, there are 5 functions that can be operated from this toolbar, however any button on the Ribbon menu can be added to it. Customising the Quick Access Toolbar To remove an item from the Toolbar: Right click the icon and select [Remove from Quick Access Toolbar] To add an item to the Toolbar: Right click the icon in the Ribbon and select [Add to Quick Access Toolbar] To move the Toolbar below or above the Ribbon: Click on the arrow icon and select [Show Below/Above the Ribbon] 30
 and provides the user with access to the various File and Help functions")

31 Navigation Application Menu The Application Menu is located in the top-left corner of the application window (indicated by the IA icon) and provides the user with access to the various File and Help functions available in the program. IA Opens the IA Help program. Help Send Query Send a technical support query via /internet Remote Help Desk Allow an Support Officer to remotely connect to your PC/Server for troubleshooting and assistance. You must contact an ARGUS EstateMaster Support Officer before attempting any connection (Powered by TeamViewer). Check for Updates Check the latest version of the software online (requires internet connection). About ARGUS EstateMaster IA Allows the user to view the current licence details and re-register an existing licence. It also lists what 'Integration Modules' are enabled for the current licence. Sheet Context Menus Context Menus pop up when clicking an item on the worksheet area, offering a list of options which vary depending on the item selected. These menus are invoked with a right-click of a mouse. Standard Sheets The context menu on the Standard sheets is invoked by right-clicking a cell, row or column. Copy Copies the currently selected range of cells to the clipboard. Paste Values Pastes the content of the clipboard (values only, not formatting) in the currently selected range. Paste Formulas Pastes the content of the clipboard (formulas only, no formatting) in the currently selected range. Insert Sheet Inserts an additional blank worksheet. 31

32 Navigation User Inserted Sheets The context menu on the User Inserted sheets is invoked by right-clicking a cell, row or column. Copy Copies the currently selected range of cells to the clipboard. Cut Cuts the currently selected range of cells to the clipboard. Paste Pastes the content of the clipboard in the currently selected range. When the active sheet is a standard sheet, then only values are pasted. Paste Special Allows the user to select what content from the clipboard (values, formatting, comments, etc) to paste in the currently selected range. Insert... Inserts a column or row next to the currently selected range. Delete... Deletes the currently selected column or row. Clear Contents Clears the cell contents (values or formulas) of the currently selected range Sheet Insert: Inserts an additional blank worksheet (user-inserted sheets). Delete: Deletes the currently selected user-inserted worksheet. Rename: Renames the currently selected user-inserted worksheet. Tab Colour: Allows the user to change the tab colour of the custom sheet from the default orange. Data Sort Ascending/Descending: Sorts the selected cells vertically. If there are multiple columns selected in the range, the user will be prompted to select which column to sort by. Apply Auto-Filter: Applies an auto-filter to the selected range. If an Auto-Filter already exists on the active sheet, then a 'Remove Filter' option will be available. Group/Ungroup: Group selected data by rows and columns using 'outlines'. Clear Outline: Clears all the outlines (groupings) on the active worksheet. Custom Data Export Define: Define a range of cells to be exported to the Enterprise Database Edit: Edit or delete existing Custom Data Export range names on the user-inserted sheet. Names Define: Define a local range name for the currently selected cells. Edit: Edit or delete existing range names on the user-inserted sheet. Data Table Insert a one-variable or two-variable data table that evaluates changing variables in a single formula. It is used for developing simple 'what-if' scenarios. It is set up similar to how Data Tables are configured in Microsoft Excel (online tutorial) Note: When a Data Table is inserted, it will calculate in 'Semi Automatic' mode to ensure that all other background calculations are not adversely impacted. This means that a Data Table will not automatically calculate if a dependent variable changes; any time you require the results in the Data Table to be updated/refresh, you will need to press the F9 button. 32
33 Navigation Insert Chart Insert a chart on the worksheet. Insert Image Insert an image (*.jpg, *.jpeg or *.bmp) on the worksheet. Format Cell Change the format of the currently selected range, including number format, font, borders, colour, conditional formats, etc. Print Set Print Area: Define what part of the worksheet to print by setting the currently selected range as the 'Print Page Setup: Change the settings for how the page is to be printed, such as orientation, zoom, margins, headers, footers, etc. Print: Print the active user-inserted sheet. Freeze / Unfreeze Panes Freeze panes at the selected row, column or cell, or unfreeze (clear) panes on the active sheet. Gridlines Toggle the gridlines on the active sheet. Row & Column Toggle the row and column headers on the active sheet. Headers Protect / Unprotect Protect or unprotect the selected worksheet. When protecting, you will be prompted to enter in a password. If this is left blank, the the worksheet will still be protected, but with no password.). Charts If you are right-clicking on any Chart, either or a Standard or custom sheet, you will be given the following options: 4.6 Edit Chart (Charts on custom sheets only) To edit the chart settings, including the source data, chart type, format, etc, either double click the chart or right-click on it and select 'Edit Chart' to load the Chart Explorer dialog. Copy Chart Copies the selected chart to the clipboard as an image, so it can be pasted in other documents. Status Bar The Status Bar is located at the bottom of the application. It has 3 definable parts: 1. Statistics: This part of the status bar provides a Sum, Average and Count of the currently selected cells (excludes text formatted cells). These update instantly. 2. Linked Excel Files Warning: This part of the status bar provides a warning if an external Excel file that has 'incoming' links has been modified since the last 'refresh'. By clicking this button, it will refresh all the links. 4.7 Dashboard The dashboard, located on the right-side of the application in a collapsible panel, provides a summary of the key performance indicators of the Cash Flow, including Net Lettable Area, Initial Yield, Market Yield, IRR and NPV. 33
![Navigation The results will automatically update when opening files, or switching between windows. Any other time, they can be updated by clicking on the left [Refresh] button.](/docs-images/89/99830304/images/34-0.jpg "Thresholds Some of the KPIs have thresholds, where the result will be displayed in: red font if it is below the threshold, green font if it is above the threshold.")
34 Navigation The results will automatically update when opening files, or switching between windows. Any other time, they can be updated by clicking on the left [Refresh] button. Thresholds Some of the KPIs have thresholds, where the result will be displayed in: red font if it is below the threshold, green font if it is above the threshold. KPI Net Operating Incom e IRR NPV (inc Acquisition Costs) Threshold 0 Target IRR (Discount Rate) 0 34

35 Navigation 4.8 Goal Seek Goal Seek is sometimes called what-if analysis. When you know the desired result of a single formula but not the input value the formula needs to determine the result, you can use the Goal Seek feature available by clicking on the Ribbon Menu menu. When goal seeking, the program varies the value in one specific cell until a formula that's dependent on that cell returns the result you want. Set Cell: The cell that contains the formula that you want to settle/resolve. That cell must always contain a formula or a function, not a value. To Value: The value you want the formula (in the Set Cell) to change to. By Changing Cell: The part of the formula that you wish to change. That cell must contain a value only, not a formula or function. 35
36 Navigation 4.9 Resizing the Model The IA model can be resized in two areas: 1. Adjusting DCF time froma (10, or 40 years) 2. Adjusting input rows. Resize DCF Timeframe Resizing the DCF timeframe periods is controlled via the the Preferences. BY default, it is set at 10 years. 1. Go the Ribbon Menu and click on or just press F Go to the 'Cash Flow Periods' tab. 3. Select the appropriate timeframe from the drop-down list. Only add what you need as it will impact on the size of the file. 4. Click on OK and it will make the appropriate changes to the file. Resize Input Rows There are various areas where the model's input rows can be resized: Resizing the number of Uses Resizing the number of Escalation Profiles Resizing the number of Tenants Resizing the number of Capital Expenditure items. Resizing the number of Manual Adjustment for the Cap Summary report Data Validation A function has been provided that can run a validation check against the input data, checking for the following types issues: 1. Circular References, possibly caused by user-inserted formulas or custom worksheets (Note: This test requires MS Excel to be installed on the machine). Running the Validation By pressing the Run on the button on the Ribbon Menu, the validation process is executed. If any issues are detected, the following form will be displayed. 36


37 Navigation Issue Describes the type of issue detected (e.g. circular reference, invalid input, etc) Sheet / Range The worksheet and the cell/range address that the issue has been found on. State Describes the current state of that sheet/range (e.g. is it visible or hidden) Extra Information Additional information about the issue, such as the formula creating the circular reference or the invalid input value. Timeout Settings When the validation process attempts to detect any circular reference issues, it may take a while to trace the formulas on a worksheet to identify where the circular reference occurs. By default, if it knows there is a circular reference on a worksheet, but cannot find the cell where it is located in, it will timeout after 60 seconds. This timeout setting can be manually changed by editing the value for the CircularReferenceTimeout configuration (measured in seconds) found in the EstateMasterIA.exe.config file, located in the folder where the IA application is installed. Fixing Issues To attempt to fix issues in the list, double-click a row and it will navigate you to to the related sheet/range. Attempt to fix each issue while the list is displayed, and then then press [Revalidate] button to run the checks again. If all issues have been rectified, the list will be cleared ing Files The program has inbuilt ing functionality to allow you to files without having to save them and then attach them manually to an message. No other software (such as Outlook, Lotus 37
.")
 FROM* email address. Only one email address can be entered here. This is also the email address that the recipient can reply to.")
38 Navigation Notes, etc) is required, only an internet connection and valid SMTP (Simple Mail Transfer Protocol) settings. The function is found in the Application Menu. When ' is clicked, it may first prompt you to save your file (if there have been any changes to your file since the last save). Once the file is saved, it will load a form where the user can enter the following information (* denotes mandatory fields): TO* address(s): You can enter multiple address in this field, separated by by a ';' semi-colon (e.g john@ .com; pete@ .com) FROM* address. Only one address can be entered here. This is also the address that the recipient can reply to. SUBJECT* of the . MESSAGE text for the body of the . You will notice that the data file is already attached to the message. Before any files can be ed through this feature, the SMTP settings must be configured. This is done by clicking on the Settings button and entering in the following information: SMTP Server: Your SMTP server name (e.g. smtp.yourisp.com) Port: The TCP (Transmission Control Protocol) port that the SMTP server uses. This is usually port 25. Encrypted Connection: Select this if your SMTP server name uses a SSL (Secure Sockets Layer) connection. 38

39 Navigation Use Default Credentials: Specifies whether the default user credentials should be used to access the SMTP mail server. If it is not selected, then the you must enter in a username and password. Username: The user name to use for authentication to the SMTP mail server. Password: The password to use for authentication to the SMTP mail server. Please note: These settings are application and machine specific, therefore you will need to configure them for each application installed on a PC/Server, and each PC/Server that has the software installed. If you do not know your SMTP settings, please consult your IT Administrators or your Internet Service Provider. Once these settings have been configured, the software is ready to files. When the Send button is clicked, it will validate the address(s) and the SMTP settings you have entered. If the was successfully sent, a message will appear to inform you. If there was any error in trying to send the file, a message like this may appear: If you receive an error, please consult your IT Administrator to verify that the SMTP settings have been entered correctly or to use an alternative SMTP server Exporting to Excel Since IA is built on a spreadsheet user interface, you can export the entire file to Excel, allowing you use that file and its data in any way you require. To export the file, go to the Ribbon Menu and click on [Data] [Export to Excel] and you will be given the option to either: è o Export it as a New Excel File, or o Append it to an Existing Excel File Export Options Create a New Excel File When an IA file is exported to a new Excel file: You will be promoted to save the file in Excel compatible format (*xlsx or *.xlsm). The file is exported as values only and contain no formulas (except on custom add-on worksheets, where custom formulas are kept intact), so changing inputs in an exported file will not impact on the results. Append to Existing Excel File 39
40 Navigation When an IA file is appended to an existing Excel file: You will be given the option to copy the existing Excel file and save it is a new one (useful when working with templates), or override the file being selected. You will be promoted to select which Excel compatible file (*xlsx or *.xlsm) to append the IA worksheets to. The IA worksheets are exported as values only and contain no formulas (including on custom add-on worksheets) Some features that are not completely supported by this spreadsheet interface used by ARGUS EstateMaster IA may be stripped from the selected Excel file after appending to it, and saving it. These features include, but not limited to, items such as: o Form/ActiveX Controls o Pivot Charts o Cell Comments o Cell Gradients o Excel 2007-style Conditional Format options o Excel 2007-style Tables and Structured References o OLE objects (Camera, Embedded Documents, etc) o Shape fill effects and shadows 40
41 Part V
42 Preferences 5 Preferences The program allows flexibility by the way of user preferences. These are operated by: 1. Clicking on [Preferences] on the Ribbon Menu or Quick Access Toolbar, 2. Pressing the [F12] key. Locking Preferences Each preference can be individually set and locked with password protection, allowing the user to standardise settings and minimise the risk of incorrectly changing them. To Lock a Preference 1. Set the preference and then click on the 2. It will the be shown as 'locked' button located to the right of it. and the selected preference will then be disabled. 3. A Password field will be displayed at the bottom on the Preferences form. 4. The user must enter in a password before they can click 'OK' and save their changes. To unlock a Preference 1. As soon as the Preferences are open, a Password field will be displayed at the bottom on the form. 2. The user must enter in a password before they can unlock any Preference. 3. Go to the preference and then click on the 4. It will the be shown as 'unlocked' user. button located to the right of it. and the selected preference can then be changed by the To Reset the Password Once a password has been used to lock the Preferences, the same password will remain with that file and will be used for any future locking/unlocking until it is reset by the user. To reset the password: 1. As soon as the Preferences are open, if any Preferences were 'locked', then a Password field with a 'Reset' button will be displayed at the bottom on the form 2. Enter in the current password and click on the button. 3. The current password on the Preferences will then be cleared, and a new password must be then set. Printing an Assumptions Report To check what preferences and settings have been defined in the model, an Assumptions Report is available to be printed from the Print Menu 42

. Unit of Measurement 5.1.")
43 Preferences 5.1 General Regional Settings Currency Set the currency format. This is important if the ARGUS EstateMaster CC software is used to consolidate cash flows that are based on different currencies. Stamp Duty Stamp Duty is automated based upon the location you select and the Nominated Purchase Price adopted on the Setup sheet. The rates used to calculate duties can be changed in the 'Taxes & Duties' sheet. Select the measurement type for the area inputs in the model (ie Sqm, Sqft, etc). Unit of Measurement Cash Flow Periods DCF Timeframe Select the cash flow timeframe required for analysis. It can be set to either be a 10, 20, 30 or 40 year model. Cash Flow Dates Choose from the drop down list, whether the monthly cash flow will be calculated from the start (1st day) of each month or from the middle (15th day) of each month. This only affects the results for the XIRR and XNPV, as it identifies where in the month the cash flow activity is to occur. Financial Year End Month For yearly reporting on the DCF and Investment reports, select from the second drop down list the Month which signifies the end of the financial year. 43


44 Preferences Spreadsheet Display Sheets to Display Select which worksheets are to be hidden. This simply allows you to hide worksheets that you are not working on or do not intend to display making navigation around the workbook a little easier. Hiding sheets does not impede in the operation of the program Spreadsheet Display Hide or show the row and column headers on the standard worksheets. For custom worksheets, you can use the context menu to toggle the row and column headers on each one. Executive Summary Report If you wish to hide both digital signatures from the Executive Summary report, select 'Hide Digital Signatures' If you wish to hide the valuation summary (i.e the box with the Purpose, Interest Valued, Valuation Date, etc) from the Executive Summary report, select 'Hide Valuation Details' Disclaimer Disclaimer on Title Page Enter the text, if applicable, for any disclaimer to be displayed on the Title page. The maximum characters allowed are 2,
 on the Executive Summary report: When the [Insert] button is clicked, a form will first appear that allows the")
![user to enter in the Certifying Valuer's details, then once [Select Digital Signature] is clicked, it will prompt the user to select the image file for the signature.](/docs-images/89/99830304/images/45-1.jpg "Corporate Logo and Property Photo Insert your own corporate logo on the Capitalisation and Executive Summary reports and Title page and insert a photo/image of the subject property/project on the")
45 Preferences Images Digital Signature 1 and 2 Insert up to 2 digital signatures (image and text) on the Executive Summary report: When the [Insert] button is clicked, a form will first appear that allows the user to enter in the Certifying Valuer's details, then once [Select Digital Signature] is clicked, it will prompt the user to select the image file for the signature. Corporate Logo and Property Photo Insert your own corporate logo on the Capitalisation and Executive Summary reports and Title page and insert a photo/image of the subject property/project on the Intro tab, Executive Summary report and Title Page Only jpeg and bmp files can be inserted. There are no file/image size restrictions. The program will automatically downscale the image if it is too large to fit in the allocated area. If the image is smaller than the allocated, it will not be upscaled to avoid distortion Protection 45

46 Preferences Save with Password Select this option to always prompt the user to password protect data files when saving. Other Automatic Check for Updates Set the software to automatically check for updates over the internet every time it is started or not. Auto Save Set the software to automatically save the active file every X minutes (minimum 5mins). If there are multiple IA files open in the application, the auto-save only applies to the file that is currently active. If the user is performing a time-consuming task in the application (which coincides with a scheduled auto-save), the auto-save in that instance may be skipped. Template Folder Path Set the location where the application templates should be stored. By default when the application is run for the first time, this folder path will be set as <directory where IA is installed>/templates. To change the location, click the 'Browse' button and select a new folder when prompted. Once it is changed, any templates that were stored in the original folder will need to be manually re-saved as templates in the new folder. Use Default Templates This indicates whether a template set as a 'default' is to be used when the application is started or when a new file is started. 46


47 Preferences 5.2 Calculations Outgoings and Recoveries Increases after Base Year If using the 'Increase after Base Year' option for calculating recoverables, select whether the increases come into affect at the lease anniversary month or the financial year end month. Recoverable Outgoings During Rent Free Period If there are any rent-free periods (using the Effective Date input), select whether any recoverable outgoings should be recovered or ignored during such time. Recovered from Tenants Indicate when recoverable outgoings are recovered from the tenant: When the outgoing cost is actually being paid. Spread over the financial year. If the 'Pro Rata Part-Years' is selected, then the cost is apportioned over the remaining months of that financial year, from the start of the cost, otherwise it is spread over the entire financial year. Capitalisation Summary For the Capitalisation Summary, select whether total outgoings are considered or only the first 12 months. Rent Review Market Rents Entered As Select how Market Rents should be entered in the model for reporting of Market Rents in the DCF and Capitalisation Summary reports: 47

48 Preferences As per the current Tenant Lease Type: Recoverable outgoings may be considered for each tenancy depending on the Lease Type as defined in the General Tenant Info section. All Gross Rents: No recoverable outgoings are considered for any tenancy. All Net Rents. Recoverable outgoings will be added to the Market Rent for each tenancy based on their % of NLA. Escalated At Select when escalation is applied to Market Rents: Apply escalation at the lease anniversary month. Apply escalation at the start fo each financial year. Lease Replication Inclusions Select if the Letting Up Period, Reletting Fees and Reletting Incentives are repeated at the end of each cycle if using the Lease Replication feature. Hurdle Rates IRR / NPV Calculation Method Nominate whether the IRR/NPV or the XIRR/XNPV method should be used for DCF calculations. IRR/NPV method can be calculated on an annual effective or nominal basis. XIRR/XNPV method calculates the Internal Rate of Return and Net Present Values on a date basis using the cash flow dates (either the 1st or the 15th of every month) chosen in the general preferences section. Discount Rate Conversion This is only applicable when using the IRR/NPV methods. This enables you to select the method of conversion from a nominal annual discount rate to an effective annual (which is compounded monthly) discount rate: Nominal Conversion Effective Conversion D/12 [(D + 1)1/12]-1 Where: D = is the annual discount rate. Note: It is imperative that a universal usage for the conversion of the discount rate be adopted for all evaluations. 48
49 Preferences The first formula simply divides the annual discount rate by 12 while the second formula is the effective conversion and takes into account the compounding on a monthly basis. 5.3 Financing Global Settings Interest Rate Conversion This option applies to interest rate calculations for Loans 1, 2 and 3 on the Investment sheet. This enables you to select the method of conversion from a nominal annual interest rate to an effective annual (which is compounded monthly) interest rate: Nominal Conversion Effective Conversion D/12 [(D + 1)1/12]-1 Where: D = is the annual interest rate. Note: It is imperative that a universal usage for the conversion of the discount rate be adopted for all evaluations. The first formula simply divides the annual rate by 12 while the second formula is the effective conversion and takes into account the compounding on a monthly basis. 49
50 Part VI


51 Step-By-Step Instructions 6 Step-By-Step Instructions 6.1 Set Preferences It is recommended that before entering any data in the 'Input' sheet, the user set their preferences. This can be done by: 1. Clicking on [Preferences] on the Ribbon Menu or Quick Access Toolbar, 2. Pressing the [F12] key. 6.2 Inputting Data Users enter data into input cells with a font colour of blue or purple. Fixed cells (non input) have a black font colour. The worksheets are locked, so the program will only allow you to enter data into the relevant input cells. Input Cells Blue Font Cells: Cells with blue font are the main input cells in the program. Purple Font Cells: Cells with purple font relate to inputs that are entered via a list selector. When selecting the cell, a drop-down arrow will appear. Click the arrow and a list of options for that input cell will be displayed. 51

52 Step-By-Step Instructions Formatting Cells When certain input worksheets are activated, a 'Formatting' menu will appear. It allows the user to apply simple formatting such as bold fonts and coloured cells in the 'ID', 'Tenant Name', 'Code', 'Description' input cells for each line item. 6.3 Project Introduction Input preliminary information such as Project Title, address, etc in the cells with blue font. These cells are only text cells and have no impact on the cash flow calculations. Please note that many of the fields on this sheet are mandatory, and you will not be able to save a file if they haven't been entered. Mandatory Inputs are highlighted in red Project Name (Mandatory) Project Number (Mandatory) Enter the name of the project that the property belongs to. 'Project' may be interpreted as a 'development project', an 'investment project, a 'valuation project', etc. Enter the unique project number related to the project. 52

53 Step-By-Step Instructions Property Name (Mandatory) Property Owner Description (Optional) Enter the name of the subject property that is being valued or assessed. Enter the name of the entity that owns the property. Enter a general description about the property. (Optional) Street Address, City/Suburb, Zip/Post Code, State/County and Country (Optional) Enter the physical address of the subject property. Property Type Select from the drop-down list the category of the subject property. (Mandatory) Status (Mandatory) Select from the drop-down list the status of the valuation. Interest Valued (Optional) Enter a description of the property interest (freehold, leasehold, etc) that is being valued or assessed. Valuation Date (Mandatory) Enter in the Date of Valuation for the Executive Summary report. It can be different to the 'Date of First Period' or Acquisition Date' as nominated on the Setup sheet. It is only used for reporting, and does not affect calculations. Title Details (Optional) Enter in the Land Title Details (or Legal Description) of the property being valued (eg "Lot 123 on Deposited Plan 456, Certificate of Title Volume 789, Folio 100"). Purpose of Valuation (Optional) Enter in a description of the purpose of the valuation (eg. Acquisition, Disposal, Mortgage, Insurance, etc). Instructions (Optional) Enter in the instructions given to reflect the type of valuation that is required (eg. "as is", "fair market", "on completion", etc.) Prepared By (Optional) Enter in who this report was prepared by. Prepared For Enter in who this report was prepared for. (Optional) 6.4 Setup Purchase and Sale Date of First Period (Mandatory) Nominated Purchase Price (Optional) Enter the date of the first month (time period zero) for the cash flow. Either enter a Purchase Price (before stamp duty and purchase costs) or enter a Target IRR on the Setup sheet and allow the model to calculate the purchase price based on the desired return (use Calculate Price function on DCF sheet). If a value is entered in this cell, the model will compute an IRR for the investment and the NPV/XNPV will represent the over or under performance of the property against the Discount Rate. 53
54 Step-By-Step Instructions If a Nominated Purchase Price is not specified, the NPV/XNPV represents the rational purchase price for the property. The rational purchase price is the maximum price a prudent purchaser should pay for the property in order to obtain a rate of return (IRR/XIRR) equal to the Discount Rate. Acquisition Date (Optional) Acquisition Costs (%) (Optional) Enter the date the property was acquired. If left blank, it will assume that the property is purchased at the Date of First Period. It cannot be before the Date of First Period or after the Disposal Date. Costs of acquiring the property as a percentage of the nominated purchase price. Acquisition Costs (Lump Sum) Costs of acquiring the property as a lump sum. This is added to the (Optional) acquisition costs as a percentage. Prepaid Outgoings on Purchase (Optional) Prepaid expenses for part of the financial year before acquisition to be paid upon purchase of the property. These expenses are simply added to the acquisition costs. Stamp Duty (Preference) Choose a Stamp Duty type from preferences. Stamp Duty rates and thresholds can be edited on the Taxes and Duties sheet. Nominated Terminal Sale Price (Optional) Enter a manual Sale Price (before selling costs) if you wish to define the sale value of the property at the Disposal Date. If left blank, it will default to the 'calculated' Terminal Sale Value that is calculated on the DCF report using the net income for each tenant and the different terminal capitalisation rates that can be applied. Selling Costs (%) (Optional) Costs of selling the property at the end of the holding period as a percentage of the end sale value. Selling Costs (Lump Sum) Lump sum costs of selling the property at the end of the holding period. This is added to the selling costs as a percentage of the sale value. (Optional) Reimbursement of Outgoings (Optional) Disposal Date (Optional) Reimbursements, for part of the financial year before disposal, to be reimbursed upon sale of the property. These reimbursements reduce the total acquisition costs. Enter the date the property will be sold.it must be later than the 'Date of First Period', but not more than the nominated DCF time frame (i.e 10, 20, 30 or 40 years) from such date. If no date is entered it will be assumed to be the month at the end of the nominated DCF time frame following the date of the first period. 54
55 Step-By-Step Instructions Important Information about Disposal Date DCF requires all cash flows pertaining to the investment to be entered into the analysis. In the case of property this is usually not possible as land values do not amortise over the investment period and the set of cash flows is considered to continue indefinitely into the future. This necessitates a notional sale at the end of the analysis period to capture the value of anticipated cash flows past the end of the analysis period. It is a common assumption within property cash flow analysis that the effect of discounting dilutes any errors that may be introduced through the forecast end value of property investments, however the fact that the end value is an escalated value suggests that the estimate of end value should be precise otherwise it may compromise the analysis. The IA model assumes a sale at the disposal date and computes the end value on the basis of a capitalisation of the following year's cash flows Uses Use Code (Mandatory) Use Description (Mandatory) Use Codes are unique codes used for categorising tenants and other sources of rental income of the same type. The Use Code should not exceed 4 characters (inc spaces). Vacant and Car Parking codes can not be edited. Enter a unique description for the Use Code. These descriptions will be used for reporting purposes. Vacant and Car Parking descriptions can not be edited. Added to NLA? (Y/N) (Mandatory) Should the category be added to the building's total Net Lettable Area (NLA)? For example, Car Parking is usually measured by the number of car spaces and is NOT added to the NLA. Unit of Input (Mandatory) Choose from the list, the unit of input for each Use type. This will determine how rental income is inputted for each Use type in the Tenants sheet. Capitalisation Rates (Optional) Current Capitalisation Rate: Used for calculating the current property value in the Capitalisation Summary report by capitalising the net income of the first 12 months. Terminal Capitalisation Rate: Used to derive the final disposal/sale price (Terminal Sale Value) by capitalising the net cash flow of the 12 months after the Disposal Date. Note: If any Use has a 0% Current/Terminal Capitalisation Rate applied, any income pertaining to that Use will be excluded from all capitalisation calculations. Adding and Deleting Uses 55
![Step-By-Step Instructions Up to 20 Uses can be added in a single file. Additional Uses can be added by clicking the [Add] button, or removed by clicking the [Delete] button. 6.4.](/docs-images/89/99830304/images/56-0.jpg "3 Escalation Profiles Profile Description (Mandatory) Average Growth Rate Enter a unique description for each Escalation Profile.")
56 Step-By-Step Instructions Up to 20 Uses can be added in a single file. Additional Uses can be added by clicking the [Add] button, or removed by clicking the [Delete] button Escalation Profiles Profile Description (Mandatory) Average Growth Rate Enter a unique description for each Escalation Profile. This will allow the user to select an Escalation Profile in various areas via a list. The description should not exceed 20 characters (inc spaces). This column displays the mean average of the escalation rates for each profile for the nominated DCF time frame. Financial Year Escalation Rate The escalation estimate for each year is the forecast growth from (Optional) the previous year that will yield the current year's value. I.e. if the escalation for 2015 is 3%, this means that the value for 2015 will be 3% greater than the value for Both positive (growth) and negative (reduction) rates can be entered. Profiles can be individually set for different costs and revenues, or they may be shared by more than one. 56

57 Step-By-Step Instructions Adding and Deleting Escalation Profiles Up to 20 Escalation Profiles can be added in a single file. Additional Escalation Profiles can be added by clicking the [Add] button, or removed by clicking the [Delete] button Capitalisation and DCF Capitalisation Sensitivity (Optional) Enter the Capitalisation Rate sensitivity (positive and negative variation) used on the Executive Summary report. Long Term Vacancy Allowance (Optional) Enter the Long Term Vacancy Allowance for the property to be deducted from the Gross Income in the Capitalisation Summary report (except for capitalisation based on Passing Income). Discount Rate for Bonus Rent The Discount Rate used for Overage Rents (or the portion of rents over and above the Market Rent). This is only used for the Reversionary Market Capitalisation method on the Capitalisation Summary report. (Optional) Discount Rate for Rental Shortfalls (Optional) The Discount Rate used for Rental Shortfalls (or the portion of rents below the Market Rent). This is only used for the Reversionary Market Capitalisation method on the Capitalisation Summary report. Months of Capex to deduct from Capital Value (Optional) Enter the number of months (starting from the Date of First Period) of capital expenditure to deduct from the capitalised value of the property on the Capitalisation Summary report. Discount Capex Decide whether the Capital Expenditure captured in the Capitalisation value is to be discounted to present value using the nominated Discount Rate. (Optional) Months of Letting Up to deduct Enter the number of months (starting from the Date of First Period) from Capital Value (Optional) of Leasing Up Allowances and Letting Fees to deduct from the capitalised value of the property on the Capitalisation Summary report. 57
58 Step-By-Step Instructions Discount Rate (Target IRR/XIRR) (Mandatory) Enter the desired Internal Rate of Return to calculate the property Purchase Price and the Net Present Value of the property s income stream. Use the Hurdle Rate Preferences to decide whether it calculated on an IRR or XIRR basis. Discount Rate Sensitivity Enter the Discount Rate sensitivity (positive and negative variation) used on the Executive Summary report. IRR/XIRR Guess (Optional) Enter a guess for the IRR/XIRR calculation. This needs to be relatively close to the actual IRR/XIRR in order for the calculation to work correctly. Use the Hurdle Rate Preferences to decide whether it is an IRR or XIRR. Terminal Cap Rate Sensitivity Enter the Terminal Capitalisation Rate sensitivity (positive and (Optional) negative variation) used on the Executive Summary report Long Term Vacancy Allowance (Optional) Enter the Long Term Vacancy Allowance for the property to be deducted from the Gross Income calculations in the DCF sheet. Start from Month Enter the month to commence calculating a Long Term Vacancy Allowance for the DCF (Optional) Other Income Description Enter a description for an additional stream of income for the property that needs to be capitalised at a different rate. (Optional) Income for the first month (Optional) Current Capitalisation Rate (Optional) Terminal Capitalisation Rate (Optional) Escalation Profile 6.5 (Optional) Enter the income for the first month (time period zero). This income flows through the entire cash flow and is escalated at the start of each financial year (excluding the first financial year).. Used for capitalising this additional source of income in the Capitalisation Summary report. Used to derive the final disposal/sale price (Terminal Sale Value) of this additional source of income by capitalising the income of the 12 months after the Disposal Date. Select an Escalation Profile for the Other Income from the list. The list of Escalation Profiles can be edited on the Setup sheet under the Escalation Profiles section. Escalation commences after the first financial year. Tenants Adding, Deleting and Resetting Tenants Rows 58
.")
![Tenant rows can also be reset (set back to a blank row with the default inputs), simply be selecting a relevant tenant row and clicking the [Reset] button.](/docs-images/89/99830304/images/59-1.jpg "Tenant 'Quick Input' Wizard Clicking [Quick Input] will display a wizard to allow tenant and lease information to be easily entered via an alternative input method.")
59 Step-By-Step Instructions Up to 500 tenants can be stored in a single file. Additional Tenant Rows can be added by clicking the [Add] button, or removed by clicking the [Delete] button (maximum 100 at a time). Tenant rows can also be reset (set back to a blank row with the default inputs), simply be selecting a relevant tenant row and clicking the [Reset] button. Tenant 'Quick Input' Wizard Clicking [Quick Input] will display a wizard to allow tenant and lease information to be easily entered via an alternative input method. Tenancy Import Clicking [Tenancy Import] will display a wizard to allow the importing of tenancy schedules from Excel or CSV files. Tenant 'Quick Input' Wizard Clicking [Quick Input] will display a wizard to allow tenant and lease information to be easily entered via an alternative input method. Tenancy Import Clicking [Tenancy Import] will display a wizard to allow the importing of tenancy schedules from Excel or CSV files. Tenancy Charts Clicking the [Charts] button will load six (6) charts which display information on income, areas, lease expiries and escalations. Tenant Detail 59
![Step-By-Step Instructions Clicking the [View] button will](/docs-images/89/99830304/images/60-0.jpg "bring up the Tenancy View Options screen.")

60 Step-By-Step Instructions Clicking the [View] button will bring up the Tenancy View Options screen. The tenancy schedule can be made simpler or more flexible by simply hiding and showing certain column fields that may or may not be needed. 60
61 Step-By-Step Instructions Tenancy Conventions Leases are assumed to operate on the basis of rents paid in advance and reviewed annually. The model has provision for an initial lease with a passing rent and a possible option for extension. Following the end of the initial lease, either at its expiry date, the end of the option period, or at some other specified termination date, the rental space is assumed to be relet at the market rental till the end of the model time frame. There are allowances for option incentives, reletting fees and incentives and a lease up period. The model adjusts the timing and magnitude of costs and revenues associated with the change in tenancy by the probability of the initial lease extension option being exercised. The model is not configured to accept multiple changes in tenancies during the analysis period. The following conventions have been adopted in the model for tenancies: Base Rent This is initial base rent used in the lease as at the time the lease was started. It should exclude turnover rent and recoverable outgoings, however the Lease Type (Net, Gross, Gross/Base) will determine if the rent is to include outgoings or not. Base Rent is used in the capitalisation computations to value the property based on 'Passing Income'. Gross Rent This is total rental revenue at any point through the lease. It includes the base rent, turnover rent and any recoverable outgoings (depending on the Lease Type). As each of these may have their own escalation profiles the escalation of gross rent may be complex. Lease Commencement Leases will start on the latter of either the start date or the effective date. The effective date is provided to accommodate an initial rent free period as a lease incentive. The value of the rent between the start date and the effective date is used in the computation of the effective rent. Due to the monthly stops on dates, the model will adopt the beginning of the month of the lease start date regardless of the day specified and rent will be computed for the whole of that month. Termination Date The termination date can be any date after the commencement of the lease and provides for the expectation that the tenant may either leave before the lease expiry, or remain on a month by month basis after lease expiry. Where a termination date is specified it takes priority over the expiry date and option provisions. Due to the monthly stops on dates, the model will adopt the end of the month of the termination date regardless of the day specified. Care should be exercised in entering termination dates to ensure that the correct lease term is entered. 61
62 Step-By-Step Instructions Market Rent This is used to estimate the anticipated rental on the re-let space. It should represent the entire expected rental, including such elements as turnover rent. Based on a user preference, Market Rents can be entered as all Gross, all Net or a mixture of Gross/Net (where it uses the nominated Lease Type for each individual tenant). If they are entered as all Net Market Rents, recoverable outgoings are automatically factored into the modelling once a tenancy reverts to market rents, based on the tenancies area as a percentage of total NLA and the total forecasted escalated recoverable outgoings for that period. It is also used in the capitalisation computations to value the property on a market rental basis. If no market rental is entered, the space will be assumed to become vacant following the lease expiry and the space will not contribute to the capitalisation valuation of the property using the market basis. The market rent value is set as the current value at the beginning of the cash flow and usually has an escalation profile attached. Monthly Cash Flows The model is worked on monthly cash flow intervals. This means that leases must assume terms in full months. In addition, the following date conventions have been included in the model: a. The model assumes that rents will be collected for the full month of the start date or the effective date (which ever is the latter). For example, if you enter in a Lease Start Date of 15th Jan, then 1 month's full rent will be collected in January, regardless of the fact that the lease started in the middle of the month. b. The model assumes that rent will be collected in the last month of the lease only if the expiry date is at the end of the month (i.e the termination date, the expiry date, or the expiry date plus option period), otherwise it is assumed that the last rent payment for that lease occurs in the previous month. For example, a one year lease starting on 1 January should have a start date of 1st Jan and an expiry date of 31st Dec. In this instance, the last rental payment will occur in December, constituting 12 months of rent payments. A one year lease starting on 15th Jan should have a start date of 15th Jan and an expiry date of 14th Jan the following year. In this instance, the last rental payment will occur in December (not in January of the following year), constituting 12 months of rent payments. Option Period Leases often include the option for tenants to elect to continue extend the lease for an additional fixed period of time. As tenants have the right to exercise or pass in the option right, the likelihood of the tenancy being extended is a risk to the owner. The model has provision for the insertion of an option period and an option exercise probability. It also has provision for option incentives to induce the tenant to exercise the option. It is assumed that a prudent landlord will relet the space as soon as possible following the end of the lease, but the timing of the new tenancy will depend on whether the current tenant exercises the option or not. 62
63 Step-By-Step Instructions Option Probability The likelihood of the initial tenant exercising the option is entered as a percentage number between 0% and 100%, where 0% is the certainty that the option will not be exercised and 100% is the certainty that it will. To better understand the possibilities for the behaviour of cash flows through an uncertain lease option, consider the following example: Lease Expiry month Option Period Option Probability Lease up period % 3 Passing Rent (per month) Market Rent (per month) Option Incentive Letting Fees/Incentives $ 1,000 $2,000 $ 100 $1,000 In this lease there is an 80% probability that the initial tenant will exercise the lease option which gives rise to the following cash flow: Month % Probability Option incentive 100 Passing (initial) rent 1,000 1,000 1,000 1,000 1,000 1,000 Letting Fees/Incentives Market rent Net revenue 1,000 2,000 2,000 2,000 2,000 1,000 1, ,000 1,000 1, ,000 2,000 2,000 2,000 In addition, there is a 20% probability that the option will not be exercised, which results in the following cash flow: 20% Probability Option incentive Passing (initial) rent 1,000 1,000 Letting Fees/Incentives Market rent Net revenue Option incentive Passing (initial) rent 1,000 1,000 1, ,000 2,000 2,000 2,000 2,000 2,000 2,000 1,000 2,000 2,000 2,000 2,000 2,000 2,000 2,000 This gives rise to the following combined probability adjusted cash flow: Probability Adjusted Cash Flow 80 1,000 1, Letting Fees/Incentives Market rent Net revenue 2, ,000 1, ,000 2,000 2,000 2,000 1, ,200 2,000 2,000 2,000 Re-Letting It is assumed that each lettable space will be re-let as it becomes vacant. The new tenant is assumed to pay market rent and the same set of recoverable outgoings that are in the original lease. Turnover rents are not available in the notional future re-let of the space, so these should be included in the estimate of market rent. Re-letting usually takes time and incurs various costs. There is provision in the model for these to be entered. Any anticipated rent free period should be included within the estimate of the lease up period. The starting date for the new tenancy will depend upon whether the option is exercised by the initial tenant. The costs and rents associated with the commencement of the new 63


64 Step-By-Step Instructions lease are located in the cashflow according to the expiry date, option length and option probability of the initial lease. Turnover Rent This is a common component retail rental revenue derived from a percentage of the tenant's turnover. Although turnover is specified and allocated an escalation profile the escalation of turnover rent may be complex due to the possibility that the percentage levied may be progressive, based on the the level of turnover with respect to set thresholds. The turnover rent is assumed to stop at the termination of the initial lease Import Wizard Use the Tenancy Import wizard to import a tenancy schedule from a compatible Excel or CSV file into IA. It utilises a field mapping process to allow the user to establish a link between data columns in a common tenancy schedule, with the appropriate input columns in the IA Tenants sheet. Using the Wizard To initiate the Tenancy Import wizard, go to the 'Tenants' sheet, and click on the 'Tenancy Import' button in the Ribbon menu. 1. Click 'Select File' and browse to a Tenancy Schedule you would like to import. Excel Workbooks (.xls,.xlsm,.xlsx) and Comma Separated Files (.csv) are supported. 2. If you have already saved a 'configuration', select it from the list. Otherwise start configuring how the import should work for your selected file: a. Enter the row number of the 'Header Row(s)' - this is the row(s) in the Excel file that contains the headers/labels for the tenancy schedule table. If your headers span multiple rows, enter all of them, separated by commas or hyphen. For example, enter 12, 13, 14 or if you have headers over those three rows. b. Enter the row in which your tenancy data begins under 'First Tenancy Row' - this is the first in the Excel file that contains data for the first tenant. It will automatically default to the next row after the header row(s). Note: When importing a CSV file, the above settings can be left at their default. c. The Import engine has the option to enter IA's First Period Date as the Start Date for any lease that does not have a Start Date in the Tenancy Schedule. If you would like to enable this, check the option 'Default Start Date to First Period'. 64


65 Step-By-Step Instructions 3. In the main section of the Tenancy Import wizard, select which Tenancy columns you would like to import by checking the 'Select' tickbox. You can expand or collapse sections to make navigation easier. For example, if you have no Turnover Rent information, you may want to collapse that section. Note that any fields which you have hidden from the Tenancy Sheet (using the 'View Options > Tenancy Detail' settings) will not appear here. 4. For each column you would like to import, select the corresponding column from your Tenancy Schedule in the drop down under 'Source Column'. For example, if you would like to import the 'Floor' for each Tenant, then check the box next to 'Floor', and then select the column where that data is found in your source file. In your Tenancy Schedule, the 'Floor' column may be called 'Level', for example, so you would choose that under 'Source Column'. Repeat this process for all the columns you would like to import. 5. Some Date columns give you extra options in the 'Date Option' section. For instance, the Expiry Date of a Lease is represented in IA as a date. However, your Tenancy Schedule may only record the Term of the lease in years. In this case, choose your 'Term' column for the Expiry Date and change the Date Option from 'Date' to 'Number of Years'. The Tenancy Import engine will calculate each Lease Expiry Date and enter them correctly for you. 6. Once you are happy with all of the configuration settings, click 'Import' to execute the Import. All of the existing data in the IA Tenants sheet will be cleared and replaced with the data from the selected fields from the Tenancy Schedule file. If any issues are found during import, a window will appear with all relevant details. For example, if ARGUS EstateMaster IA is expecting a date under 'Start Date', but finds the value 'Nil' in a cell, it will not be able to interpret that as a date, and no Start Date will be set for that lease. You will be informed of all such issues in the feedback window. Import Configurations 65


66 Step-By-Step Instructions Before executing an Import, you may want to save all of the configuration options you have set. If you regularly import Tenancy Schedules that have a similar layout, saving a configuration can be very convenient. 1. Click 'Save Configuration' and enter a name when prompted. 2. Whenever you load up a Tenancy Schedule for import, this configuration will appear in the drop down list under 'Load Saved Configuration'. When you select it, it will load all of the saved configuration options. You can then import straight away, or make any changes required. 3. Whenever you are working with a Saved Configuration: a. You can click on 'Save Configuration'. You can then update the current configuration by saving it with the same name, or can enter a different name to create a new configuration. b. You can click the red cross next to the Configuration name to delete that configuration to clean up old or unneeded configurations from your system. c. You can click on ' Configuration' to the current configuration to a colleague so that they can load it into their IA. Instructions about where to save the file will be included in the body of the Configuration files have the.ticx extension and are stored in the Local Application Data folder of your system, which is usually C:\Users\<username>\AppData\Local\EstateMaster. Updating Tenancy Data After you have imported your Tenancy data for the first time, you may want to re-import an updated Tenancy Schedule at a later date. In this scenario, it would be preferable to update the existing tenancy rows that are already in IA, rather than having all the information in there deleted. For example, you may have manually entered Comments for some of the tenants, or manually adjusted their annual rent reviews. When you re-import an updated Tenancy Schedule, you may want this manually entered data to remain - the way to achieve this is to use the Matching Criteria when you re-import. 1. In your Tenancy Schedule, consider what data uniquely identifies each tenant, and will not change for the lifetime of each lease. For example, if each of your leases have a unique Tenant ID, then you could use that column by itself for matching. If there is not a single unique identifier, you may have to rely on the combination of multiple fields. For example, the Tenant Name plus the Floor may be unique, therefore, you would 'match' on both of these columns. 66
67 Step-By-Step Instructions 2. When doing your import configuration, locate the columns you would like to match on and check their boxes under the 'Use for Matching?' section. When you execute the import, these columns will be used to match and update your existing Tenancy data. 3. Any tenant row in IA that does not have matching data in your Tenancy Schedule will be removed. If any row in your Tenancy Schedule does not match any data in IA, it will be added as a new Tenant row. 4. When an existing Tenant is updated by an import, any data you have manually entered into columns that are not configured to be 'imported', will be preserved. Data Import Rules The Tenancy Import engine uses a number of rules to properly interpret the source data from your Tenancy Schedule, in particular for Excel files. If you are finding unexpected behaviour when you import your Tenancy data, review these rules and consider whether you may need to modify your source data to ensure that the import engine can properly interpret it. When looking at the Header Rows, the engine will scan from the leftmost column of the first tab in the source file (when selecting an Excel file). It will keep reading in consecutive columns from left to right until it finds five columns in a row that are blank. At this point it will stop reading in any more data. Therefore, if your source data has a few blank columns, and then more data on the right, then the engine will keep reading and pick up all of the data. However if there are five or more blank columns in a row, then any further data to the right will not be read in. When importing Tenancy Rows, the engine will keep looking for new Tenancy Rows until it finds 10 consecutive blank rows. At this point it will stop reading in any more data. So if you have a few blanks rows between sections of tenancy data, then the engine will keep reading any further data below them. However, if you have 10 or more blank rows, then any data below that will not be read in. When importing Tenancy Rows, the engine will only create a new Tenant in ARGUS EstateMaster IA if there is more than one column of data in the first ten columns of the source row, and if all of the columns that are Used for Matching contain data. This means that many 'Total' and 'Subtotal' rows will be filtered out, as is desirable. However, if your data does include non-tenant rows (such as 'Totals') with multiple pieces of data in them, then the engine may interpret those as Tenants. In order to avoid seeing unexpected data after an import, you may want to remove non-tenant rows from the file you import from. Alternately, you could select additional Use for Matching columns in order to filter out unwanted source rows. Data Interpretation Rules Different kinds of data require different approaches to interpretation so that your Tenancy information can be properly represented in IA. Note that with all of these rules, if any issues are found during an Import, detailed information will be provided in the feedback window as to what unexpected source data was found. Some columns, such as the 'Tenant Name', will accept any kind of input and require no special interpretation. Many numeric columns, such as 'NLA (SqM) or Units', expect whole or decimal numbers as inputs. Source data such as '3.45' will be interpreted correctly, but '3.45 metres' will not be interpreted correctly. The area will be left blank in this case. Amounts of money, such as 'Current Base Rent Amount', expect whole or decimal numbers as inputs. The data may have a dollar sign, but letters or any other punctuation will mean that the data will not be interpreted correctly. The Lease 'Use Code' must match one of the 'Uses' from the Setup tab. Your Tenancy Schedule can contain any Code or Description of an existing 'Use' type and it will be properly interpreted by 67
68 Step-By-Step Instructions the Import engine. For example, a lease for a parking space can have the usage information 'CAR' or 'Car parking' either way it will import correctly. Any other data, however, will result in the default use code ('VAC') being left for that Tenant. The 'Lease Type' can be 'Net', 'Gross' or 'Gross / Base'. No other types are valid. Four IA Tenant sheet columns are used for Escalation Profiles: 'Turnover Rent Escalation', 'Recovery Escalation', 'Base Rent Escalation' and 'Rent Review Escalation'. The source data for any of these columns must match an Escalation Description under the 'Escalation Profiles' in the Setup tab. Any other data will not be imported. Columns that contain percentages, such as 'Turnover Rent Percentage', expect whole or decimal numbers as inputs. The data may have a percentage sign, in which case the source number will be divided by 100 when importing. Therefore, the inputs '.3' and '30%' will be imported as the same value. Any numbers lower than zero or higher than 100 will not be imported. The column 'Base Rent and Turnover Rent' accepts the inputs 'Add Base Rent' or 'Base as Minimum' only. The column 'Rental Payment Frequency' accepts the inputs 'Monthly', 'Bi-monthly', 'Quarterly', 'Bi- annually' or 'Annually' only. Some columns, such as 'Base Year' expect whole numbers only as inputs. Source data such as '2.4' will not be imported. Similarly, if you import any dates as a 'Number of Years' or 'Number of Months', then only whole numbers are allowed as source data, except if the number is appended with 'yrs' or 'mths' (e.g. 4yrs will be interpreted as 4 when 'Number of Years' is selected.) Non-numeric data such as 'N/A', 'Nil', 'None' or 'TBA' will be imported as zero. For Date fields, only 'DMY' (Day, Month, Year) date formats are acceptable, such as dd/mm/yyyy, dd-mm-yyyy. The ISO 8601 date format YYYYMMDD is also supported Quick Input Wizard The Quick Input Wizard enables the user to populate a tenancy schedule via a series of guided inputs via a form rather than a spreadsheet interface. The input fields in the wizard share the same rules as those on the 'Tenants' worksheet, however it provides additional controls (e.g. data pickers, drop-downs, etc) that make inputting data easier and minimises the risk of errors. Using the Wizard 1. To initiate the Quick Input Wizard, go to the 'Tenants' sheet, and click on the 'Quick Input' button in the Ribbon menu. 2. The wizard will then appear, starting with the first tenant. Edit the input fields where required, and click [Next] to proceed to the next tenant. 3. If you wish to copy the details of the current tenant to the next record (overwriting it), click on [Clone Tenant] 4. Once complete, click [OK] to return to the 'Tenants' sheet, with the updates applied. 68

69 Step-By-Step Instructions 69


70 Step-By-Step Instructions Input Validation If there is any exiting data on the 'Tenants' sheet that is causing input errors (i.e. red cells / 'Error Input' warnings), the wizard will not load until those input errors are rectified. To assist with this, a 'Validation Error' form will appear, listing the sheet/section/cell that contains the error, and description of what the input error is. Double-clicking any row in the Validation Error list will select the cell where the error is located. If there are multiple errors, there is also an option to export the list to an Excel file or print it. Setting Rent Reviews The 'Rent Reviews' table in the wizard is a more streamlined version of what is provided in the 'Lease Structures' section on the 'Tenants' sheet and data is entered in slightly differently. Instead of entering an abbreviated code (e.g. 'M', 'C', etc) to apply a type of review for that lease in a year (e.g. Revert to Market, Escalate to CPI', etc), a drop-down list is displayed with the available options. If 'Fixed Review' is selected from the drop-down list, then an amount (amount per NLA or Unit per annum) must be entered. To help with the process of entering the rent reviews, click on the 'Rent Review Profiles' button and a new dialog will appear. It will prompt the user to select a type of review (i.e. review to market), and its frequency (i.e. every 2 years), when the [OK] button is clicked, it will automatically populate the table. Saving Changes to the Tenants Sheet Changing any inputs in the wizard will not update the 'Tenants' sheet until the [OK] button is clicked. Once this is done, any input that was edited in the wizard will have its related input on the 'Tenants' sheet update with that value. This is important to note, as any custom user-inserted formulae that was entered on the 'Tenants' sheet prior to the wizard being loaded, may potentially be overridden by a value if it is edited via the wizard. Once the wizard has reverted back to the 'Tenants' sheet and inputs can then be fine-tuned via the spreadsheet interface. 70
 Enter name of the Tenant or the source of the rental Income (eg car parking, signage, etc).")
 Use Code (Mandatory) Lease Type (Mandatory) Enter the relevant Use Code for each Tenant or source of income, as defined in the Setup sheet.")
71 Step-By-Step Instructions General Tenant Info Tenant ID (Optional) Tenant identification numbers. They can be used as a reference to your accounting system but are not used within the model. Tenant Name (Mandatory) Enter name of the Tenant or the source of the rental Income (eg car parking, signage, etc). Floor Number (Optional) Enter the Level/Floor number of the tenant or source of income. Suite Enter the Suite number of the tenant (if applicable). (Optional) Use Code (Mandatory) Lease Type (Mandatory) Enter the relevant Use Code for each Tenant or source of income, as defined in the Setup sheet. This will also affect whether the specified tenant area adds to the NLA or not, and the unit of input for rental income (eg $/sqm/pa etc). Select a 'Lease Type' from the list. This only applies to the Base Rent during the initial lease period. It may also apply to the Market Rent if the user has set in the Rent Review preferences to enter them 'as per Current Tenant Lease Type'. Gross = Outgoings are included in the Base Rent. No additional recoveries are allowed (all Recoverable Outgoings inputs for that particular tenant are disabled). Gross/Base = Outgoings are included in the Base Rent. Increases in outgoings from a base year can be recovered (all other Recoverable Outgoings inputs for that particular tenant are disabled). Net = The Base Rent is net of outgoings. Additional recoveries are allowed, either as a lump sum, or as a percentage of total recoverables Area/Quantity and Base Rent NLA or Units (Mandatory) Enter the area, number of car spaces or number of units, based on the Use Code selected for each tenant. The units are displayed in the adjacent column and can be edited on the Setup sheet. Unit Type Displays the unit type. This is dependent on the Use selected and whether that Use is to be included in the NLA (as defined in the Setup sheet). If the selected use hasn't been defined in the Setup sheet then "Invalid Use" will appear. 71
72 Step-By-Step Instructions Current Base Rent Amount (Mandatory) Enter the Initial Rental Value (at the time of the lease start and before escalation) based on the Unit of Input displayed in the adjacent column. The Unit of Input corresponds to the Use selected and this can be edited on the Setup sheet. The escalated base rents will be abed on this value. Base Rent Unit of Input Displays the Unit of Input corresponding to the Use selected for each tenant. The Unit of Input for each use can be edited on the Setup sheet. Base Rent Escalation Profile Select an escalation profile for each tenant for the Base Rent from the drop down list. The list of escalation profiles can be edited on the Setup sheet under the Escalation Profiles section. (Mandatory) Base Rent Amount per Annum Displays the amount of base rent per annum. Base Rent Unit Rate Displays the base rent as a unit rate per annum. Turnover Rent Total Turnover Enter the tenant's total annual turnover at the beginning of the lease. (Optional) Turnover Escalation Profile (Optional) % of Total Turnover (Optional) Threshold Turnover & Threshold Percentage (Optional) Base Rent & Turnover Rent Select an escalation profile for the Turnover from the list. Different profiles may be used for different tenants. The list of Escalation Profiles can be edited on the Setup sheet. Enter the % of the total turnover to be paid as rent. A percentage of all turnover above the specified threshold will be paid as rent. (This is in addition to the % of Total Turnover paid as rent and the other threshold). Choose a Turnover Rent calculation method from the list: (Mandatory if Turnover Rent is used) 'Base as Minimum' takes the higher of Base Rent and Turnover Rent. 'Add Base Rent' adds the Base Rent to the Total Turnover rent. Total Turnover Rent p.a Displays the Total Turnover Rent for the first year of the lease. Total turnover rent is the % of Total Turnover plus the % of turnover above Threshold 1 plus the % of turnover above Threshold 2 plus the base rent if chosen: If 'Base as Minimum' is selected, this total will be greyed out until it exceeds the Base Rent. If 'Add Base Rent' is selected, this amount is added to the Base Rent. 72

73 Step-By-Step Instructions Payment Frequency and Recoverables Rental Payment Frequency (Mandatory) Recoverable Outgoings Select, from the list, the frequency payments are received. Payments are received monthly by default. 4 methods are available for entering Recoverable Outgoings for the initial lease period. Depending on what Lease Type is entered for the tenant, the following options are available: If 'Lease Type' = Net 1. Lump Sum Recovered O/G s: (Optional) Enter the total amount of outgoings recovered per annum in today's value and a relevant escalation profile from the list. When this option of outgoing recovery has been used, option 2 (% of Total Recoverables) is greyed out. 2. % of Total Recoverables: (Optional) Enter the percentage of total recoverables to be received (as per the Outgoings Schedule). The cash flow for this option is calculated by averaging the recoverable outgoings recovered in each financial year. 3. A combination of lump sum and % If either option above are chosen as the preferred outgoing recovery method, the following information is displayed: Recoveries Amount p.a: Displays the amount of recoveries per annum for the first year. Recoveries Unit Rate: Displays the recoveries as a unit rate per annum for the first year. If 'Lease Type' = Gross/Base 4. % Increase After Base Year: (Optional) Enter a percentage of the increase in total outgoings, after the base year, to be recovered. The Base Year can not be before the first year or after the last year in the cash flow. This is not used for the Capitalisation Summary. If 'Lease Type' = Gross, then there is no option to recover outgoings for that tenant, as it assumes that the Base Rent entered already includes outgoings. 73

74 Step-By-Step Instructions Under and Over Allocations When using either options 1 2 or 3 for the recovering of outgoings (Lump Sum Amount and/or % of Total Recoverables), if the user hasn't allocated the full 100% of outgoings that have been marked as 'Recoverable' in the Outgoings Schedule, then an 'Under-Allocated' warning will appear in red. If the user has exceeded 100%, then an 'Over-Allocated' warning will appear Gross Rent and Lease Terms Current Gross Rent Total Gross Rent: This is the current gross rent received per annum (Base Rent, plus any Recoveries if applicable). Gross Unit Rate: This is the gross rent received per annum as a Unit rate. (Base Rent plus Recoveries divided by the total area or total number of units or car spaces.) Lease Start Date (Mandatory) Enter the date the lease begins for the purpose of this cash flow. This must be: Before the end of the cash flow, and Before lease expiry, The date may be before the property Acquisition Date but no rent will be received until the property is actually acquired. The model assumes that rents are paid in advance and a Start Date anywhere in a month will result in the whole rent for that month (or other collection period) being entered in that month. Lease Expiry Date (Mandatory) Enter the expiry date of the initial lease. This must be: Greater than the Start Date plus number of months in the Rental Payment Frequency, After the start of the cash flow (otherwise it will be highlighted red and excluded from Passing Income). 74
, otherwise it is assumed that the last rent payment for that lease occurs in the previous month.")
.")
75 Step-By-Step Instructions Lease Expiry and Termination Dates The model assumes that rent will be collected in the last month of the lease only if the expiry is at the end of the month (i.e the termination date, the expiry date, or the expiry date plus option period), otherwise it is assumed that the last rent payment for that lease occurs in the previous month. The expiry of the lease must be an even multiple of the Rental Payment Frequency (i.e If it is a 'Monthly' Payment Frequency, you can not have a lease period that is not in whole months as the model will no calculate part months for rental income). For cases where the expiry date, option period, or termination date creates a lease term that is not an even multiple of the Rental Payment Frequency, enter the rents as the equivalent monthly payments and adopt a 'Monthly' Rental Payment Frequency Incentives and Effective Rent Effective Date (Optional) Enter the date that rent is effectively received. This can be used to allow for rent free periods. Rent is assumed to be paid in advance from this date. This must be between the start and expiry dates. By default the effective date is the lease start date. Letting Fees (Optional) Enter the commission percentage paid upon letting for the initial lease. This fee is calculated based on the gross annual rent and is paid at the Lease Start Date. Initial Fitout / Lump Sum Incentives (Optional) Enter any incentives during the initial lease period as a lump sum, and then enter the Start Date and Span (in months).the Start Date must be before the end of the cash flow. The total cost is then evenly spread over the Span months. Current Effective Rent Displays the rent adjusted for the lump sum lease incentives and the lost rent due to rent free time between lease start date and effective date. Both the annual effective rent and the rent per unit or area are displayed. Effective Rent = Gross Rent (Base Rent + Recoveries, excluding escalation) less the cost of the Initial Lease Incentives and Rent Free Period, which are spread over the life of the lease Option Period Option Period (Optional) Enter the Option Period in months. The default end of the lease is the Expiry Period plus the Option Period. Use the Termination Date 75

76 Step-By-Step Instructions to end the lease earlier or later. Option Probability (Optional) Enter the probability of the tenant taking up the option. It will apportion all items that relate to the option period being taken up (ie. Rents, Option Period Incentives and Reletting Fees) Important Information about Option Probability The probability is a number between 0% and 100% where 0% means it is certain that the tenant will not exercise the option and 100% means that it is certain that the tenant will take up the option. Values in between these extremes apportion the passing rents, option incentives and the initiation of a re-let to market between the expiry date and the option end date (expiry date plus option period). It is assumed that a new tenant will be sought as soon as the existing tenant quits, but the timing of the new tenancy is contingent on the exercise of the option. Hence the option probability will directly apportion all items that relate to the option period being taken up. ie. Rents, option period incentives, vacancy during leasing up period and reletting fees. Recoverable outgoings are considered to persist through the change of tenancy but are not collected through vacancies. They are also proportioned on the basis of the option probability. The effects of the option period and its probability also affect reports including Exec Summary and the Capitalisation Summary. Option Fitout / Lump Sum Incentives (Optional) Enter any incentives during the option period offered to the existing tenant as an inducement to exercise the option. These are entered as a lump sum, and then enter the Start Date and Span (in months).the Start Date must be before the end of the cash flow. The total cost is evenly spread over the Span months and proportioned to the option probability (Eg. if $10,000 is forecast as option incentives but the option only has an estimated probability of being exercised of 40% then $4,000 will be entered in the cash flow). If a Termination Date is to be used, it will pay 100% of the incentive cost. So if no incentive is forecast to be paid, then it is advised that it is set to zero Termination and Reletting Termination Date (Optional) Enter the date the lease is effectively finished. (By default, if no date is entered, it is the expiry date plus the option period). This can be used to terminate the lease earlier or later than the default period. If a Termination Date is entered, it takes priority over the Option Period (will grey out Option Period and Probability) or Expiry Date. Care should be taken when using a termination date where option incentives and an option probability have been input as these will still be computed which may be counter to intentions. If a termination date is used and no option incentive payment is intended make sure that either the option probability is zero or the option incentive is omitted. 76
, otherwise it is assumed that the last rent payment for that lease occurs in the previous month.")
77 Step-By-Step Instructions Lease Expiry and Termination Dates The model assumes that rent will be collected in the last month of the lease only if the expiry is at the end of the month (i.e the termination date, the expiry date, or the expiry date plus option period), otherwise it is assumed that the last rent payment for that lease occurs in the previous month. The expiry of the lease must be an even multiple of the Rental Payment Frequency (i.e If it is a 'Monthly' Payment Frequency, you can not have a lease period that is not in whole months as the model will no calculate part months for rental income). For cases where the expiry date, option period, or termination date creates a lease term that is not an even multiple of the Rental Payment Frequency, enter the rents as the equivalent monthly payments and adopt a 'Monthly' Rental Payment Frequency. Leasing Up Period (Optional) Enter the lease up allowance, in months. This will be applied after either the Termination Date, or the Expiry Date or the end of the Option Period depending on if an Option Period is specified and it is apportioned between these dates using the Option Probability. If a rent free period is anticipated as an incentive for new tenants this should be included by adding into the leasing up period. Reletting Incentives (Optional) Enter incentives as a percentage of the gross annual Market Rent paid upon reletting, spread across the nominated span period. The costs are assumed to be paid one month after the end of the lease up period which starts following the initial tenant's departure. Reletting Fees (Optional) Enter commission fees as a percentage of the gross annual Market Rent paid upon reletting as a lump sum. The costs are assumed to be paid one month after the end of the lease up period which starts following the initial tenant's departure. Important Information about Option Probability and Lease Up Periods Where an Option Period and Probability are specified the leasing period will have the Option Probability of starting at the end of the Option Period (Expiry Date plus Option). It will also have a Probability of one minus the Option Probability of starting following the Expiry Date (i.e the initial tenant does not exercise the option). The Lease Up Period is apportioned within the cash flow to reflect these probabilities and to determine when the lease should be assumed to revert to the escalated market rent Market Rent Comments (Optional) Enter any additional comments or remarks here related to the Rent Review. Current Market Rent (Mandatory) Enter the Market Rent on a rate per unit basis. Depending on the Rent Review preferences, Market Rents may be entered either: As per the current Tenant Lease Type as defined in the General Tenant Info section, or 77

78 Step-By-Step Instructions All Gross Rents, or All Net Rents. In this instance, for reporting of gross Market Rents in the DCF and Capitalisation Summary reports, recoverable outgoings will be added to the Market Rent for each tenancy based on their % of the total NLA. Leases will revert to the escalated Market Rent when the initial lease (inc Option Period and Leasing Up Period) finishes. The Market Rent should reflect the expected Base Rent plus any Turnover Rent component that is to be received into the reversion. Market Rents are also used in the Capitalisation Summary, for valuations based on Market Rents. To calculate market valuations, a Market Rent must be entered for each tenant and vacancy, if this is not done a warning will appear at the bottom of the sheet. Market Rent Escalation Profile Select an escalation profile for each tenant for the Market Rent from (Mandatory) the drop down list. The profile does not need to be the same as the Base Rent escalation profile and may differ between rental spaces. The list of escalation profiles can be edited on the Setup sheet under the Escalation Profiles section. Market Rent p.a: Lease Replication Displays the Net and Gross Market Rent per annum. (Mandatory) Enter in the number of months to repeat the costs or reltting until the end of the nominated DCF time frame. This feature is helpful for long cash flow time frames where the user can easily replicate the lease cash flow of a particular tenancy after the initial lease and option period has expired, and take into consideration periodic costs such as vacancies, incentives and letting fees. Based on the settings in the Preferences, the user can decide if the Letting Up Period, Reletting Fees and Reletting Incentives are repeated at the end of each cycle Rent Reviews Previous Review Date This is the date that the rent was last reviewed at and from when the Current Base Rent is calculated from. If 'Lease Start' > 'Date of First Period', then 'Previous Review' = 'Lease Start' If 'Lease Start' < 'Date of First Period', then 'Previous Review' = the last review that has occurred in the previous 12 months. Next Review Date (Optional) This defaults to 1 year from the Previous Review date, but can be overridden to a any date after the previous review. This month is used as the month to begin all subsequent escalations that are 78

79 Step-By-Step Instructions assumed to follow annually, from the start of each financial year. The review date is adopted for the entire term of the cash flow, including the forecast reletting to market following the termination of the initial lease. Upwards Only (Optional) This determines if rent reviews can allow the rent to go 'Upwards' or 'Upwards/Downwards'. If 'Yes' is selected, then the rent stays the same as the previous year, at any time when it otherwise should drop (e.g. negative escalation, reversion to market) Annual Rent Review Tables The Annual Rent Review feature allows the user to setup how leases are reviewed on a financial year basis, during the initial lease and option period. After this period, leases then revert to the escalated Market Rent for the remainder of the cash flow, and escalate according to the Market Rent Escalation Profile. Therefore any inputs in the Rent Review Type section will be ignored from that point in time. Financial Year Displays the financial year period. Rent Review Type Four possibilities are available for the escalation of each year's Base Rent for each tenant. Enter one of the following to determine how the rent review that is occurring in the selected financial year is to be calculated: M - to review it to the estimated market rent for the rent review in that financial year period derived by escalating the nominated current Market Rent using the escalation profile selected for the market rent. This should only be used where there is no turnover component in the gross rent. E - to escalate the rent from the previous financial year using the rate from the selected Base Rent escalation profile. C - uses CPI to escalate the rent from the previous financial year. N - no rent review for that financial year. OR Manually enter a base rent unit rate for the current year eg. $500 / SqM or / Unit p.a Please note, that these inputs only impact on the Base Rent, and do not affect any Turnover Rent. 79
80 Step-By-Step Instructions Where Turnover rents exist do not use the 'M' option, as market rent is assumed to include both base and turnover components and adopting it within the lease would lead to double counting of the turnover component. Fixed % Review This is a manual fixed percentage review, that overrides the nominated Rent Review Type. It escalates the rent from the previous financial year using the rate specified. Escalation Applied This displays the Escalation Rates that correspond to the selected Rent Review type (and its related Escalation Profile) or the rate entered in the Fixed Percentage, for the tenant. If a Rent Review type of 'M' or a manual rent review amount is entered (eg $500 / SqM or / Unit p.a), then this will be greyed out. Use the Tenancy View Options function to hide/unhide the Escalation Applied column. Base Rent This displays the total Base Rent that is actually received for that selected financial year for that tenant. If it is greyed out, it means that the Turnover Rent exceeds the Base Rent, and the 'Base as Minimum' option for Turnover Rent has been selected for that particular tenant. Select from this drop down list, whether to display the current rent as a total per annum or a unit rate per annum. Turnover Rent This displays the escalated Turnover Rent that is actually received for that selected financial year for that tenant. If it is greyed out, it means that the Base Rent exceeds the Turnover Rent, and the 'Base as Minimum' option for Turnover Rent has been selected for that particular tenant. Use the Tenancy View Options function to hide/unhide the escalated turnover rent column for each financial year. Expiration of Initial Lease (inc Option Period) When the Initial Lease (inc Option Period) has expired, the model assumes that leases for that particular tenancy will revert to Market Rents for the remainder of the cash flow, and escalate according to the Market Rent Escalation Profile. Therefore, the Leasing Structure inputs are no longer required and are then greyed out. The first tenant's lease expires in the 2010 financial year, therefore once it reverts to a Market Rent, the ability to edit rental review s is disabled. 6.6 Outgoings 80
.")
81 Step-By-Step Instructions Codes (Optional) Outgoing Codes can be used as a reference but are not used specifically within the program. Description Enter a short description for each outgoing. The Description should not exceed 30 characters (inc spaces). (Mandatory) Payment Frequency (Mandatory) Payment Dates (Optional) Select from the list the frequency in which payments are made, starting from the First Payment Date. Start: Enter the date the first payment is scheduled to be paid. This is used to determine the timing of the first and subsequent payments, at the selected frequency. If no date is entered, payments start immediately and January is used by default for payment frequencies. Payments can be entered before the acquisition date, but no earlier than 12 months before the Date of First Period. End: Enter the date that the last payment is scheduled to be paid. It must not be earlier Payment Start Date for that particular item. If left blank, it will assume that the payment is ongoing for the life of the cash flow. Current Outgoings Per Annum (Optional) Lump Sum Amount: Enter the total outgoings paid each year (before escalation), as a Lump Sum in today's value. If this option is used, then the Rate per NLA option is disabled. Rate per NLA: Enter the total outgoings paid each year (before escalation), as a Rate per Total NLA. If this option is used, then the Lump Sum option is disabled. Escalation Profile (Mandatory) Recoverable (Y/N) (Mandatory) Select an Escalation Profile (for the Outgoings) from the list. The list of Escalation Profiles can be edited on the Setup sheet under the Escalation Profiles section. Outgoings are escalated at the start of each financial year (except for the first year). Select whether the outgoing is recoverable from the tenants (Y) or liable by the owner (N). This will affect the Total Recoverables and thus affect the total used for calculating the % of Total Recoverables entered on the tenants sheet. Current Outgoings Per Annum Displays the forecasted outgoings paid each year as a total amount and a rate per NLA, before escalation is applied. % of Total Outgoings Displays the proportion of the outgoing as a percentage of the total. Benchmarks (1 and 2) (Optional) Enter benchmark rates per Annum for comparison with the actual outgoings. These will be used in the Outgoings Comparison charts. 81
![Step-By-Step Instructions Outgoing Charts Clicking the [Charts] button will load the 'Outgoings Comparisons' chart which display a bar chart comparing the actual outgoing costs, against the 2](/docs-images/89/99830304/images/82-0.jpg "industry benchmark cost columns. Toggling the Benchmarks Clicking the [Hide/Show] button will toggle the 2 Benchmark columns on the Outgoings sheet. 6.")
 Description (Mandatory) Enter in the description for the capital expenditure line item.")
82 Step-By-Step Instructions Outgoing Charts Clicking the [Charts] button will load the 'Outgoings Comparisons' chart which display a bar chart comparing the actual outgoing costs, against the 2 industry benchmark cost columns. Toggling the Benchmarks Clicking the [Hide/Show] button will toggle the 2 Benchmark columns on the Outgoings sheet. 6.7 Capital Expenditure Code Capex Codes can be used as a reference but are not used specifically within the program. (Optional) Description (Mandatory) Enter in the description for the capital expenditure line item. Units and Base Rate / Unit(Mandatory) For each item enter the number of units (quantity) and the Base Rate per Unit. These will be multiplied by each other to calculate the total cost. Start Date Enter the date when the capital expenditure is to start in the cash flow. It must be between the Date of First Period and the Disposal (Sale) Date. (Mandatory) Span (Months) (Mandatory) Enter the Span period of the capital expenditure from the Start Date. It must be greater than ZERO, but must not exceed the end of the cash flow. End Date Displays the end date for the capital expenditure item. It is the Start Date plus the span in months. Escalation Profile (Optional) Select an Escalation Profile for the Capex cost from the list. The list of Escalation Profiles can be edited on the Setup sheet under the Escalation Profiles section. Escalation commences after the first financial year. Remarks (Optional) You can enter any text comment in these cells. Total Cost Displays the total cost for the line item. Total cost equals Base rate multiplied by the number of units. 82
83 Step-By-Step Instructions Adding and Deleting Capital Expenditure Items Up to 50 capital expenditure items can be stored in a single file. Additional capital expenditure items can be added by clicking the [Add] button, or removed by clicking the [Delete] button. 6.8 Taxes & Duties It is recommended that the user regularly checks their relevant Statutory Revenue Office for recent changes to taxes and duties. IA has inbuilt Stamp Duty and Land Tax calculators based on tables for different regions that can be easily updated by the user when required. Please Note: The software does not automatically update these table when the rates/thresholds change - this is the responsibility of the user to manually maintain. Updating the Stamp Duty and Land Tax Tables 1. Click on the 'Taxes & Duties' worksheet tab. 2. There will be tables for each region. Each table has the following columns: Rating Land Value Thresholds: The upper value of the dutiable land value range. Tax Amount: The fee that is payable in addition to the rate. Rate: The percentage marginal rate on the dutiable value of land. Stamp Duty Example Say Stamp Duty is calculated as per the following rates: $0 - $14,000: $1.25 for every $100 or part of the dutiable value $14,001 - $30,000 $175 plus $1.50 for every $100 or part, by which the dutiable value exceeds $14,000 $30,001 - $80,000 $415 plus $1.75 for every $100 or part, by which the dutiable value exceeds $30,000 $80,001 - $300,000 $1,290 plus $3.50 for every $100 or part, by which the dutiable value exceeds $80,000 $300,001 - $1m $8,990 plus $4.50 for every $100 or part, by which the dutiable value exceeds $300,000 over $1m $40,490 plus $5.50 for every $100 or part, by which the dutiable value exceeds $1,000,000 Land Tax Example 83

84 Step-By-Step Instructions If there is a tax free threshold - this is indicated by entering '0''s in the first row of a land tax table. Example: This year a $368,000 threshold will apply to owners of liable land. The land tax rate will be $100 plus 1.6% on the combined value of all taxable land in excess of $368,000. If there is no tax free threshold - this is usually indicated by entering only a % rate in the first row of a land tax table. Example: There is no threshold for land tax this year. Taxable land is assessed at the following rates: o Not more than $75,000: 0.6% o Between $75,001 and $150,000: $450 plus 0.89% on the taxable value that exceeds $75,000 o Between $150,001 and $275,000: $1,118 plus 1.15% on the taxable value that exceeds $150,000 o More than $275,001: $2,555 plus 1.4% on the taxable value that exceeds $275,000 Rating Land Value 6.9 DCF Analysis The Discounted Cash Flow sheet collates the cash flows in order of revenues and costs as defined in the input sheets and computes present values. For valuation purposes only cash flows associated with the property itself are included in this sheet. Cash flows associated with the investor, such as loan interest and income tax, are ignored. This means that the property is analysed on the basis of no debt leverage and no income taxation. Manual Inputs In addition to the values that are automatically computed, there is facility to include additional manual inputs under each revenue and cost heading. These can be used to include simple entries or linked to add-on sheets to input the results of more complex specialised computations as required. Please Note: Care should be exercised in the use of manual inputs as they do not link to identifiable data input areas, such as the Tenant sheet. Manual Inputs on the DCF sheet do not affect any of results and valuations calculated on the Capitalisation Summary report. 84

85 Step-By-Step Instructions 6.10 Investment Analysis The Investment sheet takes the property cash flows determined in the DCF sheet and adds multiple funding layers to evaluate the property from the perspective of an investor. To achieve this, debt leverage, working capital and dividend management options are included. The outputs of the Investment sheet provide performance measures for the equity participants. Investment Conventions The Investment sheet makes the following assumptions: Up to three loans may be involved in the funding of the property. Each loan may be either interest only, interest capitalising, or principal and interest (credit foncier) loans Credit foncier loans may have a loan term that may be any whole number of years. All funds required in excess to that sourced from debt are supplied as equity from the owners. All loans will be paid out at the end of the cash flow. An equity working capital fund may be established at the beginning of the investment to facilitate dividend management through the cash flow period as described below Loan Inputs Loan Type Select between: Capitalised: All Interest and Loan costs are capitalised. Interest Only: All Interest and Loan costs paid when incurred. Principal and Interest: Pay all Interest, Loan Costs and Principal periodically. For more information about these types of loans refer to the Glossary of Terms. Term Enter the term (length) of the the loan in years (only required for principal and interest loans). LVR % Enter the borrowing ratio for this loan based on a % of the Property Purchase Price (not including acquisition costs). If the loan principal is not computed on the basis of the purchase price an equivalent LVR percentage must be computed. Base Rate + Lender Margin Enter the base interest rate and the lender margin in their respective locations. These combine to provide the actual interest rate charged by period. 85
 Line fees: constant fees paid at regular (monthly) intervals through the entire life of the loan, (2) one-off fees or charges: discrete single fees that have estimated payment dates,")
86 Step-By-Step Instructions Note: Interest rates can be manually over-written by period in the cash flow table (blue font). Loan Fees and Costs Three types of loan fees and costs are provided for. these are (1) Line fees: constant fees paid at regular (monthly) intervals through the entire life of the loan, (2) one-off fees or charges: discrete single fees that have estimated payment dates, and (3) Other costs: any other loan costs that can occur at any point in the loan. Line Fees: Enter Line Fees per annum. These are charged monthly, commencing from the establishment of the loan. The line fee entry should include all constant recurrent fees and charges. Line fees are only charged once the loan is begun which requires LVR and interest rates to be set. Other Loan Fees and Costs: Enter any other one-off loan fees or costs in the rows following the Line Fee entry. A description for each fee, the amount of the fee and the date it is to be paid should be entered in the spaces provided. Other Costs (manual inputs): For the 'Other Costs', input the amounts directly into the cash flow table as manual inputs (blue font). A description may be added and the total through the loan is computed and displayed adjacent the description Investor Distributions Fund Management Fees (%) Enter a Management Fee as a percentage of funds under management. These are calculated on an annual basis and allocated monthly. Other Fees Enter any other fund management fee as manual inputs in the monthly cash flow. Target Distribution Enter the budgeted distribution for the period from the property (positive % only). Where the operating cash flow exceeds this amount the excess will be added to working capital. If the operating cash flow is insufficient the distribution will be covered by drawing on working capital. In addition to the monthly inputs, a total weighted average rate is also displayed. Funds Under Management Enter the equity contribution for working capital. This is a fund that may be used to cover costs not funded by debt or operating income. If sufficient working capital is made available at the beginning of the investment, the distribution to investors can be regularised. 86
87 Step-By-Step Instructions Interest on Working Capital Enter the interest rate (per annum nominal) that will be earned or charged on working capital. Where the working capital balance is positive it receives interest at a nominated rate and when it is negative it pays interest at the same rate. Working capital interest payments and receipts are included in the costs and revenues to the investor. NPV/XNPV of Investor's Cash Flow Enter in the discount rate to calculate the NPV/XNPV of the investors cash flow after the initial contribution and distributions are received and paid. 87
88 Part VII


89 Custom Worksheets 7 Custom Worksheets The IA program is based on a spreadsheet interface and allows you to insert additional blank worksheet into the model. Adding custom sheets is conducted via the 'Sheets' section in the Ribbon Menu. When you click on 'Add', there will be 2 options for adding a custom worksheet into the model: 1. Importing a sheet(s) from another Excel file: This will prompt you to browse to an Excel file and select one or more worksheets in that file to import. Important Notes: If you attempt to import a worksheet that has formula links to another worksheet, you will be required to import the other worksheet to avoid any links being broken, otherwise you will not be able to import the worksheet. If you attempt to import a protected worksheet that has password on it, you will be prompted to enter in the password before the worksheet can be imported. Once the worksheet is successfully imported, it will be protected again and can be unprotected using the sheet context menu. Any 'Global' range names (those that are global to a workbook) that exist on the worksheet to be imported will be removed. Only 'local' range names (those that are local to a worksheet) will be imported with the worksheet. If you have a range name on the worksheet and you want it to be imported into IA, you will need to ensure they 'local'. Refer to this Microsoft Article about using Global and Local range names: Any 'Local' range names (that exist on the worksheet to be imported) that refer to an external Excel workbook will be removed. Any 'Local' range names (that exist on the worksheet to be imported) that have the same name as a standard IA Global Name will be renamed with "_RENAMED" appended to the end of the name. This means that any formulae that was referencing this name will be automatically adjusted. 2. Adding a blank worksheet: This will add a blank unprotected worksheet to the model. 89

90 Custom Worksheets Please Note: Custom sheets are file specific. Custom worksheets will be saved to the data file (*.emia), however they will not be stored in the Enterprise Database when Exporting. Once a sheet is added, you can do the following to it: Rename it: Click on 'Rename' and a prompt will appear asking you to give the active sheet a different name. Delete it: Click on 'Delete' and it will ask you confirm to delete the active sheet. Move it: Click on 'Move' and a list of all the custom sheets in the model will appear where you can rearrange their order. You cannot rearrange the order of any of the standard worksheets. Change the Tab Colour: The default tab colour for custom sheets is orange, but this can be changed via the Right-Click Menu Custom Sheets Formatting Menu In addition to the context menu available for custom sheets, there is also a Ribbon Menu item that appears when a custom sheet is activated to assist with cell formatting. It contains the following functions: Setting the font to Bold, Italics and Underlined. Left, centre or right aligning text. Changing the number format to Comma (#,###.00) or Percentage Style (#.00%). Setting the Fill colour of the cell.* Setting the Font colour.* Increasing or decreasing font size. Merge and Centre across cells and text wrapping. Format Painter (copies formatting of current selection and pastes it onto the next selected cell(s)) Clearing cell formatting. * When setting colours to fill or font, the previously selected colour will be displayed when hovering over the menu item. For a complete menu of all formatting available for custom sheets, click on the right of the menu. button at the bottom 90

91 Custom Worksheets 7.1 Names This feature allows you to create a named range or a named constant/formula to use them in other formulas. By using 'Names', you can make your formulas much easier to understand and maintain, and more importantly, make them dynamic. Defining a Range Name 1. On the custom sheet, select the cell(s) you want to define with a Name 2. Right-click and select 'Names > Define' 3. A form will appear with two fields: a. Refers to: This defaults to the cell address that is currently selected and that the Name is being applied to. This can be updated to a different cell address if required, or alternatively edited to be formula (e.g. to build dynamic range names) or hardcoded with value. b. Range Name: This is the actual Name applied to it. It must have no spaces in the text and not already exist. 4. Once completed, click [OK]. This will apply it as a 'Local' Name in the active worksheet. Editing a Range Name 1. On the custom sheet, right-click and select 'Names > Edit' 2. A form will appear listing all the Names located on the active worksheet. 3. You can select an individual Name and either: a. Click [Delete] to remove it from the worksheet. Any formulae referencing it will then become invalid and will need to be updated. b. Edit the 'Refers to' details to change where the Name is pointing to or its formula/value. 91

92 Custom Worksheets Using Names The Names that are created by this function are 'Local'; meaning that it is available by default only on the sheet where it is defined, whereas 'Global' Names are available to the whole workbook. This means that when using your custom Names in user-inserted formulae: If the formula is on the same worksheet where the Name is located, you can just type in the name in the formula (e.g. =TotalNLA) If the formula is on a different worksheet where the Name is located, you must include the sheet name (within single quotes if the sheet name has spaces) with an exclamation point (!) before the Name (e.g. ='Imported Tenancy Sheet'!TotalNLA) Please Note: Unlike Excel, where it automatically resolves a cell address to a Name (if it has one) when you are editing a formula, IA will not behave like this. You will need to manually type in the Name, whether it be a custom or standard one, in a formula to use it. 7.2 Exporting Data to the Enterprise Database When exporting to the Enterprise Database, by default, only data on standard worksheets is exported. If there is any data on your custom worksheets that you want exported to the Enterprise Database for consolidated analysis, you can use this feature to a define single-cell that you wish to include in the export process. Creating a Custom Database Export Range 1. On the custom sheet, select the single cell you want to export to the Enterprise Database. 2. Right-click and select 'Custom Data Export > Define' 3. A form will appear with four fields: a. Export to: Select 'Database' option b. Description: A unique description for the data you want to export. You cannot use the same 'Description' more than once in a file. c. Data Type: The format of the data selected. It can either be a Date, Number, Percentage (must contain a '%' sign) or Text. d. Refers to: This defaults to the cell address that is currently selected but can be updated to a different cell address if required. 4. Once completed, click [OK]. This will flag the cell so its value is included in the export process. 92


93 Custom Worksheets Validation Checks on File Save Upon attempting to save a file, all custom export ranges will be validated for their data type. If it finds that there is a conflict with the Data Type selected by the user and the actual data type of the cell, a warning will appear. Editing a Custom Database Export Range 1. On the custom sheet, right-click and select 'Custom Data Export > Edit' 2. A form will appear listing all the Custom Data Export cells on the active worksheet. 3. If you select one that is used for exporting to the Database, you can either: a. Click [Delete] to remove it from the worksheet and stop the data from being exported to the database (any existing data in the database will not be affected) b. Edit the 'Description', 'Data Type' or 'Refers to' details. Exporting the Data The data on the custom sheet that has been defined using the above steps, will only be exported to the Enterprise Database when the IA file itself is being exported. Validation Checks on File Export Upon attempting to export a file to the database, all custom export ranges will be validated. If data has already been exported to the database that has the same 'Description' but different 'Data Type', a warning will appear during the export process. 93

94 Custom Worksheets Accessing Exported Data When the file is exported to the Enterprise Database, any Custom Database Export Ranges that have been defined on custom worksheets will automatically be exported as well, updating the following tables and fields in the Enterprise Database: Table Field Description Custom DataExportRange RangeName A unique range name given to the cell RangeDescription The description entered by the user DataType The data type entered by the user CustomDataExportRangeID The ID of the CustomDataExportRange record that this child record belongs to RangeValue The cell value CashFlow ID The ID of the Cash Flow record that this child record belongs to SheetName The name of the custom sheet that the value existed on Custom DataExportRangeValue 94
95 Part VIII
. Once a template is created, the user can save, edit and manage the result as an ordinary ARGUS EstateMaster IA file in a centralised location for other users to access.")
, where each may have a different format or base assumptions. 8.")
96 Application Templates 8 Application Templates Templates are a 'sample' IA file that already have some inputs/preferences in place, which can be later adapted by the user (that is added/completed, removed or changed). Once a template is created, the user can save, edit and manage the result as an ordinary ARGUS EstateMaster IA file in a centralised location for other users to access. IA templates enable the ability to bypass the initial setup and configuration time necessary to create standardised IA files for various uses and objectives. For example, templates can be created for different 'types' of projects (i.e. residential, commercial, retail, etc), where each may have a different format or base assumptions. 8.1 Selecting a Template Folder The first step that should be completed before creating any templates, is defining where they should be stored on your local machine or network. This is set in the 'Template Folder Path' Preference. By default when the application is run for the first time, this folder path will be set as <directory where IA is installed>/templates. This may be sufficient for single standalone users, however for multi-user environments it is highly recommended that it be changed to a network location that all necessary users have access to. To change the location: 1. Click the 'Browse' button. 2. Select a new folder when prompted, and press 'OK' to confirm. 3. A message will appear alerting the user that the change has occurred and any templates that were stored in the original folder will need to be manually re-saved as templates in the new 96


 c. Inserting custom worksheets (custom calculations and/or reports) 3.")
97 Application Templates folder. 8.2 Creating a Template A Template is just a normal IA file that is stored in a centralised location that can be shared and used for starting new projects. To create a template: 1. Start IA - a template can be created from scratch, or you can open an existing file to create a template from it. 2. Make the necessary adjustments to the file to start building up your template, this can include, but not limited to: a. Setting preferences (taxation format, currency, calculation options, etc) b. Entering inputs (base escalation rates, discount rates, chart of accounts, etc) c. Inserting custom worksheets (custom calculations and/or reports) 3. Once you have completed setting up your template, in the Ribbon menu, click on File > Templates > Save as Template 4. A dialog will appear, prompting you to name the template and indicate if the template should be set as a 'default' for all new files. 97


98 Application Templates 5. Once you click 'Save', the file will be saved in the designated Template Folder and you will be asked whether you wish to start a new file based on that template. a. If 'Yes', the current template file will close, and a new file will be started, based on the newly created template. b. If 'No', the current template file will close. 8.3 Using a Template There are 2 ways of using a template to start a new file: 1. Using the 'New File from Template' function, or 2. Setting a Template as a 'default' so it is used every time the application is started or File-New is clicked. Manually Starting a New File from Template 1. In the Ribbon menu, click on File > Templates > New File from Template (Note: If this button is disabled, it means there are no templates saved in the Template Folder). 2. In the dialog that appears, it will display: a. The list of templates that have been created in the designated Template Folder b. When they were created and last modified, and by whom c. Which template (if any) is marked as the 'default' d. The status of the templates (they physically exist in the Template Folder) 98

99 Application Templates Select the template you wish to use, and click 'Open'. 3. A new file will then be started, based on the selected template. Setting and Using Default Templates Being able to use Default Templates is a two-step process: 1. Setting a specific template as a 'Default' either when you are creating a new template, or editing an existing template in the 'Manage Templates' form. 2. Enabling the 'Use Default Templates' setting in the Preference. Once these step are completed, the template that is designated as the 'default' will be used when: 1. Each time the IA application is started. 2. Each time File > New is pressed in the Ribbon menu 8.4 Managing Templates The Manage Templates function allows the user to make certain changes to their application templates, such as: Toggling which template is set as the 'default' Deleting templates permanently Edit a template file 'Repairing' and invalid template (e.g. a template that has moved from the Template Folder or has been deleted) To load the Manage Templates function, in the Ribbon menu, click on File > Templates > Manage Templates (Note: If this button is disabled, it means there are no templates saved in the Template Folder). 99


![2. Click on the [Default] button. A message will appear. 3.](/docs-images/89/99830304/images/100-2.jpg "If you click 'Yes', it will check to see if any other template")

100 Application Templates The following dialog will then appear: Setting a Default Template To set a template as a default: 1. Select the desired template from the 'Manage Templates' form - it must be a valid template with a green tick in the 'Status' 2. Click on the [Default] button. A message will appear. 3. If you click 'Yes', it will check to see if any other template is set as the default and remove it from that, before setting your selected template as the default, and changing the 'Status' to a 100


101 Application Templates green tick. Important Note: Even though this process marks which template is the 'default', the 'Use Default Templates' setting in the Preference still needs to be enabled to for it to be implemented Editing a Template To set a template as a default: 1. Select the desired template from the 'Manage Templates' form - it must be a valid template with a green tick in the 'Status'. 2. Click on the [Edit] button. The template will then open in 'Edit' mode, and a floating dialog appears with the template name, the 'Set as Default' checkbox and a 'Save' and 'Close' button. 3. While the template is in 'Edit' mode, you can make all the changes to the file just like any ordinary file, except: a. You cannot switch to another file window b. Use the standard 'File' menu to start a new file, open an existing file, save the file or close the file. 4. Once your edits are complete, if you wish to save the changes, click 'Save' on the floating dialog. If the template name is not changed, it will overwrite the existing template, otherwise a new template will be created with the new name, and the original template will be retained Deleting a Template To set a template as a default: 1. Select the desired template from the 'Manage Templates' form - it must be a valid template with a green tick in the 'Status'.\ 101
![Application Templates 2. Click on the [Delete] button. A message will appear. 3. If you click 'Yes', it will physically delete the file from the template folder.](/docs-images/89/99830304/images/102-0.jpg "It will however remain in the list and can be displayed when 'Show Deleted' is ticked; it will have a a red cross in the 'Status' field to indicate it has been deleted, and the 'Last Modified By'")

102 Application Templates 2. Click on the [Delete] button. A message will appear. 3. If you click 'Yes', it will physically delete the file from the template folder. It will however remain in the list and can be displayed when 'Show Deleted' is ticked; it will have a a red cross in the 'Status' field to indicate it has been deleted, and the 'Last Modified By' field will indicate who deleted the file, and when. 4. Once a template has been deleted using this method, the only option available to it in the 'Manage Templates function is to remove it from the list permanently or select another file for it, both via the 'Repair' function. Important Note: Do not delete templates directly from the Template Folder via Windows Explorer - always use the 'Manage Templates' function to do so. If a template has been moved/deleted from the Template Folder via Windows Explorer, it will appear in the list marked with a warning icon in the 'Status' and it will need to be 'repaired' to either remove it from the list permanently or select another file for it Repairing Invalid Templates An 'invalid' template is: A template that has been deleted using the 'Delete' function in the Manage Templates form (these will appear when the 'Show Deleted' option is ticked, or A template that was originally created, but can no longer be found by the IA application. This could have been caused by the template file being manually moved or deleted by a user via Windows Explorer. 102
![Application Templates When an 'invalid' template is selected in the 'Manage Templates' form, the [Repair] button will be enabled.](/docs-images/89/99830304/images/103-1.jpg "if this is clicked, the following options will be available for that template: Remove File: Permanently remove the template details from the 'Manage Templates' listing.")
103 Application Templates When an 'invalid' template is selected in the 'Manage Templates' form, the [Repair] button will be enabled.if this is clicked, the following options will be available for that template: Remove File: Permanently remove the template details from the 'Manage Templates' listing. Select New File: Browse for another IA file to act as the selected template. If the file chosen has a different name than the invalid template being 'repaired', then it will be automatically renamed to match the original template name. 103
104 Part IX
, or you can create a formula in")
105 Integration with Microsoft Excel and Word 9 Integration with Microsoft Excel and Word 9.1 Linking to Excel Files Just like in Excel, you can use this feature to either create a formula in IA that is referencing an external Excel file (an 'Incoming' link), or you can create a formula in an external Excel file that is referencing the IA file (an 'Outgoing' link). Creating an Excel Link 1. Click on the [Excel] button in the Office Links menu. 2. A dialog will appear. Click on the [Add New Link] button. Please Note: Only 1 IA window (i.e file) can be open when loading an external Excel file. If there are multiple IA windows open in the application, it will prompt you to close down the other windows before trying to add a new link. 105

![Select the file and press [Open]. 4.](/docs-images/89/99830304/images/106-1.jpg "The IA application window will re-adjust to show the ARGUS EstateMaster IA file and")

106 Integration with Microsoft Excel and Word 3. Browse to the Excel file you want to open and create links with. Select the file and press [Open]. 4. The IA application window will re-adjust to show the ARGUS EstateMaster IA file and Excel file as individual cascading windows. 5. While these windows are displayed, you can write formulae in either one that reference the other, just by selecting a cell, starting to write a formula, and then selecting the other file to select a cell/range to refer to in that formula. 106
 on the top right of the window. 7.")

107 Integration with Microsoft Excel and Word 6. When you are completed linking your files, you will need to close the Excel file. This can be done by clicking on the Close button (red X) on the top right of the window. 7. If any changes were made to the Excel file, it will ask you if you want to save these changes before closing the file. Please Note: If you save the file, some features that are not completely supported by this spreadsheet interface may be lost (including, but not limited to, items such as Form/ActiveX Controls, Pivot Charts, Cell Comments, Cell Gradients, Excel 2007-style Conditional Format options, Excel 2007-style Tables and Structured References, OLE objects (Camera, Embedded Documents, etc) and Shape fill effects and shadows). 8. At any time you can click on the [Excel] button in the Office Links menu to reload the dialog where you can: View a list of all files linking to the IA file, where they are located and whether they have Incoming, Outgoing or multi-directional links. Click [Break Link], to remove the selected Excel file from being linked to the ARGUS EstateMaster IA files. After the file is saved and re-opened, any formulas in the ARGUS EstateMaster IA file that were referencing this Excel file will be: o On Standard Worksheets: Loaded as its last known calculated value (no formula). This will allow the model to continue calculating without issues. o On Custom Worksheets: Converted to text, by adding an apostrophe before the '=' in the formula. This will allow the user to check and amend the formula where necessary. Click [Change Source], to change the location of the selected Excel file. This will prompt you to browse to another file, and the program will search for all formulae where the old Excel file was referenced, and replace it with the name of the newly selected Excel file. During such process, if any of the formulae becomes invalid (due to worksheet or range name that existed in the old Excel file, but not in the new one), there following will occur to such formulae: o On Standard Worksheets: Converted to its last known calculated value (no formula). This will allow the model to continue calculating without issues. o On Custom Worksheets: Converted to text, by adding an apostrophe before the '=' in the formula. This will allow the user to check and amend the formula where necessary. In addition, a warning will appear, listing the worksheets where such invalid formulae were found after the 'Change Source' process was completed, and cell comments will be added to the actual cells where the invalid formulae were processed. Exam ple show ing a red cell com m ent w here an invalid form ula w as created as a result of a 'Change Source' 107
![Integration with Microsoft Excel and Word Click [Open File] to open the selected Excel file again to change/add links.](/docs-images/89/99830304/images/108-0.jpg "Click [Refresh Values] to momentarily open the selected Excel file to refresh the results. Click [Add New Link] to add a link to another Excel file. 9.")
, a warning will appear in the Status bar if the program has detected")
108 Integration with Microsoft Excel and Word Click [Open File] to open the selected Excel file again to change/add links. Click [Refresh Values] to momentarily open the selected Excel file to refresh the results. Click [Add New Link] to add a link to another Excel file. 9. If there are an external Excel files that have Incoming links (i.e. there is a formula in the IA file that is referencing the Excel file), a warning will appear in the Status bar if the program has detected that the Excel file has been modified since the last refresh. Clicking this warning, will momentarily open the Excel file(s) to refresh the results. Renaming or Moving IA Files If you create a formula in an external Excel file that is referencing the IA file (i.e. an 'Outgoing' link), the formula will contain the full path and file name of that IA file. Therefore if the IA file is renamed and/or moved, either manually in Windows Explorer, or during a Save-As process, to maintain the integrity of any formulae in the external Excel file, the following will occur: 1. During File Open: No warning will be given to the user, as Outgoing links are not critical to the opening of the IA file. 2. During Office Links > Excel > 'Refresh Values' or 'Open File': If it has detected that the IA file has been renamed/moved (most likely via Windows Explorer) since the 'Outgoing' link was made to an Excel file, the user will be asked whether they wish to update the linked Excel files so any formulae now refer to the new one, or to break the link. 108
109 Integration with Microsoft Excel and Word 3. During File Save: As soon as the 'Save As' button is clicked, the user will be warned that the IA file has 'Outgoing' links and if they continue with the 'Save As' and they change the file name and/or path, they will be prompted to either update the formulae in the linked Excel file(s) or break the link. Using Square Brackets in File Names and Folders Formula links reserve the use of square brackets [ ] in its syntax to enclose the source file, for example =SUM([Budget.xls]Annual!C10:C25). Therefore you cannot use these characters in the path to that source file, or in the file name itself. This applies to the Excel files used in an 'Incoming Link' to create a formula in IA and also in IA files used in an 'Outgoing Link' to create a formula in an Excel file. Important Notes: If a user opens an IA file that already had an 'Incoming' link to an Excel file that contained [ and/or ] in its file name or path (applies to previous versions of ARGUS EstateMaster IA), then when it is next opened only values will be loaded into the input cells, not formulae. If an IA file contains [ and/or ] in its file name or path, then the user will not be able to create any Excel Links at all. If an Excel file contains [ and/or ] in its file name or path, then the user will not be able to create any links to it. If the user attempts to save an IA file with a file name or to a file path contains [ and/or ], they will not be able to. 109


110 Integration with Microsoft Excel and Word 9.2 Linking to Word Files This feature allows you to populate fields in a Word document with data from an IA file. This is done by selecting from a list of predefined IAoutputs and linking them to a Word document that contains the required Bookmarks. A Bookmark is a feature in Word that identifies a location or a selection of text that you name and identify for future reference. Creating Bookmarks in your Word Document The first thing that needs to be done is to set up the Word document you wish to link to, with the required Bookmarks. Refer to the following Bookmarks Directory to see what IA outputs are available and their corresponding Bookmark. 1. Open the document in Word. 2. Select a location, or highlight the text you wish to turn into a Bookmark. 3. Based on the IA output that you want to appear in this location, type in the name of the Bookmark that corresponds to that output. For example, if you want to populate the selected location/text with the output of the 'Street Address from the IA file, the name of EMDM_Street must be given to that Bookmark. When done, press [Add]. 110


111 Integration with Microsoft Excel and Word 4. If you wish to highlight the Bookmarks in a Word document so you can easily identify them, there is a setting in the Word Options, under the Advanced section called Show Bookmarks 5. When selected, it will identify Bookmarks in the document with square brackets. 6. Once the Bookmarks have been created in the document, save and close the file. Setting up a Link to the Word Document 1. Click on the [Word] button in the Office Links menu. 2. A dialog will appear. Click on the [Add New Link] button. 111
![Integration with Microsoft Excel and Word 3. Browse to the Word file (*.docx, *.docm, *.dotx and *.dotm) you want to open and create links with. Select the file and press [Open]. 4.](/docs-images/89/99830304/images/112-1.jpg "A new dialog will appear.")
112 Integration with Microsoft Excel and Word 3. Browse to the Word file (*.docx, *.docm, *.dotx and *.dotm) you want to open and create links with. Select the file and press [Open]. 4. A new dialog will appear. It will list all the IA outputs that can be linked to a Word document, what section they belong to in the IA file, and the related Bookmark name that must be inserted into that Word document for the link to be created. The Status will indicate if that Bookmark exists in that Word document already or not. ü ), you can select so the Word file is updated with that ARGUS EstateMaster IA output. By default, when a new Word document is linked to an ARGUS EstateMaster IA file, all Bookmarks that exist in such document will be automatically selected when this dialog loads. If it does exist (green tick û ), but you do want to link to it, you will have to close the dialog and open the document in Word and add the bookmarks to that file before you can create the link. If it doesn t exist (red cross 112
![Integration with Microsoft Excel and Word 5. Once you have selected the outputs you want to link, click [Save Links]. It will prompt you to refresh the Word document at that time. 6.](/docs-images/89/99830304/images/113-0.jpg "If you click [Yes], it will programmatically update the bookmarks in that Word document with the results of the selected outputs. 7. If you open the document in Word, you can see the end result. 8.")
![At any time you can click on the [Word] button in the Office Links menu to reload the dialog where you can: View a list of all files linking to the IA file, where they are located and the number of](/docs-images/89/99830304/images/113-1.jpg "outputs they are linked to. Click [Break Link], to remove the selected Word file from being linked to the ARGUS EstateMaster IA files.")
113 Integration with Microsoft Excel and Word 5. Once you have selected the outputs you want to link, click [Save Links]. It will prompt you to refresh the Word document at that time. 6. If you click [Yes], it will programmatically update the bookmarks in that Word document with the results of the selected outputs. 7. If you open the document in Word, you can see the end result. 8. At any time you can click on the [Word] button in the Office Links menu to reload the dialog where you can: View a list of all files linking to the IA file, where they are located and the number of outputs they are linked to. Click [Break Link], to remove the selected Word file from being linked to the ARGUS EstateMaster IA files. Click [Refresh Values] to momentarily refresh the Bookmarks in the selected Word file with update values. Click [Edit Links] to change the Bookmarks being linked to in the selected Word file. Click [Add New Link] to add a link to another Word file. Select an option to prompt the user to refresh Word links when saving a file to ensure that the Word document always has the latest results. 113
114 Integration with Microsoft Excel and Word Word Bookmarks Directory This is a list of the outputs from IA, and their relative Bookmark name, that can be used to populate Word documents. Output Description Range / Bookmark Introduction Property Photo Project Number Project Property Property Owner Ty pe Street Address City /Suburb State/County Zip/Post Code Country EMIA_PropPhoto EMIA_ProjNo EMIA_Proj EMIA_Prop EMIA_Powner EMIA_Ty pe EMIA_Street EMIA_City EMIA_State EMIA_PCode EMIA_Ctry Valuation Summary Adopted Valuation Adopted Valuation (Words) Interest Valued Valuation Date Title Details Purpose of Valuation Instructions Prepared By Prepared For Status EMIA_ValAdopt EMIA_ValAdoptWords EMIA_IntValued EMIA_ValDate EMIA_TitleDet EMIA_ValPurp EMIA_ValInst EMIA_PrepBy EMIA_PrepFor EMIA_Status Tenant Analysis Net Lettable Area Car Spaces Weighted Lease Duration - By Area Weighted Lease Duration - By Income Vacant Area Number of Tenancies (exc Car Parking) Number of Tenants (exc Car Parking) Gross Rental Range - 1st Top Use by Area Gross Rental Range 2nd Top Use by Area Gross Rental Range Passing 1st Top Use Gross Rental Range Passing 2nd Top Use Gross Rental Range Passing Other Uses Gross Rental Range Market 1st Top Use Gross Rental Range Market 2nd Top Use Gross Rental Range Market Other Uses Current Turnov er Rent (p.a) Current Ef f ectiv e Rent (p.a) Current Gross Passing Income (p.a) Current Gross Income Fully Leased (p.a) Current Gross Market Income (p.a) Current Net Operating Income (p.a) EMIA_NLA EMIA_Cars EMIA_WLD_Area EMIA_WLD_Inc EMIA_VacArea EMIA_NumTenancies EMIA_NumTenants EMIA_TopUse1 EMIA_TopUse2 EMIA_RgePassing1 EMIA_RgePassing2 EMIA_RgePassingOth EMIA_RgeMarket1 EMIA_RgeMarket2 EMIA_RgeMarketOth EMIA_TurnRent EMIA_Ef f Rent EMIA_GPassInc EMIA_GPassIncFL EMIA_GMrktInc EMIA_NOI Outgoings and Capex Total Outgoings Total Outgoing per NLA Total Recov erables Total Non-Recov erables Outgoings in f irst 12 months Recov erables in f irst 12 months Non-Recov erables in f irst 12 months Capital Expenditure Total Capital Expenditure per NLA EMIA_TotOG EMIA_TotOGNLA EMIA_TotRecov EMIA_TotNonRecov EMIA_Y r1og EMIA_Y r1recov EMIA_Y r1nonrecov EMIA_Capex EMIA_CapexNLA Capitalisation Valuation Net Income f or Capitalisation - Passing Income Net Income f or Capitalisation - Current Income Fully Leased Net Income f or Capitalisation - Net Market Net Income f or Capitalisation - Rev ersionary Market Post Capitalisation Adjustments - Passing Income Post Capitalisation Adjustments - Current Income Fully Leased EMIA_NetIncPassInc EMIA_NetIncPassIncFL EMIA_NetIncMrktInc EMIA_NetIncMrktRev EMIA_AdjustPassInc EMIA_AdjustPassIncFL 114
115 Integration with Microsoft Excel and Word Post Capitalisation Adjustments - Net Market Post Capitalisation Adjustments - Rev ersionary Market Av erage Core Cap Rate - Passing Income Av erage Core Cap Rate - Current Income Fully Leased Av erage Core Cap Rate - Net Market Av erage Core Cap Rate - Rev ersionary Market Cap Rate - Other Income Cap Value - Passing Income Cap Value - Current Income Fully Leased Cap Value - Net Market Cap Value - Rev ersionary Market Adopted Capitalisation - Method Adopted Capitalisation Net Income f or Capitalisation Adopted Capitalisation Value (inc Adjustments) Adopted Capitalisation Value (exc Adjustments) Adopted Capitalisation Av erage Core Cap Rate Initial Y ield - on Cap Value Initial Y ield (Fully Leased) - on Cap Value Rev ersionary Y ield - on Cap Value Equiv alent Y ield - on Cap Value Initial Y ield - on DCF Value Initial Y ield (Fully Leased) - on DCF Value Rev ersionary Y ield - on DCF Value Equiv alent Y ield - on DCF Value Initial Y ield - on Adopted Value Initial Y ield (Fully Leased) - on Adopted Value Rev ersionary Y ield - on Adopted Value Equiv alent Y ield - on Adopted Value Sensitiv ity Lo Cap Rate Variation Rate Sensitiv ity Mid Cap Rate Variation Rate Sensitiv ity Hi Cap Rate Variation Rate Sensitiv ity Lo Cap Rate Variation Cap Value Sensitiv ity Mid Cap Rate Variation Cap Value Sensitiv ity Hi Cap Rate Variation Cap Value EMIA_AdjustMrktInc EMIA_AdjustMrktRev EMIA_CapRatePassInc EMIA_CapRatePassIncFL EMIA_CapRateMrktInc EMIA_CapRateMrktRev EMIA_CapRateOth EMIA_CapValPassInc EMIA_CapValPassIncFL EMIA_CapValMrktInc EMIA_CapValMrktRev EMIA_AdoptCapMethod EMIA_AdoptCapIncome EMIA_AdoptCapValue EMIA_AdoptCapValueExcAdj EMIA_AdoptCapRateCore EMIA_IniY ld_cap EMIA_IniY ldfl_cap EMIA_Rev Y ld_cap EMIA_EquY ld_cap EMIA_IniY ld_dcf EMIA_IniY ldfl_dcf EMIA_Rev Y ld_dcf EMIA_EquY ld_dcf EMIA_IniY ld_val EMIA_IniY ldfl_val EMIA_Rev Y ld_val EMIA_EquY ld_val EMIA_SensCapLo EMIA_SensCapMid EMIA_SensCapHi EMIA_SensCapValLo EMIA_SensCapValMid EMIA_SensCapValHi DCF Valuation Nominated Purchase Price Acquisition Date Acquisition Costs Prepaid Outgoings on Purchase Terminal Cap Value PV of Terminal Cap Value Terminal Cap Rate - Core Income Terminal Cap Rate - Other Income Disposal Date Selling Costs Reimbursement of Outgoings on Sale Property 's NPV Discount Rate IRR Sensitiv ity Lo Discount Rate Variation Rate Sensitiv ity Mid Discount Rate Variation Rate Sensitiv ity Hi Discount Rate Variation Rate Sensitiv ity Lo Terminal Cap Rate Variation Rate Sensitiv ity Mid Terminal Cap Rate Variation Rate Sensitiv ity Hi Terminal Cap Rate Variation Rate Sensitiv ity Lo Discount Lo Terminal Cap Rate Sensitiv ity Lo Discount Mid Terminal Cap Rate Sensitiv ity Lo Discount Hi Terminal Cap Rate Sensitiv ity Mid Discount Lo Terminal Cap Rate Sensitiv ity Mid Discount Mid Terminal Cap Rate Sensitiv ity Mid Discount Hi Terminal Cap Rate Sensitiv ity Hi Discount Lo Terminal Cap Rate Sensitiv ity Hi Discount Mid Terminal Cap Rate Sensitiv ity Hi Discount Hi Terminal Cap Rate EMIA_NomPrice EMIA_AcqDate EMIA_AcqCosts EMIA_PrepaidOG EMIA_TerminalVal EMIA_TerminalValPV EMIA_TermCap_Core EMIA_TermCap_Oth EMIA_SellDate EMIA_SellCosts EMIA_ReimbOG EMIA_NPV EMIA_DiscRate EMIA_IRR EMIA_SensDiscLo EMIA_SensDiscMid EMIA_SensDiscLHi EMIA_SensTermLo EMIA_SensTermMid EMIA_SensTermHi EMIA_SensLoDiscLoTerm EMIA_SensLoDiscMidTerm EMIA_SensLoDiscHiTerm EMIA_SensMidDiscLoTerm EMIA_SensMIdDiscMidTerm EMIA_SensMidDiscHiTerm EMIA_SensHiDiscLoTerm EMIA_SensHIDiscMidTerm EMIA_SensHiDiscHiTerm Returns on Funds Invested - Loan 1 Funds Inv ested (Cash Outlay ) Interest Charged Loan Fees Charged Total Prof it to Funder EMIA_L1_Funds EMIA_L1_Int EMIA_L1_Fees EMIA_L1_Prof 115
116 Integration with Microsoft Excel and Word Loan to Value Ratio IRR on Funds Inv ested Interest Cov erage Ratio Debt Serv ice Ratio EMIA_L1_LVR EMIA_L1_IRR EMIA_L1_ICR EMIA_L1_DSR Returns on Funds Invested - Loan 2 Funds Inv ested (Cash Outlay ) Interest Charged Loan Fees Charged Total Prof it to Funder Loan to Value Ratio IRR on Funds Inv ested Interest Cov erage Ratio Debt Serv ice Ratio EMIA_L2_Funds EMIA_L2_Int EMIA_L2_Fees EMIA_L2_Prof EMIA_L2_LVR EMIA_L2_IRR EMIA_L2_ICR EMIA_L2_DSR Returns on Funds Invested - Loan 3 Funds Inv ested (Cash Outlay ) Interest Charged Loan Fees Charged Total Prof it to Funder Loan to Value Ratio IRR on Funds Inv ested Interest Cov erage Ratio Debt Serv ice Ratio EMIA_L3_Funds EMIA_L3_Int EMIA_L3_Fees EMIA_L3_Prof EMIA_L3_LVR EMIA_L3_IRR EMIA_L3_ICR EMIA_L3_DSR Returns on Funds Invested - Total Debt Interest Cov erage Ratio Debt Serv ice Ratio IRR on Funds Inv ested EMIA_Debt_ICR EMIA_Debt_DSR EMIA_Debt_IRR Returns on Funds Invested - Managed Funds Management Fee Rate Total Management Fees Total Other Fees Target Distribution Rate Total Distributions Interest Rate on Working Capital Total Interest on Working Capital IRR on Inv estor's Cash Flow NPV Discount Rate EMIA_MgmtFeeRate EMIA_TotMgmtFees EMIA_TotOthFees EMIA_DistRate EMIA_TotDist EMIA_IntWorkCapRte EMIA_TotIntWorkCap EMIA_IRR_Inv est EMIA_NPV_Inv est EMIA_DiscRate_Inv est 116

 1. If the data exists on a standard IA worksheet, you will need to first link it on a custom worksheet, including any formatting you want to apply to it.")
117 Integration with Microsoft Excel and Word Creating Custom Bookmarks If there is data in the IA file that is not listed in the standard Word Bookmarks Directory, and you wish to have it linked to a Word Document, you can use the Custom Data Export feature to define this data and have it selectable in a 'Custom' Word Bookmarks Directory. This makes the amount of IA file data being able to be linked to a Word Document almost endless. Data (Values, Tables, Reports, etc) 1. If the data exists on a standard IA worksheet, you will need to first link it on a custom worksheet, including any formatting you want to apply to it. If the data does not exist anywhere yet (i.e. a custom calculaiton), prepare it on a custom worksheet. 2. Once the formatted data is on a custom worksheet, use the Custom Data Export feature to define the cell or range of cells that you wish to assign a custom bookmark to, and give it a Description. 3. The Bookmark that will be assigned to it will be EM_<Product Initials>_C_<Description with underscores replacing spaces> 117

, then")
118 Integration with Microsoft Excel and Word Dynamic Table Data In-built into the functionality of exporting tabular (mult-cell) data to a linked Word Document, is a feature where any blank rows or columns in a defined range of cells is automatically hidden before the table is exported to Word, and then unhidden back to its original state after the process is completed. This allows the user to create tables that dynamically expand/contract based on the data they have calculated/entered in them. The feature works by searching the cell contents of each cell for each row and column; if an entire row/column has no values in the cells (including formulas which may return an 'empty' value), then it is hidden from the final output that is exported to Word. Therefore, if you wish to intentionally have an empty row/column included in the export, just ensure that at least one cell in that row/column has any value in it - if you do not want this visible, then change the font colour to the same as the cell background. To take advantage of this feature, ensure that any formulas return an empty result (i.e. "") instead of a Zero value (i.e. "0") in all cells in the row/column if you want it hidden. Charts 1. If there are any Charts on a custom worksheet, these will automatically have the following Bookmark assigned to it: EM_<Product Initials>_C_<Chart Title with underscores replacing spaces and special characters removed>. 2. Since the program uses the Chart Title for the Bookmark Name, it is important to ensure that Charts on custom worksheets are all given unique Titles, and are not left blank. Linking to a Custom Bookmark The custom Bookmarks created will be selectable on the 'Custom' tab, when editing links for a particular linked Word Document. When exporting the data to the Word Document during a 'refresh': Single-cell Data will data will be exported as a text value. Multi-cell Data will be exported as an image. Charts will be exported as an image. 118
119 Part X

120 Valuation and Investment Reporting 10 Valuation and Investment Reporting There are numerous valuation and investment reports that are generated from inputting data in the IA program, and all may be viewed and printed Executive Summary The Executive Summary displays all key information at a glance. It also includes functions for: Changing the Adopted Valuation figure; and Sensitivity Analysis for the Capitalisation and DCF approaches. 120
![Valuation and Investment Reporting Updating the Adopted Valuation Click the [Update Value] button to bring up the Adopted Value screen, where the Capitalisation and DCF](/docs-images/89/99830304/images/121-0.jpg "Valuations are displayed.")


121 Valuation and Investment Reporting Updating the Adopted Valuation Click the [Update Value] button to bring up the Adopted Value screen, where the Capitalisation and DCF Valuations are displayed. Choose one of the calculated valuations or enter your own adopted value (in the last input box) by selecting one of the buttons on the right, then click Apply. Values can also rounded to the selected number of significant figures chosen. This value will be then displayed as the 'adopted valuation' figure in this report. Running a Sensitivity Analysis In the DCF valuation summary, a sensitivity to the valuation value using the variables of discount rate and terminal capitalisation rate is available. If any values that affect the DCF valuation change then a red message will appear and the sensitivity analysis will need to be run again. Clicking the Run Sensitivity button will re-run the sensitivity analysis with the current model values. The Sensitivity Analysis for the Capitalisation summary is automatically calculated and updated. 121

122 Valuation and Investment Reporting Selecting the Capitalised Valuation Select from the drop-down list on the Cap Summary sheet, one of the four Capitalisation approaches to be displayed as the preferred calculation method for the Executive Summary report. Two Capitalised Values are then displayed: Capitalised Value Including Adjustments: This is the capitalised value of the relative net income, including the long term vacancy allowance and all adjustments such as Lease Up Allowances, Capital Expenditure, the Present Value for Bonus/Shortfall rents (for Reversionary Market value only) and any manual adjustments entered by the user. Capitalised Value Excluding Adjustments: This is the capitalised value of the relative net income and including the long term vacancy allowance. No adjustments are considered. Yields Initial Yield: Current passing net income as a percentage of the value/price. Initial Yield (Fully Leased): Current passing net income, with any vacancies assumed to be fully leased out at market rent, as a percentage of the value/price. Reversionary Yield: Current market net income (what the property would receive if all rents were current market rents), as a percentage of the value/price. Equivalent Yield: The weighted average rate of return on stepped incomes, calculated by taking into consideration the present value of bonus/shortfall rents at the next market review. All yields are also based on 3 different values/prices that exist in the mode: The selected Capitalised Value, including all adjustments. The Nominated Purchase Price on the DCF report. The Adopted Valuation on the Executive Summary report. Annual Allowances This table summaries estimated extraordinary costs pertaining to capital expenditure and vacancy. Capital expenditure is summarised by year from the Capex sheet. Its exact timing can be found in the DCF sheet. Letting Up allowances are the costs of lost revenue due to vacancy summarised by year. They comprise of: The market rental value of the leasing up period nominated in the Tenants sheet, assuming that all leases run run for their full term including any option periods. 122

123 Valuation and Investment Reporting These vacancy costs, do not exist as cash flows in the DCF sheet explicitly as they are not actual cash flows but estimates of notional lost rents. If a more precise indication of their impact on the performance of the property is required it can be deduced from the depressed cash flows following the end of the current leases as found in the DCF sheet. These are computed from probabilityweighted timings of the forecast transitions from the initial leases to anticipated reletting at market rents, based on option periods and option exercise probabilities as well as the lease up periods. The associated Reletting Costs (Letting Fees and Incentives) that follow the period of leasing up Capitalisation Summary The Capitalisation Summary Calculates the total capital value of the property using the four most commonly used methods: Passing Income: Passing Income is calculated by taking the income of the first month of income within 12 months of the start of the model and multiplying it by the appropriate payment frequency. Passing Income is based on all leases that have lease terms that start in the first year. It is important that lease term dates be entered for all spaces that are not expected to be permanently vacant. Current (Net) Income Fully Leased: Assumes passing income plus all vacancies leased at market rent; and the larger of current recoverables or market recoverables for each tenant. Current (Net) Income Fully leased assumes passing income plus all vacancies leased at Market Rent; and current recoverables for each tenant or adjusted market recoverables for each vacancy. Market Income: Net Market valuations have assumed the property is 100% occupied at Market Rent and all recoverables are recovered at each tenant's proportion of the total NLA. Reversionary Market Income: The Reversionary Market value is identical to the Net Market calculation except for the adjustment of the present value of rental bonus & shortfalls. Definition of Outputs Base Rent Base Rent includes all rents (whether it is Gross or Net) entered in either the 'Base Rent' (or Turnover rent if it is greater than the base rent for those particular tenants) or 'Market Rent' columns of the Tenants sheet, depending on the valuation method. Recoverables Recoverable Outgoings for Market Income and Reversionary Market Income are based on proportional areas. This ensures that the total of recoverable outgoings listed in the Outgoings sheet is exactly represented in the Capitalisation Summary for these approaches. Car parking is not based on area and so does not attract an estimate of recoverable outgoings for these situations. Recoverable Outgoings under the Current Income Fully Leased situation are forced to equal the total recoverables shown in the outgoings sheet. This is done by allocating the residue to the retailing use. 123
124 Valuation and Investment Reporting Outgoings These are the Outgoings for the property, separated into those that have been allocated as 'Recoverable' from the tenants (but may not be equal to what is actually recovered) and those that have been allocated as 'Non-Recoverable' (or payable by the owner). Income Not Capitalised This is the gross income that relates to a Use that has a zero Current Capitalisation rate applied to it. Such income is therefore excluded from the capitalisation calculations. Long Term Vacancy Allowance This is a percentage of Gross Rent (Base + Recoverables) and it is deducted from the Gross Income in the Capitalisation Summary report (except for capitalisation based on Passing Income). It is based on the percentage input entered in the Capitalisation section of the Setup sheet. It is only applied to income allocated to Uses that are being capitalised (i.e. excludes Uses where their cap rate is zero). Weighted Average Cap Rate The weighted average capitalisation rate (WACR) of all the tenants, weighted by the gross income of each use. This single figure is shown as each Use may have a different Current Capitalisation Rate (as displayed at the top of the report). The formula is: Gross Rent to be capitalised (Base Rent + Recoverables - Income Not Capitalised) divided by The total sum of: Gross Rent for each Use multiplied by Inverse of the Current Cap Rate for that Use Core Income This is the main income entered in the 'Tenants' sheet (excludes 'Other Income' entered on the 'Setup' sheet) and is capitalised at the Weighted Average Capitalisation Rate (WACR). Other Income This is the secondary income capitalised by its own special Current Capitalisation Rate nominated on the Setup sheet. Lease Up Allowance Adjustments A defined number of months (from the Date of First Period) of Leasing Up Allowances and Reletting Costs (Fees and Incentives) is deducted from the capitalised values (except for capitalisation based on Passing Income). Capital Expenditure Adjustments A defined number of months (from the Date of First Period) of Capital Expenditure is deducted from the capitalised values. It may also be discounted to a present value as nominated on the Setup sheet. Bonus/Overage Rents Bonus/Overage is the portion of rental income received (exc. Other Income) over and above the Market Rent. Rental Bonuses only affect the Reversionary Market value and are discounted to a present value using a separate discount rate as nominated on the Setup sheet. Refer to the DCF report for a monthly/yearly summary of the Bonus Rents (before being discounted). Rental Shortfalls Rental Shortfalls is the portion of rental income received (exc. Other Income) below the Market Rent. Rental Shortfalls only affect the Reversionary Market value and are discounted to a present value using a separate discount rate as nominated on the Setup sheet. Refer to the DCF report for a monthly/yearly summary of the Shortfall Rents (before being discounted) 124
 to be made to the net income that is being capitalised, these can be entered for each valuation method. 2.")

125 Valuation and Investment Reporting Manual Adjustments There are 2 types of manual adjustments that can be made on the Capitalisation Summary: 1. Before Income Capitalisation: If there are any adjustments (positive or negative) to be made to the net income that is being capitalised, these can be entered for each valuation method. 2. After Income Capitalisation: If there are any adjustments (positive or negative) to be made to the capitalised value, up to 10 different ones can be entered for each valuation method. The number of manual adjustment rows for this purpose can be adjusted, just by using the [Add] and [Delete] buttons. Capital Value View Options There are 2 options for reporting the Capitalisation Values: 1. Report on Cap Summary: You may choose any or all valuation methods to be displayed in the report, just be selecting the checkboxes for each. 2. Report on Exec Summary: Select from the drop-down list on the Cap Summary sheet, one of the four Capitalisation approaches to be displayed as the preferred calculation method for the Executive Summary report. 125


![Cash Flow Detail Clicking the [View] button will load the 'View Options' for the DCF sheet, allowing the user to select which sections](/docs-images/89/99830304/images/126-2.jpg "should be collapsed (only show sub totals) or expanded (show all detail).")
126 Valuation and Investment Reporting 10.3 DCF The Discounted Cash Flow sheet: Displays the breakdown of the entire cash flow by month or by financial year for all the major income and expenditure items: Displays a running IRR, Running Yield and Sale Price at the end of each financial year. Allows you to nominate or calculate a purchase price for the property based on a Target IRR. Cash Flow Detail Clicking the [View] button will load the 'View Options' for the DCF sheet, allowing the user to select which sections should be collapsed (only show sub totals) or expanded (show all detail). When expanded, it will also display the 'Manual Input' row for the relevant section. This row allows the user to make manual adjustments to any of the cash flow sections (eg. adding their own rental income or leasing costs). 126
![Valuation and Investment Reporting Showing a Monthly or Yearly DCF Clicking the [Show by Month/Year] button will toggle between a Monthly and Yearly (Financial Year) view of the cash flow.](/docs-images/89/99830304/images/127-1.jpg "When in 'Yearly' mode, additional outputs will be displayed to the user (see below).")
![Displayed w hen in 'Yearly' m ode Calculate Purchase Price Either enter a Nominated Purchase Price on the Setup sheet or click the [Calculate Purchase Price] button and it will calculate the required](/docs-images/89/99830304/images/127-2.jpg "purchase price in order to achieve the desired IRR/XIRR (Discount Rate) specified.")
127 Valuation and Investment Reporting Showing a Monthly or Yearly DCF Clicking the [Show by Month/Year] button will toggle between a Monthly and Yearly (Financial Year) view of the cash flow. When in 'Yearly' mode, additional outputs will be displayed to the user (see below). Displayed w hen in 'Yearly' m ode Calculate Purchase Price Either enter a Nominated Purchase Price on the Setup sheet or click the [Calculate Purchase Price] button and it will calculate the required purchase price in order to achieve the desired IRR/XIRR (Discount Rate) specified. Manually enter a Purchase Price on the Run the 'Calculate Price' funtion to find Setup sheet w here Calculated IRR/XIRR = Discount Rate Definition of Outputs Base Rent (Calculated) This is the escalated Base Rent, which may include Turnover Rent, that is calculated for reference purposes. It is based on the Base Rent and Escalation Profile entered in the Current Base Rent section of the tenancy schedule. Market Rent (Calculated) This is the escalated Market Rent, that is calculated for reference purposes. It is based on the Market Rent and Escalation Profile entered in the Market Rent section of the tenancy schedule. Bonus/Shortfall Rents It displays where the Base Rent (Received) is above (Bonus) or below (Shortfall) the Market Rent (Calculated), up until the Initial Lease expires (Lease + Option, or Termination Date). Since it compares the actual rent received to the full potential Market Rent, it will be impacted by vacancies, rent-free periods, lease up periods and option probabilities. Base Rent (Received) This is the escalated Base Rent, which may include Turnover Rent, that the tenant is actually receiving. It may be affected by Vacancy, Rent-Free periods, Option periods, Option Probability, Leasing Up Period (on termination and during the lease replication phase), annual Rent Reviews and reversion to Market Rents. For periods where rent is displayed in grey italic font (confined to the 12 months after the Terminal Sale Date), this is where a lease up 127

128 Valuation and Investment Reporting vacancy is forecasted to occur, however for purposes of calculating the Terminal Sale Value, the tenancies are capitalised assuming they are fully let, and the cost of the lease up vacancy is deducted from the capitalised value, rather than being capitalised. A summary of the Lease Up Vacancies, is displayed further down the DCR report. Recoveries These are the outgoings that are recovered from the tenants, either on a lump sum basis, percentage basis or a percentage of the increase after the base year, as entered in the Recoverables section of the tenancy schedule. Gross Income Base Rent (Received) + Recoveries Other Income This is the recurring escalated income as entered in the Other Income section of the Setup sheet. Outgoings These are the escalated Outgoings as entered in the Outgoings schedule. Incentives These are the incentives that are paid for Initial Fitout / Lump Sum Incentives, Option Incentives and Reversion to Market Incentives Letting Fees These are the letting fees paid for the Initial Lease and Reletting to Market. Capital Expenditure These are the escalated capital expenditure costs as entered in the Capex sheet. Lease Up (Vacancies) These are any vacancies that are a result of a Lease Up period, either during the initial lease or during a Lease Replication. The next 12 months of these from the Disposal Date are deducted from the Terminal Sale Value. Long Term Vacancy Allowance This is the Vacancy Allowance, calculated as a percentage of Gross Income. It is based on the percentage input and start month entered in the DCF section of the Setup sheet. Net Cash Flow Before Interest Gross Income + Other Income and Tax Less Outgoings + Incentives + Letting Fees + Capex + Long Term Vacancy Allowance Total Investment Cash Flow This is the cash flow of the property that includes property purchase price, acquisition costs, all rental revenue and expenses,disposal costs, and terminal sales revenue. Calculated IRR/XIRR This is the Internal Rate Return of the Investment Cash Flow (before interest and tax) from the date of acquisition through to the period of the cash flow where the property is sold or disposed of. 128
129 Valuation and Investment Reporting Net Present Value This is the NPV of the Investment Cash Flow (before interest and tax) from the date of acquisition through to the period of the cash flow where the property is sold or disposed of. Total Purchase Price Displays the total purchase price for the property including stamp duty, outgoing adjustments and purchase costs. Terminal Sale Value By default, this is calculated by capitalising the Net Income (Gross Income + Other Income - Outgoings - Long Term Vacancy Allowance) of the proceeding 12 months using the weighted average of the Terminal Capitalisation Rates applied to each use, less any adjustments for Lease Up Vacancies, Incentives, Letting Fees and Capital Expenditure that are occurring in the proceeding 12 months. When determining the proceeding 12 months of rental income, Option Probabilities are not taken into consideration. Any Use where their Terminal Capitalisation Rate has been entered as zero is also ignored. In addition, the Terminal Sale Value can also be manually defined in the Sale section of the Setup sheet. Entering a value in this input will ignore the capitalisation of future income and use that value as the actual disposal/sale value. About the Terminal Value: Cash flow analysis is completed over a defined investment period. Property tends to appreciate over time and will have a substantial value at the end of any investment period. To accommodate this, an estimated sale price must be included at the end of the cash flow to reflect the value of the property to the owner at that time. A notional sale must conclude the cash flow even though the owner may not intend to actually sell the property at that time. Running Sale Value * The estimated Terminal Sale Value of the property if it was sold at the end of that financial year. PV of Sale Value * The present value of the annual 'Running Sale Value', discounted by the nominated discount rate. Running Yield * The quotient of the property's net income (Gross Income + Other Income - Outgoings - Long Term Vacancy Allowance) and the annual 'Running Sale Value'. If the first year does not start on the first month of the financial year, the yield will be lower than normal. Running IRR/XIRR * Running IRR/XIRR is calculated on a yearly basis (thus differing from the calculated monthly IRR/XIRR), assuming the property is sold on the last day of the year. * These results are only available w hen the cash flow view is in 'Yearly' mode. 129

130 Valuation and Investment Reporting 10.4 Investment Cash Flow Definition of Outputs for Debt Loans Drawdown The loan drawdowns automatically occur at the time of acquisition and are based on the LVR% input. Interest Charged This shows any interest that is charged on the loan, and is calculated based on the Loan Type and the Base + Margin Rates entered. Loan Fees Charged This shows any fees that are charged on the loan, including Line Fees and any other fees and costs inputted. Payments This shows any principal and/or interest payments made to the lender. Loan Balance This shows the current balance of the loan. LVR% This is the ratio of the loan principal to the purchase price at the month of acquisition. Lender Cash Flow This is the actual cash flow of the lender, including all drawdowns and payments. IRR/XIRR This is the Internal Rate Return on the lenders cash flow Interest Coverage Ratio This is the ratio of net operating income to interest expense and other loan fees. It is an indicator of how well the investment's internal income covers debt servicing obligations. In addition to a running ratio, a total weighted average ratio is also displayed. Debt Service Ratio This is the ratio of net operating income to loan repayments. It is an indicator of how well the investment's internal income covers debt repayment obligations. In addition to a running ratio, a total weighted average ratio is also displayed. 130

131 Valuation and Investment Reporting Definition of Outputs for Fund Management Interest Coverage Ratio This is the ratio of net operating income to interest expense and other loan fees. It is an indicator of how well the investment's internal income covers debt servicing obligations. In addition to a running ratio, a total weighted average ratio is also displayed. Debt Service Ratio This is the ratio of net operating income to loan repayments. It is an indicator of how well the investment's internal income covers debt repayment obligations. In addition to a running ratio, a total weighted average ratio is also displayed. Total LVR% This is the ratio of the current total loan principal to the: 1. The purchase price at the month of acquisition. 2. The estimated running capital value (after the acquisition date). Estimated running capitalised property value is based on the property NCF before interest and tax,(exc Capex) capitalised at the nominated capitalisation rate. Net Cash Flow After Debt Funding & Before Tax This is the cash flow of the property after taking into consideration the funds sourced from the debt lenders and the respective financing fees to fund the acquisition. It excludes the fees associated with fund management. Its related IRR/XIRR is also displayed. Cash Flow Available for Investors This displays the cash flow that is available to investors after fund management fees have been taken into account. Working Capital Balance This is the cash available for the funds manager. It should not be permitted to go negative, as it indicates that there are insufficient funds. Equalisation This is the monthly amount that is needed to bridge the gap between the raw distribution to investors and the revised distribution to investors. It represents the funds that are either required or excess in the current period if the revised distribution is to be met. Interest on Working Capital This is the interest income, or expense, for the working capital account from the previous period. 131

132 Valuation and Investment Reporting Investor's Cash Flow This is the actual contributions by and distributions to investors, following the target distribution policy. It uses the working capital fund to smooth the raw available distribution from operations. IRR/XIRR on Distribution to Investors This is the Internal Rate Return on the initial contribution and actual distributions following the distribution policy input as target distribution. NPV/XNPV This is the Net Present Value of the on the initial contribution and actual distributions following the distribution policy input as target distribution, at the specified discount rate. Showing a Monthly or Yearly Investment Cash Flow Clicking the [Show by Month/Year] button will toggle between a Monthly and Yearly (Financial Year) view of the cash flow. Toggling the Loan Facilities By selecting/unselecting the checkboxes for each loan,they can be hidden or shown Charts There are 2 Chart Reports available in IA: 1. Tenancy Charts: displaying tenant and use composition. 2. Outgoings Charts: displaying comparison of outgoing costs. These charts can either be printed, exported to Excel/PDF or copied to the clipboard to paste it in other documents. Tenancy Charts The Tenancy charts are generated by clicking on the [Charts] menu button on the 'Tenants' tab. Choose from the drop down boxes: Whether to graph the 'Income' pie charts using the Gross Passing Annual Income or the Gross Market Annual Income. Whether to group the 'Tenant' pie charts by 'Tenant ID', 'Tenant Name' or have no grouping (each row on the Tenant sheet is individually reported on the chart). 132

. 2.")
133 Valuation and Investment Reporting There are six (6) charts which display information on income, areas, lease expiries and escalations. 1. Two pie charts which show a breakdown of the top 5 tenants by Income and by Net Lettable Area (NLA). 2. Two pie charts which show a breakdown of the top 3 uses by Income and by Net Lettable Area (NLA). 133


134 Valuation and Investment Reporting 3. A column graph that displays the annual Lease Expiry Profile (of Initial Lease Expiries). The chart is on a financial year basis. 4. A column graph comparing the CPI, weighted average outgoings escalation rates and the weighted average tenant escalation rates. The weightings are all done on an income basis for tenants and costs basis for outgoings. The weighted average tenant escalation rates are based on the lease structure inputs and do not include rental revenue behaviour through the notional relet to market at the end of the initial lease. 134
![Valuation and Investment Reporting Outgoing Comparison Charts The Outgoings charts are generated by clicking on the [Charts] button on the 'Outgoings' tab.](/docs-images/89/99830304/images/135-0.jpg "The chart compares the actual outgoing costs against up to 2 industry benchmarks that can be entered by the user on the 'Outgoings' sheet.")
 located at the bottom of the Tenancy Charts screen.")
135 Valuation and Investment Reporting Outgoing Comparison Charts The Outgoings charts are generated by clicking on the [Charts] button on the 'Outgoings' tab. The chart compares the actual outgoing costs against up to 2 industry benchmarks that can be entered by the user on the 'Outgoings' sheet. If any benchmarks are not used (either left blank or hidden), then they will not be displayed on the chart. Chart Functions Printing To print the charts while viewing them, either click on the [Print...Chart] button to print the individual chart, or click on the [Tenancy Report] button (Tenancy Charts) located at the bottom of the Tenancy Charts screen. The 'Tenancy Report' is a compilation of all 6 Tenancy Charts on one printable report, and when the button is clicked, it will generate the report in a print preview before giving the option to print it. 135

136 Valuation and Investment Reporting Export to Excel/PDF This feature is only available for the 'Tenancy Report'. When the report is generated, click on the button, and it will give you the options to export the report as an Excel file or a PDF file. Copy to Clipboard This feature is available for all charts. To copy a chart to the clipboard as a Bitmap image, while viewing the chart, right-click it and select [Copy Image to Clipboard]. Once it is clicked, the image then can be pasted in any other document, such as Microsoft Word, Excel, etc. 136
137 Part XI

138 Printing Reports 11 Printing Reports Conducting a Final Check There are numerous output report sheets in the IA program that provide you with the performance indicators upon which the property's feasibility is assessed. You should do a reality check of these to make sure that there are no errors. Check the graphs to make sure that they look reasonable and make sure there are no numbers in the cash flow or summary reports, which appear to be unrealistic or wrong. If there are obvious errors, amend them accordingly and update the valuation if necessary. Printing To print the reports, load the Print Menu by clicking on one of the the toolbars. buttons on When the Print Menu is activated, a series of check boxes will appear for each report. Select the reports that you wish to print and the paper size you wish to print on then click [Print]. Auto Page Breaks On the Discounted Cash Flow reports, 'Auto Page Breaks' can be set to apply page breaks at the start of certain cash flow sections so they start on a new page rather than have a continuous flow. Using Auto Page Breaks will provide neater report layouts, but may print out on more pages. Selecting your Printer Before printing any reports, check that the printer you wish to print to is the currently active printer (ie 'Currently Printing on...'). If you need to select a different printer, then click on the [Select Printer] button. PDF IA has its own built-in PDF writer. When you initially installed the software, a printer would have been added to your list if Printers called "EstateMaster PDF Printer". This is used to generate PDF files of the selected reports. When [PDF] is clicked: If multiple reports are selected, a single PDF file will generated containing all those reports in the orders as selected in the 'Print Sorting' tab. 138


139 Printing Reports Print Sorting Using the 'Move Up/Down' buttons, the user can sort the printing order of the selected reports. Custom Sheets If there are any custom worksheets in the model, the user can select to print them here. They will be printed in the order they appear, after the standard reports are printed. If once of the custom worksheets are greyed out in this list, it indicates there is nothing to print on that sheet. Before printing custom worksheets, it is advised that the Print Area and Page Setup be set for them via the options in the context menu of each sheet Custom Worksheets If using User-Inserted Worksheets, printing functionality is provided to customise how these worksheets are printed. This is available via the Sheet Context Menus. When right-clicking on a User-Inserted Worksheet, the following options are provided: Set Print Area Define what part of the worksheet to print by setting the currently selected range as the 'Print Area'. Page Setup Change the settings for how the page is to be printed, such as: Orientation (portrait or landscape) Zoom (percentage or 'Fit to Page') Paper Size Margins and Page Centring Headers and Footers Print Area Title Rows and Columns to repeat Page Order. Print Print the active User Inserted sheet. 139
140 Part XII
141 Using the Enterprise Database 12 Using the Enterprise Database 12.1 Introduction to the Enterprise Database The Enterprise Database is a central data management tool that allows the user to archive development cash flows created in the DF (Development Feasibility), DM (Development Management), IA (Investment Appraisal) and HF (Hotel Feasibility) software. It is available to all users of DF and DM version 3.xx and above, ARGUS EstateMaster IA 2.xx and HF 2.xx and above. When using it in conjunction with CC (Corporate Consolidation), it allows users to generate consolidate or comparison reports for selected cash flows, projects or portfolios to calculate forecasted and actual investment returns including, development profit, internal rate of return and net present value. The Enterprise Database can be used to: Archive all input and cash flow data from DF, DM, IA and HF files. Generate comparison summary and cash flow reports for unlimited number of development options (when used with EM CC). Generate consolidated summary and cash flow reports for unlimited number of development stages (when used with EM CC) Preparing Data for Exporting The Enterprise Database is a powerful data repository and a robust framework for high level reporting. It is therefore recommended that the data that is exported to it is accurate and meaningful. Before exporting your IA file into the Enterprise Database, please ensure that the following key areas are set: Intro Sheet 1. Project Introduction This is information that will be used in the Enterprise Database to identify your Project, please insure it is completed. The 'Project Number' and 'Project Title' are distinctive: This will be the most unique identifier of this Project that the cash flow belongs to. Any cash flows with the same Project Number and Project Name will grouped together in the Enterprise Database. 141
142 Using the Enterprise Database Other mandatory fields to be completed on the the Intro sheet include Property Name, Property Type, Status and Valuation Date 12.3 Exporting to the Database To export all the input data in your IA file to the Enterprise Database, follow these steps: 1. Ensure that your data is ready and prepared to be exported and the file is saved. If this file has not been saved since the last change, the following message will appear. 2. Go to 'Data' in the Ribbon Menu and select 'Export to Database'. 3. If the database configuration file (EMDB.ini) is not found on the system (and hence a connection to the Enterprise Database cannot be established), then the following error message will appear. It will prompt the user to run the Enterprise Database Management Utility to assist in setting up a connection. Please refer to the Enterprise Database Operations Manual for more information about configuration. 4. Once the connection is successful, an Export Wizard will appear. 142

143 Using the Enterprise Database Step 1 - Project Allocation 1. Using the Project Name and Project Number on the Intro sheet of the IA file, it will attempt to find that Project in the database. If the project is already in the database, it will skip Step 1 and continue to Step 2. Otherwise, the following messages may appear on the wizard: It is the first Project to be created in the database Project Number and Name don't exist in the database There is a mismatch between the details on the file and in the database 2. If it is the first Project that is created in the database, then by default the Project Name and Number that are entered in the file are used for creating the Project in the database, with the ability for the user to update these before exporting. If the any of the other messages appear, two options are available to the user: Add New Project to Database: If this option is selected, by default, it will use the details on the Intro sheet of the IA file as the Project Number and Name. The user can edit this if necessary directly in the wizard, and the Intro sheet will be automatically updated. Append to Existing Project: If this option is chosen, the Project Number and Name fields are disabled, and the user is required to select a project that is already in the database. Once selected, the Intro sheet will be automatically updated. 143

144 Using the Enterprise Database Step 3 - Confirm Export Details 3. If the project is already in the database, it will go then the following messages may appear. The user has the ability to change the project the cash flow is being exported to if required. It will also inform the user if this is a new cash flow being exported, or if the cash flow already exists in the database. Step 4 - Export Data 1. Once satisfied with the details, click [Export] to begin the data transfer process Importing from the Database To import input data in your IA file from the Enterprise Database, follow these steps: 1. Go to 'Data' in the Ribbon Menu and select 'Import from Database' 2. If the database configuration file (EMDB.ini) is not found on the system (and hence a connection to the Enterprise Database cannot be established), then the following error message will appear. It will prompt the user to run the Enterprise Database Management Utility to assist in setting up a connection. Please refer to the Enterprise Database Operations Manual for more information about configuration. 3. Once the connection is successful, an Import Wizard will appear. Step 1 - Select Project 144


145 Using the Enterprise Database 1. The first step will display a list of the Projects that exist in the Enterprise Database. If their is an extensive list, you can filter it either by Project Number or Name. 2. Select the appropriate project and click on 'Next'. Step 2 - Select Cashlow 1. The next step will display all the cash flows that exist in the selected Project in the database. You can sort the list by clicking on the column headers. 2. Select the cash flows you wish to import. There is a maximum of 1 cash flows you can import into a DM file from the database at any one time. Step 3 - Import 1. Once the cash flows have been selected, click on 'Import' to begin the file transfer process. 145
Estate Master DF Software User Manual
 Estate Master DF Software User Manual www.estatemaster.com 2 Estate Master DF Table of Contents 6 Part I Introduction to Estate Master 1 2 Introduction... 6 Program Integrity... 6 3 System... Requirements
Features Guide. Enhancements. Mortgage Calculators VERSION 7. May 2008
 Features Guide VERSION 7 May 2008 Copyright 2002-2008 SuperTech Software All rights reserved. Printed in Australia. Enhancements This document describes new features and enhancements in POSH. Mortgage
Six Steps to a Completed Appraisal Report
 Six Steps to a Completed Appraisal Report Section 1 DataLog - Comparable Sales Database ClickFORMS - Report Processor Section 2 Addenda Section 3 Mini Sample - Approach Pages 1 Six Steps to a Completed
Step By Step Guide. Release Version 14.0 August 21 st, 2008
 Step By Step Guide Release Version 14.0 August 21 st, 2008 ARGUS Software: ARGUS Valuation DCF Step By Step Guide The contents of this document are considered proprietary by ARGUS Software, the information
ARGUS Software: ARGUS Valuation-Capitalisation Step-by-Step Guide
 ARGUS Software: ARGUS Valuation-Capitalisation Step-by-Step Guide The contents of this document are considered proprietary by ARGUS Software, the information enclosed and any portion thereof may not be
USER MANUAL. for. Program Version SDS Shelton Development Services Redcroft House Redcroft Walk Cranleigh Surrey GU6 8DS
 USER MANUAL for Program Version 7.10 SDS Shelton Development Services Redcroft House Redcroft Walk Cranleigh Surrey GU6 8DS Tel. 01483 278444 Fax. 0845 076 3777 Email support@sdslandval.co.uk Contents
Investit Software Inc. Investor Pro
 Investor Pro Table of Contents Investor Pro...3 Introduction...3 The fastest way to learn Investor Pro...4 Selecting a Template. Which Template should I use?...6 Setting and changing the Starting Date
ARGUS Valuation Capitalisation. v Change History
 ARGUS Valuation Capitalisation v2.50.010 Change History Last Updated: 10/11/2010 While ARGUS endeavors to correct known issues, software is provided "as is" without warranty of any kind, express or implied.
HOW TO CREATE AN APPRAISAL
 Page 1 7/19/2005 IMAGEsoft s Appraise Link Instruction Manual HOW TO CREATE AN APPRAISAL Start at the MAIN MENU. Click on APPRAISALS. The WORK WITH APPRAISALS screen appears. This screen stores your appraisals,
Appraisal Firewall Guide for Administrators
 Appraisal Firewall Guide for Administrators Managing Your Branches and Market Areas in Appraisal Firewall The Appraisal Firewall Administrator user was designed to give lenders fast and easy access to
Here s How to Do a Simple Property Search.
 Here s How to Do a Simple Property Search. Conducting a Search Using the Single Property Search First step to conducting a property search is selecting the state and the county in which to search. Then,
Comparative Lease Analysis Version 3. User s Guide. RealData Inc. PO Box 691 Southport, CT 06890
 Comparative Lease Analysis Version 3 User s Guide RealData Inc. PO Box 691 Southport, CT 06890 www.realdata.com 1983-2012, RealData Inc. RealData is a registered trademark of RealData, Inc Comparative
Regression + For Real Estate Professionals with Market Conditions Module
 USER MANUAL 1 Automated Valuation Technologies, Inc. Regression + For Real Estate Professionals with Market Conditions Module This Regression + software program and this user s manual have been created
Oregon State University Extension Service
 -----, E55 6 0-713 Cop. Oregon State University Extension Service Computer Software LEASE-BUY? DESCRIPTION: LEASE-BUY? is a spreadsheet template designed to show the least-cost option when deciding whether
Credit Union Leasing of America Residual Web Users Guide Consumer Lease Program. January 2018
 Credit Union Leasing of America Residual Web Consumer Lease Program January 2018 i CULA Residual Web - Consumer Lease Program Table of Contents Table of Contents Accessing CULA Residual Web... 3 Creating
Real Estate Investment Analysis Version User s Guide. RealData Inc. P. O. Box 691 Southport, CT 06890
 Real Estate Investment Analysis Version 16.0 User s Guide RealData Inc. P. O. Box 691 Southport, CT 06890 www.realdata.com 1982-2012, RealData Inc. RealData is a registered trademark of RealData, Inc.
Investit Software Inc. LEASE ANALYSIS LANDLORD INDUSTRIAL USA EXAMPLE TENANT RENTING SINGLE SPACE
 LEASE ANALYSIS LANDLORD INDUSTRIAL USA EXAMPLE TENANT RENTING SINGLE SPACE INTRODUCTION This Lease Analysis example analyses an industrial lease from a Landlord s perspective where the tenant is renting
Introducing Property Valuation
 Introducing Property Valuation Michael Blackledge Routledge Taylor & Francis Group LONDON AND NEW YORK Illustrations Cases Acknowledgements Disclaimers x xii xiv xv 1: Background 1 Economic context 3 1.1
NA Calculations Manual
 NA Calculations Manual ARGUS Developer 8.0 November 2017 ARGUS Software An Altus Group Company 0 2017 ARGUS Software, Inc. NA Calculations Manual for ARGUS Developer 8.0 November 2017 Published by: ARGUS
Abila MIP Fund Accounting TM. Encumbrances STUDENT WORKBOOK ABILA LEARNING SERVICES. Important Notice:
 Abila MIP Fund Accounting TM Encumbrances STUDENT WORKBOOK ABILA LEARNING SERVICES Important Notice: Authentic Abila MIP Fund Accounting TM training guides display a holographic image on the front cover.
Full CMA. Cover Page Tab
 CMA A Comparable Market Analysis (CMA) is a comparison between properties that are like a property you re trying to sell. A CMA is used in pricing a property you compare the property you re trying to sell
RMS USER GUIDE. Version 17. Steps for the Doctor being Appraised Page 5 Steps for the Appraiser Page 31 Help Section Page 36
 RMS USER GUIDE Please use this guide if you are using the Revalidation Management System If you can see the RMS logo and your organisation s logo at the top of your screen you are using the correct user
Audit Rent... 3 Calculate Rent... 3 Verify and Accept Rent... 4 Print Tenant Rent Report... 4 Print Revised Tenant Rent Report...
 Rent Calc Rent Calculation Tabs Prompt Tab... 1 Family Tab... 1 Income Tab... 1 Assets Tab... 1 Detail Tab... 2 Summary Tab... 2 History Tab... 2 Audit Tab... 2 Comments Tab... 2 Amounts Tab... 2 Control
Investit Software Inc. OFFICE BUILDING YEARLY CANADA EXAMPLE
 INTRODUCTION This office example uses features such as Free Rent. OFFICE BUILDING YEARLY CANADA EXAMPLE For simplicity there are only two tenants used in the example. Tenant A. 5,000 Sq. Ft Tenant B. 3,400
User Manual. Section 2: Implementation and Industry Translations. Created: October Copyright PropertyBoss Solutions, LLC. All Rights Reserved.
 User Manual Section 2: Implementation and Industry Translations Created: October 2010 Copyright PropertyBoss Solutions, LLC. All Rights Reserved. PropertyBoss Manual Section 2 - Implementation and Industry
All information and reports concerning properties can be found by clicking on the Properties tab in your black toolbar along the top of your page.
 support@payprop.co.za 087 820 7368 TRAINING MANUAL: PROPERTIES All information and reports concerning properties can be found by clicking on the Properties tab in your black toolbar along the top of your
Investit Software Inc. LEASE ANALYSIS LANDLORD INDUSTRIAL USA EXAMPLE
 LEASE ANALYSIS LANDLORD INDUSTRIAL USA EXAMPLE INTRODUCTION This Lease Analysis example analyses an industrial lease from a Landlords perspective. The landlord is considering a proposal from Apex Manufacturing
Real Estate Software User s Guide Close It Original HUD Title Page DisplaySoft 2018 Display Systems, Inc.
 DisplaySoft Close It Original HUD Real Estate Software User s Guide Close It Original HUD Title Page DisplaySoft 2018 Display Systems, Inc. GET STARTED Open a new file or a file in progress (File). Inside
Investit Software Inc. LEASE ANALYSIS LANDLORD OFFICE USA EXAMPLE TENANT RENTING SINGLE SPACE
 LEASE ANALYSIS LANDLORD OFFICE USA EXAMPLE TENANT RENTING SINGLE SPACE INTRODUCTION This Lease Analysis example analyses an office lease from a landlord s perspective where the tenant is renting one space
Investit Software Inc. INVESTMENT ANALYSIS RETAIL EXAMPLE USA USING RENT ROLL AND TWO CATEGORIES
 INVESTMENT ANALYSIS RETAIL EXAMPLE USA USING RENT ROLL AND TWO CATEGORIES INTRODUCTION This comprehensive retail example uses Rent Roll and Categories and includes all the lease features such as Free Rent,
Uniform Collateral Data Portal (UCDP) General User Guide October 2017
 General User Guide October 2017") Uniform Collateral Data Portal (UCDP) General User Guide October 2017 direction of their regulator, the Federal Housing Finance Agency. 1 of 100 direction of their regulator, the Federal Housing Finance
Uniform Collateral Data Portal (UCDP) General User Guide October 2017 direction of their regulator, the Federal Housing Finance Agency. 1 of 100 direction of their regulator, the Federal Housing Finance
WCMS User s Guide. Effective August, 2013
 WCMS User s Guide Effective August, 2013 Your Computer s Settings: WCMS is currently compatible with Internet Explorer only using any other web browser such as Mozilla Firefox, Google Chrome, etc. may
Investit Software Inc. LEASE ANALYSIS TENANT RETAIL USA EXAMPLE TENANT RENTING SINGLE SPACE
 LEASE ANALYSIS TENANT RETAIL USA EXAMPLE TENANT RENTING SINGLE SPACE INTRODUCTION This Lease Analysis example analyses a retail lease from a tenant s perspective where the tenant is renting one space in
@Value Narrative Appraisal Software User's Guide and Help Manual Version 2.0
 @Value Narrative Appraisal Software User's Guide and Help Manual Version 2.0 2003 @Value Software, LLC Table of Contents Part I @Value Overview 1 Installation 2... 3 2 Registration... 4 3 Macros... 6 4
Introducing. Property. Valuation. Second edition. Michael Blackledge. Routledge R Taylor & Francis Croup LONDON AND NEW YORK
 Introducing Property Valuation Second edition Michael Blackledge Routledge R Taylor & Francis Croup LONDON AND NEW YORK I Contents List of illustrations List ofcases Acknowledgements Disclaimers x xiii
Homeowner s Exemption (HOE)
") Homeowner s Exemption (HOE) Table of Contents CHEAT SHEETS... 3 Add HOE to a Parcel...3 Edit HOE Record...3 Remove HOE from a Parcel...3 Find the HOE Amount...3 Who is getting the exemption?...4 New Application
Homeowner s Exemption (HOE) Table of Contents CHEAT SHEETS... 3 Add HOE to a Parcel...3 Edit HOE Record...3 Remove HOE from a Parcel...3 Find the HOE Amount...3 Who is getting the exemption?...4 New Application
Capital One Escrow Express SM Reference Guide
 Capital One Escrow Express SM Reference Guide Table of Contents Overview 2 Accessing Capital One Escrow Express 2 About the Capital One Escrow Express Menu 4 About the Master Account Summary 5 Creating
Pro Series User Guide
 Pro Series User Guide Table of Contents Page 2 Getting Started Page 7 Property Search and Reports Page 22 Farm Search and Reports Page 30 Using the Map GETTING STARTED 2 P a g e Property Search select
WinTen² Section 8 Desktop Inspections
 WinTen² Section 8 Desktop Inspections Preliminary User Manual User Manual Edition: 11/15/2004 We are your inside track for making your job easier! Tenmast Software 132 Venture Court, Suite 1 Lexington,
Performance Pro Update 3.13 June 7, Concurrent Appraisals
 Performance Pro Update 3.13 June 7, 2018 Concurrent Appraisals 3.13_2018 What s New? The 3.13 release adds a few exciting new features to Performance Pro. The first is the ability to add a new section
The ecrv Submit application opens with the following important warning message on privacy:
 Submit Form Tabs Buyers and Sellers Property Sales Agreement Supplementary Submitter The ecrv form is a single Web-page form with entry fields, choices and selections in multiple tabs for submitting a
Yardi Voyager 6.0 Manual
 Yardi Voyager 6.0 Manual Created 2.26.2010 Updated On 12.11 Updated 3.26.2012 Echelon Property Group 5655 South Yosemite Street #460 Greenwood Village, CO 80111 Yardi Voyager Manual Page Voyager Log in
Investit Software Inc. BUY versus LEASE EXAMPLE
 BUY versus LEASE EXAMPLE INTRODUCTION The Buy v Lease example analysis is for an office, industrial or retail property This practice example consists of two Sections; 1. The input information for the project
Universal Anywhere Getting Started Guide. Thesaurus Technology
 Universal Anywhere Getting Started Guide Thesaurus Technology 0845 83 82 666 support@thesaurus.org.uk Universal Rentals Management Getting Started Guide The getting start guide is designed to help you
OQOOD Off-Plan Property Management Solution
 Emirates Real Estate Solutions (ERES) OQOOD Off-Plan Property Management Solution Property Developers Guide Version 1.1 http://www.oqood.ae/ Copyrights Emirates Real Estate Solutions (ERES) 2010. All Rights
MULTI-TENANT SOLUTION GUIDE
 c MULTI-TENANT SOLUTION GUIDE Front Office 8.5 A solution guide to support Multi-Tenant implementations Contents 1.0 Introduction... 3 2.0 Solution Principles... 3 3.0 Licensing... 4 4.0 Integration &
GeoWarehouse Land Registry. Teranet Enterprises Inc.
 GeoWarehouse Land Registry Teranet Enterprises Inc. TABLE OF CONTENTS Neighoubourhood Sales... 1 Overview... 1 Find Neighbourhood Sales... 1 Neighbourhood Sales and Map... 6 Map Neighbourhood Sales...
Appraisal Firewall Quick Start Guide
 Appraisal Firewall Quick Start Guide Information for Manager Users BASIC USAGE AND LAYOUT... 2 MANAGER SETTINGS... 3 ORDERS... 5 PINNED ORDERS... 6 WORKING IN AN ORDER... 7 RELATIONSHIPS... 9 LENDERS TAB...
Keller Williams Listing System (KWLS)
") Keller Williams Listing System (KWLS) NOTES... KWLS AND THE GSO 0707R3 2007 KELLER WILLIAMS REALTY INC. i NOTICES While Keller Williams Realty International (KWRI) has taken due care in the preparation
Keller Williams Listing System (KWLS) NOTES... KWLS AND THE GSO 0707R3 2007 KELLER WILLIAMS REALTY INC. i NOTICES While Keller Williams Realty International (KWRI) has taken due care in the preparation
Table of Contents Before You Begin... 2 Starting an Analysis... 2 Address Verification... 3 Order Confirmation... 5 Overview of Drop Down Menu Bar...
 Table of Contents Before You Begin... 2 Starting an Analysis... 2 Address Verification... 3 Order Confirmation... 5 Overview of Drop Down Menu Bar... 6 Overview of the Analytic Process... 7 Process Tab
Valuation techniques to improve rigour and transparency in commercial valuations
 Valuation techniques to improve rigour and transparency in commercial valuations WHY BOTHER? Rational Accurate Good theory is good practice RECESSION. Over rented properties Vacant Properties Properties
Cost Segregation Instructor Teaching Schedule (3-Hour)
") Time Topic Pages Student Objectives 8:30-8:35 Course introduction Page 2 What is cost segregation? Objective of cost segregation: to increase cash flow Benefit of cost segregation Learning objectives Page
Time Topic Pages Student Objectives 8:30-8:35 Course introduction Page 2 What is cost segregation? Objective of cost segregation: to increase cash flow Benefit of cost segregation Learning objectives Page
VISION ASSET REGISTER TABLE OF CONTENTS
 VISION ASSET REGISTER TABLE OF CONTENTS Introduction... 2 Outlook of the Asset Register Software... 2 Setups... 4 Asset Location... 5 Asset Type/Group... 5 Currencies... 7 Custodian... 7 Cost Center/Project
CASE STUDY DEVELOPER CONTRIBUTES LAND AS EQUITY INTRODUCTION
 CASE STUDY DEVELOPER CONTRIBUTES LAND AS EQUITY INTRODUCTION This case study demonstrates where a developer owns a parcel of land that they are developing, and they want the Performance Indicators in the
Implementation Success with
 Implementation Success with Copyrights IMPORTANT NOTICE: YOUR USE OF THESE MATERIALS SHALL BE DEEMED TO CONSTITUTE YOUR AGREEMENT THAT SUCH USE SHALL BE GOVERNED BY THE MUTUAL NON-DISCLOSURE PROVISIONS
Family Self-Sufficiency winfss M anual
 Family Self-Sufficiency winfss M anual Page 1 of 25 General Setup Some general setup work needs to be done before you can use WinFSS: (1) Transaction codes need to be created (FSS Transaction Codes), (2)
A Complete Guide to Creating a Tenancy
 A Complete Guide to Creating a Tenancy 1 This guide initially describes all the steps that will need to be in place prior to a tenancy being created. To Create Instruction: Area Applicant Property Landlord
Demonstration Properties for the TAUREAN Residential Valuation System
 Demonstration Properties for the TAUREAN Residential Valuation System Taurean has provided a set of four sample subject properties to demonstrate many of the valuation system s features and capabilities.
Performance Pro Update June 14, 2018
 Performance Pro Update 3.13.1 June 14, 2018 3.13.1_2018 What s New? Routing As part of this release, some enhancements have been made to the Routing feature. The changes to this feature include: Post Approval
Real Estate & REIT Modeling: Quiz Questions Module 1 Accounting, Overview & Key Metrics
 Real Estate & REIT Modeling: Quiz Questions Module 1 Accounting, Overview & Key Metrics 1. How are REITs different from normal companies? a. Unlike normal companies, REITs are not required to pay income
Comparables Sales Price (Old Version)
") Chapter 486 Comparables Sales Price (Old Version) Introduction Appraisers often estimate the market value (current sales price) of a subject property from a group of comparable properties that have recently
Chapter 486 Comparables Sales Price (Old Version) Introduction Appraisers often estimate the market value (current sales price) of a subject property from a group of comparable properties that have recently
Guidance for Financial Appraisal Tool
 Guidance for Financial Appraisal Tool This guidance has been written for users of the National CLT Network s free Appraisal Tool. It should be read alongside other guidance and general information on our
WinTar-Tenant Accts Receivable User' s Guide
 WinTar-Tenant Accts Receivable User' s Guide Copyright HAB INC June 2009 All Rights Reserved Revised August 2011 2 P a g e 3 P a g e WinTAR Users Guide Table of Contents WinTAR Users Guide... 4 Table of
AFFORDABLE HOUSING CONNECTIONS NOTES FOR CHART REPORTING (FOLLOW THESE INSTRUCTIONS TO AVOID FINDINGS)
") AFFORDABLE HOUSING CONNECTIONS NOTES FOR HTC-12 PREPARATION AND REPORTING: PROGRAM YEAR 2015, DUE MARCH 15, 2016 (FOLLOW THESE INSTRUCTIONS TO AVOID FINDINGS) i. The HTC 12 requires the signature of the
AFFORDABLE HOUSING CONNECTIONS NOTES FOR HTC-12 PREPARATION AND REPORTING: PROGRAM YEAR 2015, DUE MARCH 15, 2016 (FOLLOW THESE INSTRUCTIONS TO AVOID FINDINGS) i. The HTC 12 requires the signature of the
3-Way Reconciling in ProTrust (Standard Edition)
") Introduction 3-Way Reconciling in ProTrust (Standard Edition) The steps below outline the process of reconciling your trust account(s) in ProTrust with your monthly bank statement. More detailed instructions
Introduction 3-Way Reconciling in ProTrust (Standard Edition) The steps below outline the process of reconciling your trust account(s) in ProTrust with your monthly bank statement. More detailed instructions
National Housing Co-Investment Fund APPLICATION GUIDE FOR FINANCIAL VIABILITY WORKBOOK - NEW CONSTRUCTION
 National Housing Co-Investment Fund APPLICATION GUIDE FOR FINANCIAL VIABILITY WORKBOOK - NEW CONSTRUCTION TABLE OF CONTENTS About the Financial Viability Workbook... 3 Rents Affordability (Tab 2)... 3
MARS Doctor User Guide Primary Care
 1 MARS Doctor User Guide Primary Care https://gp.marswales.org This guide is intended to walk you through the Appraisal Process using the online MARS system. Primarily for primary care doctors practising
Title Transfer of Ownership (Bill of Sale Initiation)
") Title Transfer of Ownership (Bill of Sale Initiation) Note: The transfer of title between Free Miners is handled in two (2) parts. These instructions cover the Initiation portion. 1. The seller enters
Title Transfer of Ownership (Bill of Sale Initiation) Note: The transfer of title between Free Miners is handled in two (2) parts. These instructions cover the Initiation portion. 1. The seller enters
The IRAM Web app. Description of the internet application of the Integrated Risk Assessment Method (IRAM)
") The IRAM Web app Description of the internet application of the Integrated Risk Assessment Method (IRAM) https://www.fms.nrw.de/lip/authenticate.do The internet application of the Integrated-Risk-Assessment-Method
The IRAM Web app Description of the internet application of the Integrated Risk Assessment Method (IRAM) https://www.fms.nrw.de/lip/authenticate.do The internet application of the Integrated-Risk-Assessment-Method
Business Valuation More Art Than Science
 Business Valuation More Art Than Science One of the more difficult aspects of business planning is business valuation. It is also one of the more important aspects. While owners of closely held businesses
Development Tabs. Unit Tabs
 Section 7 Development Development Tabs Block Tabs Unit Tabs Add Rent Amount... 7-2 Block Level... 7-2 Unit Level... 7-3 Tenancy Level... 7-3 To Add A Rent Amount At The Block Level... 7-3 To Add A Rent
CS324 Umoja Lease Administration Process. Umoja Lease Administration Process Version 16 1
 CS324 Umoja Lease Administration Process Umoja Lease Administration Process Version 16 Last Copyright Modified: United 15-January-14 Nations 1 Agenda Course Introduction Module 1: Lease Administration
Real Estate Products USER MANUAL. Get Started Log in... 1
 Real Estate Products USER MANUAL Get Started Log in... 1 CA Agent Market Wizard Introduction... 2 Generate A Report... 3 Save Search... 4 Report Output... 4 Export Report & Data... 5 CA HomePriceTrends
Chapter 8. How much would you pay today for... The Income Approach to Appraisal
 How much would you pay today for... Chapter 8 One hundred dollars paid with certainty each year for five years, starting one year from now. Why would you pay less than $500 Valuation Using the Income Approach
ProForm User Guide. SoftPro Select 3.0 Friday, May 01, Falls of Neuse Road, Suite 400 Raleigh, NC 27609
 ProForm User Guide SoftPro Select 3.0 Friday, May 01, 2015 4800 Falls of Neuse Road, Suite 400 Raleigh, NC 27609 p (800) 313-0085 Support@softprolite.com Table of Contents Resources... 4 Connecting to
MMSVP Migration Wizard
 MMSVP Migration Wizard Questions? From within BS&A, go to Help>Contact Customer Support and select Request Support Phone Call or Email Support. Or, you may call us at (855) 272-7638 and ask for the appropriate
IFRS 16 Lease overview and EY s enabling toolkit
 IFRS 16 Lease overview and EY s enabling toolkit Content Page Section I IFRS 16 overview 2 Appendix I EY Lease enabling technology suite 9 Appendix II EY Contacts 17 Page 1 IFRS 9 Classification and measurement
BUSI 331: Real Estate Investment Analysis and Advanced Income Appraisal
 BUSI 331: Real Estate Investment Analysis and Advanced Income Appraisal PURPOSE AND SCOPE The Real Estate Investment Analysis and Advanced Income Appraisal course BUSI 331 is intended to build upon the
Taxpayer Guide. Pioneer Technology Group 110 Central Park Drive, Suite 200 Sanford, FL or Fax:
 Taxpayer Guide Pioneer Technology Group 110 Central Park Drive, Suite 200 Sanford, FL 32771 407.321.7434 or 1.800.280.5281 Fax: 407.321.7971 Table of Contents INTRODUCTION...1 CONTACT INFORMATION... 2
Marshall & Swift SwiftEstimator
 Program Reference Marshall & Swift SwiftEstimator Commercial Estimator Program June 2016 June 2016 SwiftEstimator - Commercial Estimator 2 - i 2016 CoreLogic, Inc. All Rights Reserved Worldwide. No part
Project Economics: The Value of Leasing. Russell Banham, Savills
 ICSC European Retail Property School Project Economics: The Value of Leasing Russell Banham, Savills (Investment, Development & Asset Management) Introduction Who I am Russell Banham Over 30 years of experience
Marsha M. Faux, CFA, ASA Polk County Property Appraiser. A Tour of Our Website
 Marsha M. Faux, CFA, ASA Polk County Property Appraiser A Tour of Our Website 2017 www.polkpa.org Bartow Main Office 255 N Wilson Ave Bartow, FL 33830 Phone: 863-534-4777 Fax: 863-534-4753 Lakeland Branch
DMS Authority Online. User s Manual
 Illinois Housing Development Authority DMS Authority Online User s Manual for Property Owners and Agents Revised 4/1/2018 DMS Authority Online User Guide Table of Contents Overview What is DMS How Owners
Working with the LendingQB-Appraisal Firewall Interface
 Working with the LendingQB-Appraisal Firewall Interface Setup and User Training Guide Lenders that use the LendingQB LOS can stay in their familiar loan origination system and place real estate appraisal
Raising Your Commercial IQ
 Raising Your Commercial IQ Real Estate Investment & Lease Analysis January 2013 0 P age Neil Osborne M.B.A. DL. (604) 988-5518 nosborne@investitsoftware.com Investit Software Inc. Toll free 877-878-1828
An Interactive Feasibility Tool
 INSTRUCTION GUIDE Affordable Assisted Living and Community Based Care: An Interactive Feasibility Tool Developed for: The Coming Home Program In partnership with the Robert Wood Johnson Foundation NCB
Analysing lessee financial statements and Non-GAAP performance measures
 February 2019 IFRS Foundation The Essentials Issue No. 5 Analysing lessee financial statements and Non-GAAP performance measures Introduction Investors and company managers generally view free cash flow
table of contents Profile Setup...1 Personal Info, Contact Info, Web Info... 2 Profile Photo... 3 Create a Presentation in 5 Easy Steps!...
 USER GUIDE table of contents Profile Setup...1 Personal Info, Contact Info, Web Info... 2 Profile Photo... 3 Create a Presentation in 5 Easy Steps!... 3 Working with the Search Screen... 4 Presentation
Introduction to CREST EDG Reports
 9 Introduction to CREST EDG Reports Introduction to CREST EDG Reports Overview Action Items Reports Report Formats Types of CREST EDG Reports CREST EDG produces many types of reports that help you to
Accessing and Viewing Voided Claims in EI Billing
 1 Accessing and Viewing Voided Claims in EI Billing 2 Introduction Hint: For quicker navigation, click on the 'Menu' link on the top right-hand side of the player to move freely among the sections of this
TOOL FOR COSTING SUSTAINABLE COMMUNITY PLANNING: USER GUIDE
 Canadian Mortgage and Housing Corporation TOOL FOR COSTING SUSTAINABLE COMMUNITY PLANNING: USER GUIDE DRAFT SEPTEMBER 2006 TABLE OF CONTENTS 1. INTRODUTION...1 1.1 What is the Tool for Costing Sustainable
THE VALUATION ANALYST
 USER MANUAL Companion Spreadsheet for the book: THE VALUATION ANALYST Research in Extracting Adjustment Rates by David A. Braun, MAI, SRA, AI-GRS. The Compass Spreadsheet copyright 2016 by Automated Valuation
etrac Guide Enhanced Appraiser Scoring Global DMS, 1555 Bustard Road, Suite 300, Lansdale, PA , All Rights Reserved.
 etrac Guide to Enhanced Appraiser Scoring Version: 2.5.0 Published: 09/22/2014 Global DMS, 1555 Bustard Road, Suite 300, Lansdale, PA 19446 2014, All Rights Reserved. Table of Contents Introduction to
BUSI 330 Suggested Answers to Review and Discussion Questions: Lesson 10
 BUSI 330 Suggested Answers to Review and Discussion Questions: Lesson 10 1. The client should give you a copy of their income and expense statements for the last 3 years showing their rental income by
Listing Load Manual. for. Staff
 Listing Load Manual for Staff 1 Listing Load Listing Load is the module that allows you to add a new listing, change listing information and make contractual changes such as status or price at any time
MARS User Guide Appraisers https://gp.marswales.org https://medical.marswales.org. Guide Index
 1 MARS User Guide Appraisers https://gp.marswales.org https://medical.marswales.org This guide is intended to walk you through the Appraisal Process using the online MARS system. Primarily for Appraisers
Investit Software Inc. ANALYZER EXPRESS
 ANALYZER EXPRESS Table of Contents Introduction...3 Project Info Folder...4 Finance Folder...6 Income Folder...8 Expenses Folder...9 Goal Seeking...10 Sample Reports...12 Comparison Report...14 Introduction
Quarterly Owner s Financial Certification Reporting Instructions
 Quarterly Owner s Financial Certification Reporting Instructions Quarterly Owner Financial Certification Reports are due by the 15 th business day of April (for the Quarter Jan Mar), July (for the Quarter
Chapter 8. How much would you pay today for... The Income Approach to Appraisal
 How much would you pay today for... Chapter 8 One hundred dollars paid with certainty each year for five years, starting one year from now. Why would you pay less than $500 Valuation Using the Income Approach
User Guide and Training Manual
 User Guide and Training Manual Version 2012 Table of Contents Introduction About This Manual... 1 Exercises... 1 Statement of Warranty and Disclaimer... 2 Training Files... 3 LOGON & Keyboard Objectives...