Icons on packaging and labelling
|
|
|
- Ronald Sherman
- 5 years ago
- Views:
Transcription
1 Sonaris User Guide-English+Languages 3/9/07 9:31 am Page I Icons on packaging and labelling Bathlift labelling & Packaging Hand Controller Hi-power Pack 140 kg Maximum User Weight. Maximales Benutzergewicht. Poids maximum d utilisation. Peso máximo del usuario. Peso massimo dell utente. Maximale gewicht van de gebruiker. Raise the seat. Sessel anheben. Élever le siège. Elevar el asiento. Sollevare il sedile. Zitting optillen. Contains dangerous voltages. Do not remove the cover. Enthält gefährliche Spannungen. Abdeckung nicht entfernen. Tensions dangereuses. Ne pas retirer le capot. Contiene tensiones peligrosas. No retire la cubierta. Voltaggio pericoloso Non rimuovere il coperchio. Bevat gevaarlijke spanning. De afdekkap niet verwijderen. Type B electrical insulation. Typ B, elektrisch isoliert. Isolant électrique Type B. Aislamiento eléctrico de tipo B. Isolamento elettrico tipo B. Elektrische isolering - Type B. Lower the seat. Sitz senken. Abaisser le siège. Bajar el asiento. Abbassare il sedile. De zitting laten zakken. For indoor use and should not be exposed to water or dust. Zur Verwendung in Innenräumen und sollte Wasser und Staub nicht ausgesetzt werden. Destiné à un usage à l intérieur, ne doit pas être exposé à l eau ni à la poussière. Para uso en interiores y no deberá exponerse al agua ni al polvo. Esclusivamente per uso a domicilio; non va esposto a liquidi o polvere. Voor gebruik binnenshuis en mag niet aan water of stof worden blootgesteld. Consult the user manual. Bedienungshandbuch beachten. Consulter le manuel d utilisation. Consulte el manual del usuario. Consultare il manuale dell utente. Raadpleeg de gebruikershandleiding. Battery low. Schwache Batterie. Batterie déchargée. Batería baja de carga. Batteria scarica. Batterij bijna leeg. Double Insulated. Doppelt isoliert. Double isolation. Doble aislamiento. Doppio isolamento. Dubbel geïsoleerd. Manufactured during (date). Herstellungsdatum. Fabriqué en (date). Fecha de fabricación (fecha). Data di fabbricazione (data). Productiedatum (datum). Warning read manual. Warnung - Handbuch lesen. Attention Lire le manuel. Atención, lea el manual. Attenzione. Consultare il manuale. Waarschuwing - Handleiding lezen. Electrical wiring. Elektrische Leitung. Branchement électrique. Cableado eléctrico. Impianto elettrico. Elektrische bedrading. Approval logo. Zulassungszeichen. Logo d homologation. Logotipo de aprobación. Logo dell approvazione. Logo van goedkeuring. I 0 Emergency stop. Notstopp. Arrêt d urgence. Detención de emergencia. Arresto d emergenza. Stop bij noodgeval. Direct Current. Gleichstrom. Courant continu. Corriente continua. Corrente continua. Gelijkstroom. Dispose of battery and motor correctly - contains electronic components. Entsorgen Sie vorschriftsmäßig die Batterie und den Motor, die elektronische Komponenten enthalten. Éliminer correctement la batterie et le moteur qui contiennent des déchets électroniques. Deseche la batería y el motor correctamente, ya que contienen componentes electrónicos. Smaltire correttamente la batteria e il motore - contiene componenti elettronici. Voer de batterij en motor correct af; deze bevatten elektronische onderdelen. Recycle battery contains Nickel Metal Hydride. Batterie recyceln - enthält Nickel-Metall-Hydrid. Recycler la batterie - contient du nickel métal hybride. Recicle la batería; contiene hidruro de metal de níquel. Riciclare la batteria - contiene nichel-idruri di metallo. Recycleer de batterij - bevat nikkelmetaalhydride. +45 Max. & min. battery operating temperature. Max. und min. Batterie-Betriebstemperatur. Températures max. et min. de fonctionnement de la batterie. +10 Temperaturas operativas máx. y min. de la batería. C Temperatura massima e minima di funzionamento della batteria. Max. en min. gebruikstemperatuur van de batterij kg Total Product Weight. Gesamtes Produktgewicht. Poids du produit complet. Peso total del producto. Peso totale del prodotto. Totaal gewicht van product. Recycle battery contains Nickel Metal Hydride. Batterie vorschriftsmäßig entsorgen - enthält Nickel- Metall-Hydrid. Ne pas jeter la batterie avec les ordures ménagères - Contient du nickel-métal-hybride. Elimine correctamente la batería; contiene hidruro de metal de níquel. Smaltire correttamente la batteria contiene nichel-idruri di metallo. Voer de batterij op correcte wijze af - bevat nikkelmetaalhydride. Please retain these instructions for future reference. For enquiries, telephone: UK: International: +44 (0) Homecraft Rolyan, Nunn Brook Road, Huthwaite, NG17 2HU, UK. Telephone: Facsimile: Sammons Preston Rolyan, 4 Sammons Court, Bolingbrook, IL , USA. Telephone: Telefax: _ is1

2 Sonaris User Guide-English+Languages 3/9/07 9:31 am Page II User s Manual Bedienungshandbuch Manuel d utilisation Manual del usuario Manuale dell utente Gebruikershandleiding The Bathmaster Sonaris Bathlift Bathing Made Easy
3 Sonaris User Guide-English+Languages 3/9/07 9:31 am Page III Please unfold for reference


4 3/9/07 9:31 am Page 1 English Sonaris User Guide-English+Languages C B I F E G D B A H 11 I C 1
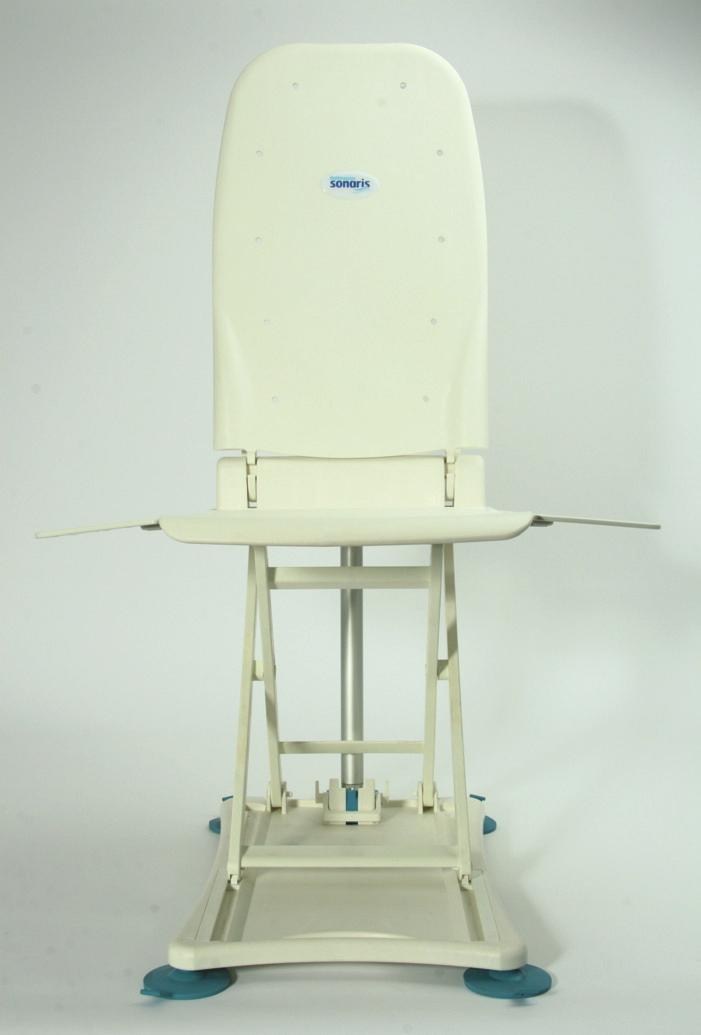
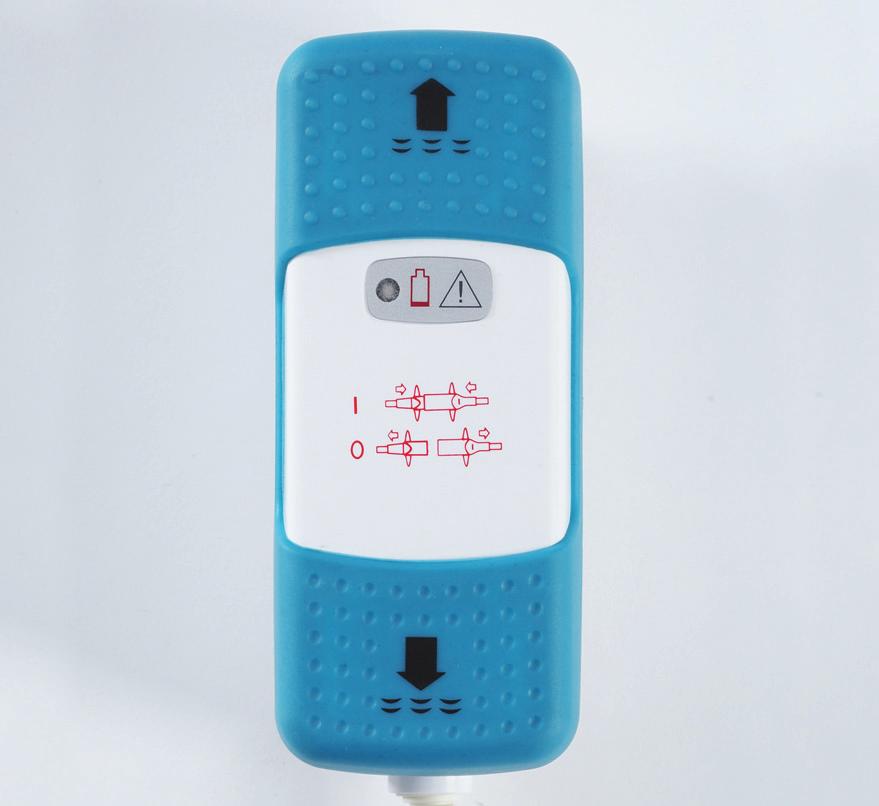
5 Sonaris User Guide-English+Languages 3/9/07 9:31 am Page 2 English Introduction The Bathmaster Sonaris is a patient bathing device intended to assist a bather into and out of a bath. Designed to make the pleasure of taking a bath safer and easier, for both user and carer, the Bathmaster Sonaris is a fully battery powered, self-contained bath seat which requires no plumbing or electrical installation and is suitable for use in either domestic or institutional situations. The bath lift folds compactly, and separates into two parts, enabling it to be carried, transported and stored easily. The Bathmaster Sonaris is easily positioned in any standard bath (Note: There are a few extremely narrow or contoured designs of bath in which a powered bath seat is not suitable). The frame stands on four suction feet that may be rotated to suit the curved floor of the bath. Integral pull- up tabs on the suction feet, plus a rear release system, enable the Bathmaster Sonaris to be easily removed from the bath. Replacement components and accessories are available. Components The Bathmaster Sonaris included the following components: White plastic lower seat section with side transfer flaps and four blue suction feet, White plastic backrest with motor and cable, Two blue side flap protectors, Hand controller containing battery pack with LED low-battery warning light and audible bleep, Battery recharger with country specific lead and plug, User instructions. If any of the above components are missing or damaged, do not use the Bathmaster Sonaris and contact your distributor or Homecraft Rolyan. Optional accessories are available for those requiring increased comfort or functionality. Do the following Before using Bathmaster Sonaris for the first time, read these instructions and familiarise yourself with the product and the lifting techniques. Become familiar with the operation of the unit before using it to lower or raise a person. Retain these instructions for future reference and keep them where people using the bath lift can have access to them. Ensure the suitability of the unit to lift the individual is assessed. Judging the suitability of any patient lifting device is the responsibility of the healthcare professional or the care giver. Some circumstances that must be considered include the following: size and weight of the individual; his or her upper body strength, balance, co-ordination, cognition and hip flexibility; their potential to spasm. Inspect the unit before each use to be sure it is free from damage and excessive wear. Bi-annual inspections by trained technicians are strongly recommended (see Maintaining the Unit). Ensure both the bath surface and suction feet are clean, dry and free from soap and bath oil residue before fitting the Bathmaster Sonaris into the bath. Use the Bathmaster Sonaris only with accessories, hand controllers, and rechargers that are supplied by Homecraft Rolyan. When the Bathmaster Sonaris is being used by a disabled person unaided, please ensure that an alarm system or telephone is available that could be used in the event of difficulty or emergency. Do not do the following Do not exceed the maximum lifting capacity of the unit - 140kg (22stone, 308lbs). An overload protection mechanism is incorporated and the lift will not operate if the maximum load is exceeded. In the event that a patient exceeding the maximum load is partially lowered before the overload mechanism operates the patient can be lifted by manually bearing a small proportion of their weight, which will allow the overload mechanism to reset. Note: The overload mechanism will reset automatically, however it is important to ensure the unit is not damaged in any way and should be thoroughly inspected before the next use. Do not use the Bathmaster Sonaris as a support to help you stand or steady yourself. Do not use the unit on an incline greater than 5. Do not operate the hand controller whilst the unit is disassembled. Do not use the Bathmaster Sonaris if metal parts of the connectors or cables are exposed. Do not use Bathmaster Sonaris for other uses than which it is designed and detailed in these instructions. Do not allow children to play with Bathmaster Sonaris, its parts or accessories. During assembly, use or cleaning, be careful not to put your fingers between any moving parts, especially around the backrest (see Fig.1). Do not carry the backrest of the Bathmaster Sonaris by the drive mechanism. Charging the battery The Bathmaster Sonaris is operated using a rechargeable, battery powered, hand controller. Each hand controller is completely waterproof and has two suckers on its base allowing it to be secured where convenient. The batteries are charged using low voltage rechargers, designed for the appropriate countries electricity supply. The hand controller must be charged prior to first use and whenever it is low on power. New hand controllers should be charged for a minimum of 3 hours prior to first use. Optimum battery capacity will be reached following a few charging cycles. Charging the battery should be done away from the bathroom and other sources of water. The light on the battery pack illuminates when the charge is low. When the light flashes during ascent or descent, enough power remains for one to three complete cycles. If the light is permanently lit, enough power remains for one complete lift only. The unit will not lower into the bath. Do not use the unit after the low-battery light on the hand controller has permanently illuminated. Recharge it before use. An audible bleep also informs the user that the battery is low. Repeated bleeps during ascent and descent notify the user when enough power remains for one to three complete cycles. A continuous bleep alerts the user that the battery is almost fully discharged. However, enough power remains for one complete lift but the unit will not lower into the bath. Do not use the unit after the continuous bleep sounds. Recharge it before use. The hand controller is designed so that it cannot be charged at the same time as being connected to the Bathmaster Sonaris. The hand controller should be removed from the Bathmaster Sonaris, if the unit is not going to be used for some time. If storing the unit for more than one week, fully charge the battery pack prior to storage and again before use. All battery packs are sealed units and batteries are non-replaceable. The chargers are not designed for use with non-rechargeable batteries. Ensure that the connector (see Fig.2) on the hand controller is completely dry before plugging it into the recharger or the bath lift. Inspect the charger and the power cord before each use to ensure they are free from damage. Ensure the small vent holes on the underside of the hand controller (see Fig.3) are not covered and are free from dirt and debris. If dirt or debris are present, wipe clean with a damp cloth. Recharging the hand controller (see Fig.2) To charge the battery, use the following procedure: 1. Disconnect the cable of the hand controller from the unit. 2. Ensure that the connector is dry. 3. Connect the cable of the hand controller to the cable of the recharger. 4. Plug the recharger into an electrical outlet. The light on the recharger indicates the following: Yellow Orange Green Flashing Orange No Battery Connected Charging Fully Charged Battery Error A complete charge takes approximately 3 hours; the battery can be left continuously connected to the recharger. Note: at the end of the recharge, the hand controller can be hot. This is normal and does not indicate a problem. Improving the battery lifetime Before recharging, wait at least 1 hour after the last use. After recharging, wait at least 1 hour before using the hand controller. Improving the battery performance If the capacity of the hand controller has noticeably reduced (i.e., the unit provides fewer lifts than expected per full charge), it may need reconditioning. To recover the full capacity of the battery, use the following procedure: 2
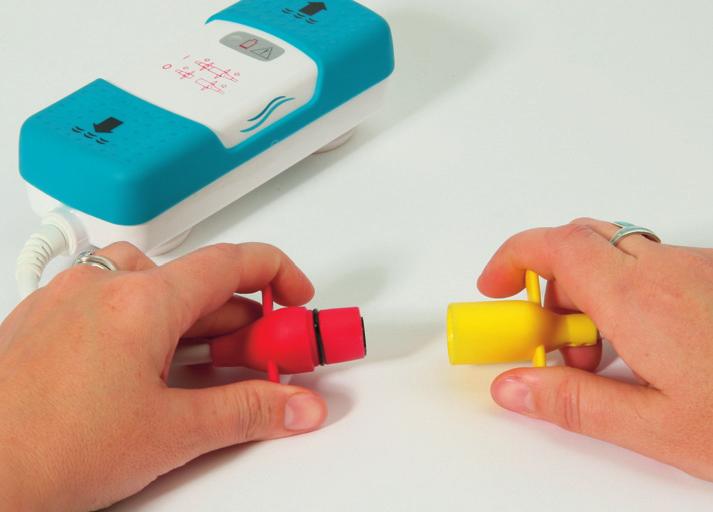
6 Sonaris User Guide-English+Languages 3/9/07 9:31 am Page 3 1. Remove the Bathmaster Sonaris from the bath. 2. Operate the unit repeatedly up and down, without a person on the seat until the light on the battery pack illuminates. 3. Wait at least 1 hour before recharging the battery. 4. Recharge the hand controller for approximately 3 hours (wait until the light on the recharger illuminates green). 5. Wait at least 1 hour before using the hand controller. 6. Repeat steps 2 through 5 four more times. Preparing the unit for use If the bath tub has handles then side flap protectors may be needed. Fitting side flap protectors Side flap protectors enable the side flaps to move smoothly up and down without catching beneath the handles on the bath. Clip the protectors into place on the handles with the short edges towards the outside of the bath. When fitted correctly, they should rest at the bottom of the edge of the bath (see Fig.4). If necessary they may be trimmed to length. Sharp edges of the trimmed end can be removed with abrasive paper or a file. Installing the bath lift Before use, ensure there are no obstructions or projections within the bath that may prevent the frame from standing securely and squarely on its suction feet, also that it can be raised and lowered freely without catching under or on, any part of the bath surface, the taps and adjacent fittings. You will need to lift the Bathmaster Sonaris and place it into the bath. If you feel you may have difficulty or are unsure how to lift correctly, please ask somebody for help. Take particular care to avoid back injury when lifting the unit into and out of the bath, by following safe moving and handling procedures and by separating the Bathmaster Sonaris into it s individual parts. Make sure the bathroom floor is dry and free from obstructions to minimise the risk of stumbling, falling and dropping the frame. Placing the seat unit into the bath 1. Remove the backrest from the seat unit by folding the backrest forward onto the seat and lift it straight up and off the unit. 2. Check the suction feet are securely in place on the frame of the Bathmaster Sonaris before lowering it into the bath. 3. Position the seat unit close to the bath to minimise the carrying distance and the eventual lift into the bath. 4. Lift the seat unit into the bath and position it at the opposite end to the tap fixtures. Ensure the backrest hinges are towards the rear and allow room for the back of the unit to recline. 5. Ensure the side flaps are inclined upwards and that they will not catch under any handles fitted to the bath as the seat rises. If so, side protectors must be used. 6. The suction feet may be rotated to enable the unit to be located as far back and as securely as possible. 7. Ensure all four feet are in contact with the bath surface and are not resting on a bath mat or similar item. Push them securely onto the bottom of the bath. Fitting the backrest to the seat unit 1. Lay the backrest, face down, onto the seat unit and align the hinges. 2. Lower the hinges onto the brackets, ensuring that they locate fully. 3. Check the drive mechanism is fully retracted into the column. If not, this can be rectified by connecting the hand controller (see below) and pressing the down button. 4. Lift the front of the backrest and rotate until it is in the recline position. 5. Ensure that the back rest is securely attached to the seat unit and the drive mechanism is located within the cup before operating the unit. Connecting the hand controller 1. Ensure that the connector on the hand controller is completely dry before plugging it into the bath lift. 2. Plug the red connector of the hand controller into the matching yellow plug on the lead from the drive mechanism (see Fig.5). The plugs are egg shaped to enable easy and accurate connection. 3. Ensure that connectors are fully mated before the bath lift is used. 4. Position the hand controller at the side of the bath using the suckers where possible. Ensure that the cable runs clear of the seat and the connector will not become disconnected as a result of the movement of the seat. 5. Operation and safety of the unit are not affected if the hand controller or connector falls into the water during use. Using the unit whilst bathing Ensure the Bathmaster Sonaris is in an upright position and is stable and secure before every use. Check the warning light does not illuminate or bleep does not sound when the hand controller is used. If necessary, recharge the battery prior to use. Ensure that the unit is tested first before being used by the bather. Check that the unit is able to move up and down and recline without obstructions by using the hand controller to raise and lower the unit. Ensure the water temperature is neither too hot nor too cold. To operate the hand controller: Press pad (C) to raise the unit and (B) to lower. (See Fig.6). The control pads are textured, to assist the visually impaired, with bumps on the up pad (C) and dimples on the down pad (B). When either pad is pressed, the warning light will flash and the bleep will sound to signify operation. At any time during the descent or ascent, the lifting mechanism can be stopped by releasing pressure on the switch pad and travel started in the opposite direction by depressing the other pad. In case of emergency, stop operation of the unit immediately by pulling apart the connector between the hand controller and the bath lift (see Fig.7 & 8). Hands should be kept clear of the bath sides, bath floor and the sides of the seat when descending or ascending. Legs and feet should not be tucked under the seat. Ensure the bather s feet are situated beyond the front legs of the frame. When sitting on the seat of the Bathmaster Sonaris do not push against the bath, such that the front of the bath lift is raised off the floor of the bath, as this will make the bath lift unstable. Once the Bathmaster Sonaris is positioned correctly in the bath, it can be used as follows: 1. Raise or lower the seat so that the side flaps are level with and resting on the rim of the bath. 2. Stand with your back to the bath and sit down on the outer side flap with the seat directly behind you. 3. Slide back until your buttocks are central on the seat. 4. Swing round, raising each leg over the edge of the bath. 5. Using the hand controller, lower the seat into the bath, keeping the hands and feet away from the underneath of the seat. 6. The unit will stop at the lowest point of travel. To recline the backrest release the down button and press again. 7. When you are in the desired recline position simply release pressure on the pad. When bathing is complete, alight from the bath by following steps 7 to 10 below: 8. Use the hand controller to raise the seat from the bath, ensuring the flaps, and the users hands, do not become caught under any handles fitted into the bath. 9. Swing round, raising each leg over the edge of the bath. 10. Slide forwards until your buttocks are on the outer side flap with the seat directly behind you. 11. Stand up with your back to the bath. Where possible, it is preferable that the hand controller is operated by the bather rather than an assistant, so they have complete control and can stop movement in case of discomfort. The seat will only move whilst the controller buttons are pressed down. Removing the unit from the bath Disconnect the hand controller from the lifting mechanism by pulling apart the connectors (see Fig.7). Recharge the hand controller if necessary (See Charging the Battery). The Bathmaster Sonaris may be stored in the bath if convenient. However, should you wish to remove it, follow either of these procedures: Removing the unit disassembled 1. Check the bathroom floor is dry and free from obstructions to minimise the risk of stumbling, falling or dropping the frame. 2. Allow any water to drain from the bath. 3. Lower the seat to the bottom of bath and recline the backrest. 4. Fold the side flaps onto the seat. 5. Fold the backrest forward onto the seat. 6. Ensure the hinges are aligned and lift backrest away from the seat and remove from the bath. 7. Lift the tabs to release the suction on the front feet and raise the front of the seat unit off the surface of the bath tub. The rear suction feet should automatically release, enabling the seat unit to be easily removed from the bath. Removing the unit folded 1. Check the bathroom floor is dry and free from obstructions to minimise the risk of stumbling, falling or dropping the frame. 2. Allow any water to drain from the bath. 3. Lower the seat to the bottom of bath and recline the backrest. 4. Fold the side flaps onto the seat. 5. Fold the backrest forward onto the seat. 6. Lift the tabs to release the suction on the front feet and raise the front of the seat unit off the surface of the bath tub. The rear suction feet should automatically release, enabling the Bathmaster Sonaris to be easily removed from the bath. English 3
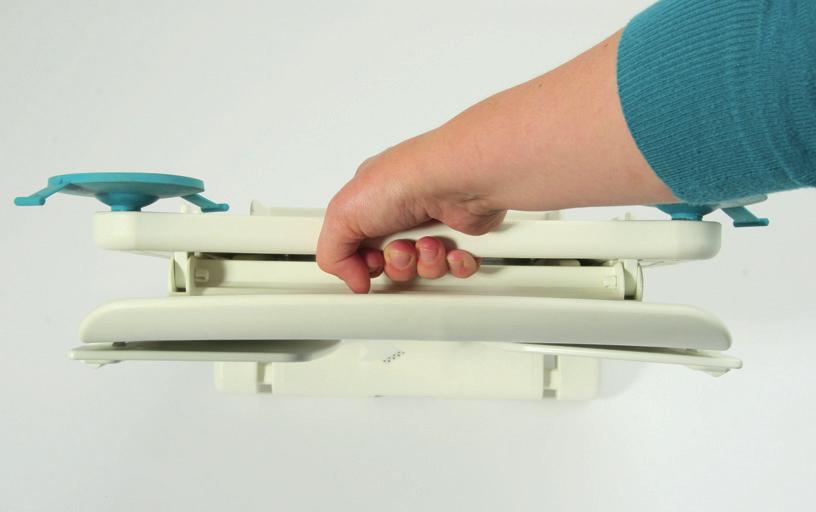
7 Sonaris User Guide-English+Languages 3/9/07 9:31 am Page 4 English Take particular care to avoid back injury when removing the Bathmaster Sonaris from the bath. Follow safe moving and handling procedures. Seek help if you are unsure about installing or removing the bathlift safely yourself. Transport the unit A handle hole is provided in the lower section of the seat unit to enable easier carrying (see Fig.9). Please ensure you do not trap your fingers during use. Care and cleaning After bathing, clean the seat with a disinfectant wipe, spray or a mild disinfectant solution then rinse with clean water. This is particularly important when using the Bathmaster Sonaris for more than one person. The frame should be cleaned weekly with a mild solution of detergent or disinfectant in warm water. Do not use strong solutions of disinfectant. If bleach is used for cleaning always ensure that a diluted solution is used and that it is thoroughly removed by rinsing with clean water. Ensure that the bath lift is completely dry before storing it. We recommend cleaning the Bathmaster Sonaris thoroughly when changing location or patient Technical specifications Degree of protection against ingress of water: Actuator motor housing...ip66 Hand Controller...IP67 Motor power rating:...12v DC...Max 6 amps Hand controller power rating battery: v DC...Max 6 amps...nimh 1500mAh Hand controller operating force:...2.8n Time for a complete charge:...3h Transport and storage conditions: Temperature C to +35 C (-4 Fto +95 F) Relative humidity...30% to 70% Atmospheric pressure...700pa to 1100hPa Conditions for use: Temperature C to +45 C (+50 F to +113 F) Relative humidity...30% to 100% Atmospheric pressure...700pa to 1100hPa Type of protection against shock:...internally powered equipment Degree of protection against electric shock:...type B Mode of operation:...15% Maximum user weight: kg (22 stone, 308 lbs) Time for a complete charge:...3h Noise emission of drive without load (according DIN3746):...52 db (A) Number of complete cycles with a fully charged battery..13 Cycles with 140kg...18 Cycles with 100kg Product lifetime: Cycles Total product weight: kg Disassembled: Seat frame assembly kg Backrest frame assembly...4.6kg Hand controller...0.5kg Dimensions: (See fig 10 & 11) Seat height (A)...75mm to 455mm Overall height in highest position (B) mm Overall length in highest position (C)...700mm Overall length in reclinest position (C)...880mm Seat Length (D)...510mm Recline positions (E)...7 to 40 Width of seat with extended side flaps (F)...680mm Width of backrest (G)...360mm Width of base (H)...360mm Width of seat (I)...375mm Possible Cause Warranty Homecraft Rolyan Ltd warrants that the Bathmaster Sonaris Bath Lift is free from defects in material and workmanship. This warranty shall remain in effect for the following terms: Five years from the date of original consumer purchase for the frame Two years from the date of original consumer purchase for the hand controller and recharger. In the event that the unit needs inspection or repair, contact Homecraft Rolyan Ltd, the distributor or an approved agent. This warranty does not cover the following: Replacement parts or labour furnished by anyone other than Homecraft Rolyan Ltd, the distributor or an approved agent. Any failure of the unit during the warranty period if the failure is not caused by defect in material or workmanship or if the failure is caused by unreasonable use. Homecraft Rolyan Ltd is not liable for incidental or consequential injury or damage to property. Should it be necessary to return the Bathmaster Sonaris, it is essential it is adequately packed to protect it in transit, preferably in its own purpose made original box, otherwise Homecraft Rolyan Ltd cannot accept any responsibility for transit damage to the unit. Any attempt at repair or maintenance by persons other than Homecraft Rolyan Ltd trained or approved personnel will void this warranty. Maintaining the Unit The Bathmaster Sonaris should be inspected before each use to ensure it is free from damage and excess wear. The Bathmaster Sonaris is built to give long, reliable use, without need for servicing. Whilst being robust, the lift should be treated with care and in particular should not be dropped. If damage or deterioration is suspected, please contact Homecraft Rolyan Ltd or the distributor, for repair by an approved agent. For professionals issuing the Bathmaster Sonaris, Homecraft Rolyan Ltd recommend that it receives bi-annual inspections in line with requirements of the Lifting Operations and Lifting Equipment Regulations 1998 (LOLER). Inspections should only be carried out by trained and experienced personnel. We recommend giving the product a thorough inspection when changing location or patient. Replacement components and accessories Replacement Suction Feet (set of 4) Seat Covers Pack of 1 normal cover Pack of 1 Gel cover Hand Controller with Battery Pack Battery Recharger North America AA1371U Europe AA1371E Australia / New Zealand AA1371A UK / Ireland AA1371 Japan AA1371J Swivel Transfer Seat Head Rest Safety Belt Side Flap Protectors Recycling Bathlift, hand controllers and recharger must be disposed of correctly, if in doubt contact your local refuse site. The bath seat is made from plastic; Hand controller contains electronic components and NiMH batteries; Actuator and recharger contain electronic components; please separate and dispose of correctly. Troubleshooting Guide Solution Is the correct button on the hand controller being pressed? Is the hand controller fully connected to the actuator cable? Arrows on the buttons point away from or towards the water to indicate the direction of travel as shown right. Push the connectors together until the rubber seal meets the female socket. UP Does the hand controller have sufficient charge? See Charging the battery for instructions. DOWN 4
8 Sonaris User Guide-English+Languages 3/9/07 9:31 am Page 5 Einleitung Bathmaster Sonaris ist ein Patientenbadelifter, das dafür vorgesehen ist, dem Badenden beim Ein- und Aussteigen aus der Badewanne zu helfen. Dafür entwickelt, das Badevergnügen sowohl für den Badenden als auch das Pflegepersonal sicherer und einfacher zu machen, ist der Bathmaster Sonaris ein vollständig batteriebetriebener, eigenständiger Badesitz, der keine Sanitär- oder elektrische Installation benötigt und ist geeignet für die Verwendung im Privathaushalt oder öffentlichen Institutionen. Der Badelift faltet sich kompakt und ist in zwei Teile geteilt, wodurch er leicht getragen, transportiert und aufbewahrt werden kann. Der Bathmaster Sonaris kann in jeder Standardbadewanne leicht positioniert werden. (Anmerkung: Es gibt einige extrem schmale und gebogene Ausführungen von Badewannen, für die ein elektrisch betriebener Badesitz nicht geeignet ist.) Der Rahmen steht auf vier Füßen mit Saugnäpfen, die zur Anpassung an einen gebogenen Badewannenboden gedreht werden können. Mit den integrierten Zugschlaufen an den Saugfüßen plus dem hinteren Freigabesystem kann der Bathmaster Sonaris leicht von der Badewanne abgenommen werden. Ersatzkomponenten und Zubehör sind verfügbar. Komponenten Der Bathmaster Sonaris enthält folgende Komponenten: Untere Sitzeinheit aus weißem Plastik mit Seitenklappen Übergabeklappen und vier blauen Saugfüßen, Rückenlehne aus weißem Plastik mit Motor und Kabel, zwei blaue Seitenklappenschützer, Handsteuereinheit, die den Batteriesatz enthält, mit LED-Warnleuchte für Batterieentladung und Warntongeber, Batterielader mit länderspezifischem Kabel und Stecker und die Bedienungsanleitung. Wenn irgendeine der oben aufgeführten Komponenten fehlt oder beschädigt ist, verwenden Sie den Bathmaster Sonaris nicht und wenden Sie sich an Ihren Lieferanten oder an Homecraft Rolyan. Für höheren Komfort und weitere Funktionen ist optionales Zubehör verfügbar. Folgendes ist durchzuführen Bevor Sie den Bathmaster Sonaris das erste Mal verwenden, lesen Sie diese Anweisungen und machen Sie sich mit dem Gerät und der Hebetechnik vertraut. Machen Sie sich auch mit der Bedienung des Sitzes vertraut, bevor er für das Senken oder Heben einer Person verwendet wird. Bewahren Sie diese Anleitungen zum späteren Nachschlagen dort auf, wo Personen, die den Badelift benutzen, Zugriff haben. Stellen Sie sicher, dass die Eignung des Gerätes zum Heben einer individuellen Person beurteilt wird. Die Beurteilung der Eignung eines beliebigen Patienten-Hebegeräts obliegt der Verantwortung einer Gesundheitspflege-Fachkraft oder Pflegeperson. Dabei müssen einige Sachverhalte einschließlich der folgenden berücksichtigt werden: Größe und Gewicht der individuellen Person sowie deren Oberkörperkraft, Gleichgewicht, Koordination, Wahrnehmung, Hüftflexibilität und deren Neigung zu Krämpfen. Inspizieren Sie das Gerät vor jeder Benutzung und stellen Sie sicher, dass es frei von Beschädigungen und übermäßiger Abnutzung ist. Zweijährige Inspektionen durch ausgebildete Techniker werden überaus empfohlen (siehe Gerätewartung). Stellen Sie sicher, dass sowohl die Oberfläche der Badewanne als auch der Saugnapffüße sauber, trocken und frei von Seifen- und Badeölrückständen sind, bevor der Bathmaster Sonaris in der Badewanne befestigt wird. Verwenden Sie den Bathmaster Sonaris nur mit Zubehör, Handsteuereinheiten und Ladegeräten, die von Homecraft Rolyan geliefert wurden. Wenn der Bathmaster Sonaris von einer behinderten Person ohne fremde Hilfe benutzt wird, stellen Sie sicher, dass im Falle von Schwierigkeiten oder eines Notfalls ein Alarmsystem oder Telefon zur Verfügung bereit steht. Folgendes darf nicht getan werden Überschreiten Sie nicht die maximale Hebefähigkeit des Geräts = 140 kg (22 Stone, 308 lbs). Es ist ein Überlastungs-Schutzmechanismus vorhanden und der Lift arbeitet nicht, wenn die maximale Belastung überschritten wird. Falls ein Patient, mit dem die Maximalbelastung überschritten wurde, bereits teilweise gesenkt wurde, bevor der Überlastmechanismus auslöste, kann der Patient angehoben werden, indem ein kleiner Teil dessen Gewichts manuell gestützt wird, was die Rückstellung des Überlastmechanismus ermöglicht. Anmerkung: Der Überlastmechanismus wird automatisch zurückgesetzt. Es ist jedoch wichtig, sicherzustellen, dass das Gerät in keinster Weise beschädigt wurde und es sollte vor der nächsten Benutzung sorgfältig inspiziert werden. Verwenden Sie den Bathmaster Sonaris nicht als Unterstützung, beim Stehen. Verwenden Sie die Einheit nicht bei einer Neigung von über 5. Betätigen Sie die Handsteuereinheit nicht, solange die Einheit demontiert ist. Verwenden Sie den Bathmaster Sonaris nicht, wenn Metallteile an den Steckverbindern oder an den Kabeln freiliegen. Benutzen Sie den Bathmaster Sonaris nicht für Anwendungen, für die er nicht konzipiert wurde und die in diesen Anleitungen nicht beschrieben sind. Erlauben Sie Kindern nicht, mit dem Bathmaster Sonaris, seinen Teilen oder seinem Zubehör zu spielen. Achten Sie während des Zusammenbaus, der Benutzung oder der Reinigung darauf, Ihre Finger nicht zwischen irgendwelche sich bewegende Teile zu stecken, insbesondere im Bereich der Rückenlehne (siehe Abb. 1). Tragen Sie die Rückenlehne des Bathmaster Sonaris nicht am Antriebsmechanismus. Laden der Batterie Der Bathmaster Sonaris wird mit einer Handsteuereinheit bedient, die von einer aufladbaren Batterie versorgt wird. Jede Handsteuereinheit ist vollständig wasserdicht und hat auf ihrer Grundplatte zwei Saugnäpfe, womit sie an einer geeigneten Stelle befestigt werden kann. Die Batterien werden mit Niederspannungs-Ladegeräten geladen, die für die Elektrizitätsversorgung des jeweiligen Landes ausgelegt sind. Die Handsteuereinheit muss vor der ersten Verwendung und wann immer die Batterie schwach ist, geladen werden. Vor der ersten Benutzung sollte die Handsteuereinheit mindestens 3 Stunden geladen werden. Die optimale Batteriekapazität wird erst nach einigen Ladezyklen erreicht. Das Laden der Batterie sollte außerhalb des Badezimmers und entfernt von anderen Wasserquellen erfolgen. Wenn die Ladekapazität zu niedrig ist, leuchtet die Lampe am Batteriesatz. Wenn die Leuchte während des Hebens oder Senkens blinkt, ist noch genügend Leistung für einen bis zu drei vollständigen Zyklen vorhanden. Wenn die Lampe permanent leuchtet, ist nur noch genügend Ladung für einen kompletten Hebevorgang vorhanden. Das Gerät lässt sich dann jedoch nicht mehr in die Badewanne absenken. Verwenden Sie die Einheit nicht, solange an der Handsteuereinheit die Warnleuchte für niedrige Batterieladung permanent leuchtet. Laden Sie sie vor der Verwendung. Außerdem informiert ein Warnton den Benutzer über die schwache Batterie. Wiederholte Pieptöne während des Hebens oder Senkens zeigen dem Benutzer, dass noch genügend Leistung für einen bis zu drei vollständigen Zyklen vorhanden ist. Ein ununterbrochener Piepton warnt den Benutzer über die nahezu vollständige Entladung der Batterie. Für einen kompletten Hebevorgang bleibt noch genügend Leistung vorhanden aber die Einheit lässt sich dann nicht mehr in die Wanne absenken. Benutzen Sie die Einheit nach konstantem Warnton nicht mehr. Laden Sie sie vor der nächsten Verwendung. Die Handsteuereinheit ist so konzipiert, dass sie während sie am Bathmaster Sonaris angeschlossen ist, nicht gleichzeitig geladen werden kann. Die Handsteuereinheit sollte vom Bathmaster Sonaris entfernt werden, sollte das Gerät einige Zeit nicht verwendet werden. Wenn Sie die Einheit länger als eine Woche lagern, laden Sie die Batterie vor der Lagerung und nochmals vor der Verwendung. Alle Batteriesätze sind hermetisch geschlossene Einheiten und die Akkus sind nicht austauschbar. Die Ladegeräte sind zur Verwendung mit nicht-ladbaren Batterien nicht geeignet. Stellen Sie sicher, dass der Steckverbinder (siehe Abb. 2) an der Handsteuereinheit vollständig trocken ist, bevor er in das Ladegerät oder in den Badelift gesteckt wird. Inspizieren Sie das Ladegerät und das Netzkabel vor der Verwendung, um sicherzugehen, dass diese nicht beschädigt sind. Die kleinen Belüftungslöcher auf der Unterseite der Handsteuereinheit (siehe Abb. 3) dürfen nicht abgedeckt werden und müssen frei von Schmutz und Fremdkörpern sein. Vorhandenen Schmutz oder Fremdkörper mit einem feuchten Tuch abwischen. Nachladen der Handsteuereinheit (siehe Abb. 2) Um die Batterie zu laden, verwenden Sie folgende Vorgehensweise: 1. Ziehen Sie das Kabel der Handsteuereinheit vom Gerät ab. 2. Stellen Sie sicher, dass der Steckverbinder trocken ist. 3. Schließen Sie das Kabel der Handsteuereinheit am Kabel des Ladegeräts an. 4. Stecken Sie das Ladegerät in eine Netzsteckdose. Die Kontrollleuchte am Ladegerät zeigt Folgendes an: Gelb Orange Grün Orange blinkend Keine Batterie angeschlossen Laden Voll geladen Batteriefehler Eine komplette Ladung benötigt etwa 3 Stunden; die Batterie kann ständig am Ladegerät angeschlossen bleiben. Anmerkung: Nach Beendigung des Ladevorgangs kann die Handsteuereinheit heiß sein. Dies ist normal und stellt kein Problem dar. Deutsch 5
9 Sonaris User Guide-English+Languages 3/9/07 9:31 am Page 6 Deutsch Verbesserung der Batterielebensdauer Nach der letzten Verwendung mindestens 1 Stunde bis zum Nachladen warten. Nach dem Laden mindestens 1 Stunde bis zur nächsten Verwendung der Handsteuereinheit warten. Verbesserung der Batterieleistung Wenn sich die Kapazität der Handsteuereinheit zusehends verringert (die Einheit leistet beispielsweise nach einer Vollladung weniger Hebezyklen als erwartet), ist eventuell eine Rekonditionierung erforderlich. Um die volle Kapazität der Batterie wieder zu erlangen, verwenden Sie folgende Vorgehensweise: Entfernen Sie den Bathmaster Sonaris aus der Badewanne. Fahren Sie den leeren Sitz ohne eine Person fortlaufend nach oben und unten, bis die Lampe am Batteriesatz aufleuchtet. Warten Sie mindestens 1 Stunde bis zum Nachladen der Batterie. Laden Sie die Handsteuereinheit etwa 3 Stunden (warten Sie, bis die Lampe am Ladegerät grün aufleuchtet). Warten Sie mindestens 1 Stunde bis zur nächsten Verwendung der Handsteuereinheit. Wiederholen Sie viermal die Schritte 2 bis 5. Vorbereitung der Einheit zur Verwendung Wenn die Badewanne Handgriffe hat, werden eventuell die Seitenklappenschützer benötigt. Montage der Seitenklappenschützer Die Seitenklappenschützer ermöglichen eine reibungslose Bewegung der Seitenklappen nach oben und unten, ohne dass sie unter den Handgriffen an der Badewanne hängen bleiben. Klammern Sie die Schützer mit den kurzen Kanten zur Außenseite der Badwanne gerichtet an die Handgriffe. Wenn sie richtig angebracht sind, sollten sie an der unteren Kante der Wanne (siehe Abb. 4) anliegen. Falls erforderlich müssen Sie in der Länge angepasst werden. Scharfe Kanten am gekürzten Ende können mit Schmirgelpapier oder einer Feile entfernt werden. Installation des Badelifts Stellen Sie vor der Verwendung sicher, dass keine Hindernisse in der Badewanne vorhanden sind, die verhindern, dass der Rahmen frei und voll und ganz auf seinen Saugnapffüßen steht. Achten Sie auch darauf, dass der Sitz frei gehoben und gesenkt werden kann, ohne dass er an irgendwelchen Teilen an der Wannenoberfläche oder an den Badewannenarmaturen hängen bleibt. Sie müssen den Bathmaster Sonaris anheben und in die Badewanne platzieren. Wenn Sie meinen, dass Sie damit Schwierigkeiten haben oder wenn Sie unsicher sind, wie das Gerät korrekt gehoben wird, fragen Sie jemand um Hilfe. Seien Sie besonders vorsichtig, um Rückenverletzungen beim Heben der Einheit in und aus der Badewanne zu vermeiden, indem Sie sichere Transport- und Handhabungsverfahren einhalten und den Bathmaster Sonaris in seine Einzelteile zerlegen. Minimieren Sie das Risiko, zu stolpern und zu fallen oder den Rahmen fallen zu lassen, indem Sie darauf achten, dass der Badezimmerboden trocken und frei von Hindernissen ist. Platzieren der Einheit in der Badewanne Entfernen Sie die Rückenlehne von der Sitzeinheit, indem Sie diese nach vorne auf den Sitz klappen und gerade von der Sitzeinheit abheben. Prüfen Sie, ob die Saugfüße sicher an ihrem Platz auf dem Rahmen des Bathmaster Sonaris sitzen, bevor Sie den Sitz in die Badewanne ablassen. Platzieren Sie die Sitzeinheit nahe der Badewanne, um die Tragedistanz und das nachfolgende Heben in die Badewanne zu minimieren. Heben Sie die Sitzeinheit in die Wanne und platzieren Sie sie auf das gegenüberliegende Ende der Wannenarmaturen. Stellen Sie dabei sicher, dass die Scharniere der Rückenlehne nach hinten zeigen, und genügend Raum für das Zurücklehnen der Einheit vorhanden ist. Achten Sie darauf, dass die Seitenklappen nach oben stehen und nicht unter irgendeinem an der Badewanne angebrachten Handgriff hängen bleiben können, wenn sich der Sitz wieder nach oben bewegt. Sollte dies der Fall sein, müssen Seitenklappenschützer verwendet werden. Die Saugfüße müssen eventuell gedreht werden, damit der Sitz so weit nach hinten und so sicher wie möglich platziert werden kann. Stellen Sie sicher, dass alle vier Füße mit der Wannenoberfläche in Kontakt sind und nicht auf einer Badematte oder einem ähnlichen Teil stehen. Drücken Sie die Füße fest gegen den Wannenboden. Montage der Rückenlehne auf der Sitzeinheit 1. Legen Sie die Rückenlehne mit der Oberseite nach unten auf die Sitzeinheit und richten Sie die Lehne an den Scharnieren aus. 2. Senken Sie die Scharniere in die Halterungen und stellen Sie sicher, dass sie vollständig eingeführt sind. 3. Überprüfen Sie den Antriebsmechanismus, ob er vollständig in die Säule eingefahren ist. Wenn nicht, kann dies durch den Anschluss der Handsteuereinheit (siehe unten) und Drücken der Taste Senken erledigt werden. 4. Heben Sie die Vorderseite der Rückenlehne an und drehen Sie sie nach oben in die Lehnenposition. 5. Stellen Sie sicher, dass die Lehne fest an der Sitzeinheit befestigt ist und der Antriebmechanismus vollständig in die Säule eingefahren ist, bevor Sie die Einheit betätigen. Anschluss der Handsteuereinheit 1. Stellen Sie sicher, dass der Steckverbinder an der Handsteuereinheit vollständig trocken ist, bevor er in den Badelift gesteckt wird. 2. Stecken Sie den roten Steckverbinder der Handsteuereinheit in den passenden gelben Stecker an der Leitung vom Liftmechanismus (siehe Abb. 5). Die Stecker haben eine Eiform und ermöglichen damit einen einfachen und genauen Anschluss. 3. Stellen Sie sicher, dass die Steckverbindung vollständig zusammenpasst, bevor der Badelift verwendet wird. 4. Platzieren Sie die Handsteuereinheit wo es möglich ist mit den Saugnäpfen seitlich an der Badewanne. Stellen Sie sicher, dass das Kabel frei vom Sitz verläuft und die Steckverbindung sich nicht durch die Bewegung des Sitzes lösen kann. 5. Die Bedienung oder die Sicherheit wird nicht beeinträchtigt, falls die Handsteuereinheit oder der Steckverbinder während der Verwendung ins Wasser fallen. Verwendung der Einheit während des Badens Stellen Sie vor jeder Verwendung sicher, dass der Bathmaster Sonaris in aufrechter Position stabil und sicher steht. Prüfen Sie, dass weder die Warnleuchte leuchtet noch der Piepton ertönt, wenn die Handsteuereinheit benutzt wird. Laden Sie falls erforderlich vor der Verwendung die Batterie. Stellen Sie sicher, dass die Einheit getestet wird, bevor sie der Badende benutzt. Prüfen Sie mit der Handsteuereinheit, ob sich der Sitz ohne Behinderung nach oben und unten bewegt und ob sich die Lehne zurücklegt. Stellen Sie sicher, dass die Wassertemperatur weder zu heiß noch zu kalt ist. Bedienung der Handsteuereinheit: Zum Heben drücken Sie das Tastfeld (C) und zum Senken (B) (siehe Abb. 6). Die Tastenfelder sind zur Unterstützung von Sehbehinderten mit Erhöhungen auf dem Tastfeld (C) zum Heben und Vertiefungen auf dem Tastfeld (B) zum Senken versehen. Wenn eines der beiden Tastfelder gedrückt wird, blinkt die Warnleuchte und der Piepton ertönt, um die Funktion zu signalisieren. Während des Senkens oder Hebens kann der Hebemechanismus jederzeit gestoppt werden, indem der Druck auf das Tastfeld freigegeben wird, und die Bewegung in die Gegenrichtung durch Drücken des anderen Feldes gestartet werden. Stoppen Sie bei einem Notfall sofort die Einheit, indem Sie die Steckverbindung zwischen der Handsteuereinheit und dem Badelift auseinanderziehen (siehe Abb. 7 und 8). Die Hände sollten während des Senkens oder Hebens von den Seiten und vom Boden des Bades sowie von den Seiten des Sitzes entfernt gehalten werden. Beine und Füße sollten nicht unter den Sitz platziert werden. Es ist sicherzustellen, dass die Füße des Badenden sich vor dem Rahmen befinden. Wenn man auf dem Bathmaster Sonaris sitzt, nicht gegen die Wanne drücken, so dass sich der Badelift vom Boden der Wanne abhebt, da dadurch der Badelift unstabil wird. Nachdem der Bathmaster Sonaris richtig in der Badewanne positioniert wurde, kann er wie folgt verwendet werden. 1. Heben oder senken Sie den Sitz, bis die Seitenklappen eben auf dem Rand der Badewanne aufliegen. 2. Stellen Sie sich mit dem Rücken zur Wanne direkt vor den Sitz und setzen Sie sich auf die äußere Seitenklappe. 3. Gleiten Sie nach hinten, bis Ihr Gesäß sich in der Mitte des Sitzes befindet. 4. Drehen Sie sich herum und heben Sie nacheinander jedes Bein über den Badewannenrand. 5. Senken Sie mit der Handsteuereinheit den Sitz in das Bad und halten Sie Ihre Füße und Hände von der Unterseite des Sitzes entfernt. 6. Die Einheit stoppt am untersten Punkt des Bewegungshubs. Um die Sitzlehne nach hinten zu legen, das Tastfeld Senken freigeben und nochmals drücken. 7. Wenn Sie sich in der gewünschten Rücklehnenposition befinden, geben Sie einfach den Druck auf das Tastfeld frei. 6
10 Sonaris User Guide-English+Languages 3/9/07 9:31 am Page 7 Wenn das Bad beendet ist, steigen Sie aus dem Bad, indem Sie die folgenden Schritte 8 bis 10 durchführen. 8. Verwenden Sie die Handsteuereinheit, um den Sitz aus der Wanne zu heben. Achten Sie dabei darauf, dass die Seitenklappen und die Hände nicht unter irgendwelchen an der Wanne montierten Handgriffe eingeklemmt werden. 9. Drehen Sie sich herum und heben Sie nacheinander jedes Bein über den Badewannenrand. 10. Gleiten Sie auf dem Sitz, bis sich Ihr Gesäß auf der äußeren Seitenklappe befindet. 11. Stehen Sie mit dem Rücken zur Badewanne auf. Wo es möglich ist, sollte die Bedienung der Handsteuereinheit bevorzugt durch den Badenden statt durch einen Helfer erfolgen, damit diese die vollständige Kontrolle haben und die Bewegung bei einem Problem selbst stoppen können. Der Sitz bewegt sich nur, während eine der Tasten auf der Steuereinheit gedrückt wird. Entfernen der Einheit aus der Badewanne Trennen Sie die Handsteuereinheit vom Hebemechanismus, indem Sie die Steckverbindung auseinanderziehen (siehe Abb. 7). Laden Sie falls erforderlich die Handsteuereinheit (siehe Laden der Batterie ). Falls es möglich ist, kann der Bathmaster Sonaris in der Badewanne stehen bleiben. Sollten Sie ihn jedoch entfernen, befolgen Sie eine der folgenden Vorgehensweisen: Entfernung der demontierten Einheit 1. Minimieren Sie das Risiko, zu stolpern und zu fallen oder den Rahmen fallen zu lassen, indem Sie darauf achten, dass der Badezimmerboden trocken und frei von Hindernissen ist. 2. Lassen Sie das gesamte Wasser aus der Wanne ablaufen. 3. Senken Sie den Sitz auf den Boden der Wanne und legen Sie die Rückenlehne zurück. 4. Falten Sie die Seitenklappen auf den Sitz. 5. Falten Sie die Rückenlehne nach vorne auf den Sitz. 6. Stellen Sie sicher, dass die Scharniere ausgerastet sind und heben Sie die Rückenlehne vom Sitz ab und entfernen Sie sie aus der Wanne. 7. Ziehen Sie die Schlaufen der Saugnäpfe nach oben, um die angesaugten Vorderfüße zu lösen und heben Sie die Vorderseite der Sitzeinheit von der Oberfläche der Badewanne ab. Die hinteren Saugfüße sollten sich dabei automatisch lösen, so dass die Sitzeinheit leicht aus der Badewanne entfernt werden kann. Entfernung der gefalteten Einheit 1. Minimieren Sie das Risiko, zu stolpern und zu fallen oder den Rahmen fallen zu lassen, indem Sie darauf achten, dass der Badezimmerboden trocken und frei von Hindernissen ist. 2. Lassen Sie das gesamte Wasser aus der Wanne ablaufen. 3. Senken Sie den Sitz auf den Boden der Wanne und legen Sie die Rückenlehne zurück. 4. Falten Sie die Seitenklappen auf den Sitz. 5. Falten Sie die Rückenlehne nach vorne auf den Sitz. 6. Ziehen Sie die Schlaufen nach oben, um die angesaugten Vorderfüße zu lösen und heben Sie die Vorderseite der Sitzeinheit von der Oberfläche der Badewanne ab. Die hinteren Saugfüße sollten sich dabei automatisch lösen, so dass die Sitzeinheit leicht aus der Badewanne entfernt werden kann. Seien Sie beim Entfernen des Bathmaster Sonaris aus der Badewanne besonders vorsichtig, um Rückenverletzungen zu vermeiden, und befolgen Sie sichere Transport- und Handhabungsverfahren. Wenn Sie unsicher sind, ob Sie den Badelift selbst installieren oder entfernen können, lassen Sie sich dabei helfen. Transport der Einheit Für bequemes Tragen befindet sich im unteren Abschnitt der Sitzeinheit eine Handgrifföffnung (siehe Abb. 9). Stellen Sie sicher, dass Sie während der Benutzung keine Finger einklemmen. Pflege und Reinigung Reinigen Sie den Sitz nach dem Baden mit einem Desinfektions-Wischtuch, einem Desinfektions-Spray oder einer milden Desinfektionslösung und spülen Sie ihn dann mit sauberem Wasser ab. Die Desinfektion ist besonders wichtig, wenn der Bathmaster Sonaris für mehr als eine Person verwendet wird. Der Rahmen sollte wöchentlich mit einer milden Lösung aus Reinigungs - oder Desinfektionsmittel in warmem Wasser gereinigt werden. Verwenden Sie keine starken Lösungen oder Desinfektionsmittel. Wenn zur Reinigung ein Bleichmittel verwendet werden soll, achten Sie immer darauf, dass eine verdünnte Lösung angewandt wird und dass diese durch Abspülen mit sauberem Wasser gründlich entfernt wird. Stellen Sie sicher, dass der Badelift vollständig trocken ist, bevor er gelagert wird. Bei Patientenwechsel oder Umstellung des Bathmaster Sonaris empfehlen wir eine gründliche Reinigung. Technische Daten Schutzgrad gegen Eindringen von Wasser: Aktuatormotorgehäuse...IP66 Handsteuereinheit...IP67 Motornenndaten:...12 VDC...Max. 6 A Handsteuereinheit - Batterienenndaten:...16,8 VDC...Max. 6 A...NiMH 1500 mah Handsteuereinheit-Betätigungskraft:...2,8 N Dauer einer vollständigen Ladung:...3 h Transport- und Lagerungsbedingungen: Temperatur: C bis +35 C (-4 F bis +95 F) Relative Feuchtigkeit:...30 % bis 70 % Luftdruck: Pa bis 1100 hpa Betriebsbedingungen: Temperatur: C bis +45 C (+50 F bis +113 F) Relative Feuchtigkeit:...30 % bis 100 % Luftdruck: Pa bis 1100 hpa Schutzart gegen Stöße:...Intern stromversorgte Einheit Schutzgrad gegen Stromschlag:...Typ B Betriebsart:...15 % Maximales Benutzergewicht: kg (22 Stone, 308 lbs) Dauer einer vollständigen Ladung:...3 h Lärmabgabe des Antriebs ohne Belastung (entsprechend DIN3746):.52 db (A) Mit einer voll geladenen Batterie sind folgendes möglich:...13 komplette Hebe-Zyklen von 140 KG...18 komplette Hebe-Zyklen von 100 KG Produktlebensdauer: Zyklen Gesamtes Produktgewicht:...12,3 kg Demontiert: Sitzrahmeneinheit...7,2 kg Rückenlehnenrahmeneinheit...4,6 kg Handsteuerung...0,5 kg Abmessungen: (siehe Abb. 10 & 11) Sitzhöhe (A)...75 bis 455 mm Gesamthöhe in höchster Stellung (B) mm Gesamtlänge in höchster Stellung (C) mm Gesamtlänge in zurückgelehntester Stellung (C) mm Sitzlänge (D) mm Rückenlehnenstellungen (E)...7 bis 40 Sitzbreite mit ausgeklappten Seitenklappen (F) mm Rückenlehnenbreite (G) mm Sockelbreite (H) mm Sitzbreite (I) mm Deutsch 7
18. Wahlperiode Drucksache 18/257
 18. Wahlperiode 15.03.2019 Drucksache 18/257 Schriftliche Anfrage der Abgeordneten Ludwig Hartmann, Christian Hierneis BÜNDNIS 90/DIE GRÜNEN vom 07.12.2018 Landschaftselemente in der bayerischen Agrarlandschaft
Exposé zum Gewerbeobjekt
 Exposé zum Gewerbeobjekt 8055 Graz Gradnerstraße 54 Quelle: Google-Maps O B J E K T D A T E N Objektadresse: 8055 Graz, Gradnerstraße 54 Objekttyp: Einheit: Nutzfläche: Parkplätze: zu vermieten ab: Geschäftsgebäude
FRANKFURT AM MAIN METROPOLREGION AUF WACHSTUMSKURS CLUB DES AFFAIRES DE LA HESSE BUSINESS LUNCH
 FRANKFURT AM MAIN METROPOLREGION AUF WACHSTUMSKURS CLUB DES AFFAIRES DE LA HESSE BUSINESS LUNCH ANDREAS VÖLKER Frankfurt, 9. November 2017 Agenda Boomtown Frankfurt / Main The Only Way is Up? 1 Office
BESTA525 BESTA528 BESTA530.
 4 1 2 3 5 6 www.blackanddecker.eu 7 9 8 BESTA525 BESTA528 BESTA530 25 26 8 10 11 6 A 9 B 4 12 C D 13 5 E F 2 2 14 3 G H I 60cm 5º - 10º J 5 K L 3 25 17 18 16 19 15 M N 20 O 19 P 21 24 Q 22 23 R 4 (Original
T10 Treadmill.
 T10 Treadmill User manual Benutzerhandbuch Manuel de l utilisateur Gebruikershandleiding Manuale d uso Manual del usuario Bruksanvisning Käyttöohje Serial number Seriennummer Numéro de série Serienummer
3. ProModel Move Logic
 Gliederung 1. Grundkenntnisse zur Simulation 2. Einführung in ProModel 3. Grundbausteine von ProModel 4. Path Networks 5. Variablen und Counter 6. User Distributions 7. Attribute 8. Uhrzeitabhängiges Routing
Clubhouse User Manual
 Clubhouse User Manual For Round Propel Trampoline Models Assembly, Installation, Care, Maintenance, and User Instructions WARNING READ THESE MATERIALS PRIOR TO ASSEMBLING AND USING THIS TRAMPOLINE CLUBHOUSE
USER MANUAL EN IN 7152 Power Rack insportline Cable Column CC300
 USER MANUAL EN IN 7152 Power Rack insportline Cable Column CC300 CONTENTS IMPORTANT SAFETY PRECAUTIONS... 3 PARAMETERS... 3 PARTS LIST... 4 HARDWARE LIST... 5 ASSEMBLY... 6 USAGE... 14 TERMS AND CONDITIONS
adjustable height mechanisms
 adjustable height mechanisms lifts to make worktops height adjustable mechanisms for wall cupboards adaptability create adaptable working environments enable working spaces to suit all users and carers
BEMW461BH BEMW471BH BEMW481BH.
 2 1 3 4 5 7 6 8 10 9 13 12 11 www.blackanddecker.eu BEMW461BH BEMW471BH BEMW481BH 8 8 13a 13a 13b 13c A 13d B 13b 13c 13b 13a 13c C D 13b 13a 7 13c 13d E F 2 4 5 6 6 14 7 G H 9 2 13 13g I 13f J 11 12 K
Invacare Stand Assist
 Invacare Stand Assist RPS350 1E, RPS350 1FR en de es fi fr it nl pt Patient Lift User Manual............................... 3 Aufstehlifter Gebrauchsanweisung........................ 45 Grúa de bipedestación
Patrick Grüneberg (Hg.) Das modellierte Individuum Biologische Modelle und ihre ethischen Implikationen
 Das modellierte Individuum Biologische Modelle und ihre ethischen Implikationen") Aus: Patrick Grüneberg (Hg.) Das modellierte Individuum Biologische Modelle und ihre ethischen Implikationen Juli 2012, 262 Seiten, kart., 29,80, ISBN 978-3-8376-2015-3 Debatten um Doping sind wesentlich
Aus: Patrick Grüneberg (Hg.) Das modellierte Individuum Biologische Modelle und ihre ethischen Implikationen Juli 2012, 262 Seiten, kart., 29,80, ISBN 978-3-8376-2015-3 Debatten um Doping sind wesentlich
Kvadrat Soft Cells Installation guide
 Kvadrat Soft Cells Installation guide version 2017.07.03 Introduction Kvadrat Soft Cells are patented panels that control sound absorption. Their design is based on an innovative, aluminium frame, with
18.0 V CORDLESS HYDRAULIC CRIMPING TOOL B1300L CE
 1 18.0 V CORDLESS HYDRAULIC CRIMPING TOOL B1300L CE The next generation of Cembre cordless hydraulic tools represents a significantly advantageous evolution from current models. Born of the renowned B131LN
INSTRUCTION MANUAL MM-601J. Series FS4-3 General Purpose Liquid Flow Switch
 INSTRUCTION MANUAL MM-601J 246796 Series FS4-3 General Purpose Liquid Flow Switch INSTALLATION STEP 1 - Paddle Sizing Determine the correct paddle length for your installation from the chart below. Pipe
Transparency of the German Property Market
 Transparency of the German Property Market Dipl.Ing. Maximilian KARL, Germany Keywords: Regional, Supra-Regional and Federal Transparency of the Property Market SUMMARY The German legislative body has
Hotel Accessibility Pack
 Hotel Accessibility Pack Thank you for considering the Hilton Aberdeen Treetops Hotel. We are pleased to provide you with information about our hotel and our accessible facilities and services that you
TRAMPOLINE LADDER. 250 Lbs 113 Kgs MODEL# 9200TL PRODUCT MANUAL - VERSION Do not use ladder if children under 6 years of age are nearby.
 TRAMPOLINE LADDER PRODUCT MANUAL - VERSION 12.17.05 FOR AGES: 6+ WEIGHT LIMIT: 250 Lbs 113 Kgs ADULT(S) NEEDED: TOOLS NEEDED: WARNING/ADVERTENCIA CUSTOMER SERVICE Do not exceed weight limit of 250lbs.
Accessible Facilities Report Template
 Accessible Facilities Report Template Applicant Information Sheet and Report Template CCC Use Only: Project No: TRIM Ref: Project Address: [include Level and Unit No] If you have not used this template
Apeiron LTE+ / E12 Power Box LED Downlight System For Elevators. Installation Guide
 Apeiron LTE+ / E12 Power Box LED Downlight System For Elevators Installation Guide 1 Thank you for purchasing the Apeiron LTE+ LED Fixture and E12 Elevator Power Box! Support If you have questions after
Residential Accessible, Type A, and Type B Dwelling Unit Requirements 2012 International Building Code and 2009 ICC/ANSI A117.1
 Residential Accessible, Type A, and Type B Dwelling Unit Requirements 2012 International Building Code and 2009 ICC/ANSI A117.1 20 E Olive Street STE 208 PO Box 1230 Bozeman, MT 59771-1230 Phone: (406)
USER MANUAL EN Massage Tables insportline
 USER MANUAL EN Massage Tables insportline CONTENTS PRECAUTIONARY INSTRUCTIONS... 3 PARTS LIST... 3 ASSEMBLY... 4 STORAGE AND TRANSPORT... 5 TERMS AND CONDITIONS OF WARRANTY, WARRANTY CLAIMS... 5 2 PRECAUTIONARY
Property. Introduction
 This access statement does not contain personal opinions as to our suitability for those with access needs, but aims to accurately describe the facilities and services that we offer all our guests/visitors
The Danish Cadastre of Tomorrow
 Line Træholt HVINGEL, Denmark and Lars Emil Vindfeld MØLLER, Denmark. Key words: Cadastre, Cadastral Systems, Digital Cadastre, Land-use, Land-administration, Spatial Planning, Geo-information, E-governance,
GCSE German Checklist
 Unit 1 Schule Describe my school type, number of pupils, facilities etc. GCSE German Checklist Say what I do at break and what I did recently at break Describe a typical school day Ich stehe um 7 Uhr auf,
Microwave Oven User Manual
 Microwave Oven User Manual MOB 17131 X EN DE FR ES NL 01M-8856073200-4118-01 Please read this manual first! Dear Customer, Thank you for purchasing a Beko product. We hope that you get the best results
Ultimate Instructions for Use
 Format Booklet: Din A5 Farben: Schwarz, BA-Blau (Pantone?) Ultimate 1400 Curing Light Polymerisationslampe Lampe à photopolymériser Luce di polierizzazione Luz de curado Polymerisatie lamp Instructions
ADAPTABLE DESIGN GUIDELINES
 ADAPTABLE DESIGN GUIDELINES Adaptable design creates liveable residences for a wider range of persons than current building codes require. By considering design features that can be easily and inexpensively
Contents. Important Safety Instructions
 U S E R M A N U A L 2 Contents Installation - Important safety instructions 2 Important Electrical Information 3 Grounding Instructions 3 Important Operation Instructions 3 Safety Key 4 Assembly instructions
Hoogsteder Groenten en Fruit B.V.
 Terms and conditions of sale Hoogsteder Groenten en Fruit B.V. (version 1.0 dated 1 July 2015) 1. APPLICATION AND AMENDMENTS 1.1 These conditions of sale shall apply to all quotations, offers and agreements
OWNER'S MANUAL BETRIEBSANLEITUNG MODE D'EMPLOI MANUALE D'USO MANUAL DEL USUARIO HANDLEIDING BRUKSANVISNING KÄYTTÖOHJE SERIAL NUMBER SERIENNUMMER
 J7 J7F OWNER'S MANUAL BETRIEBSANLEITUNG MODE D'EMPLOI MANUALE D'USO MANUAL DEL USUARIO HANDLEIDING BRUKSANVISNING KÄYTTÖOHJE www.tunturi.com SERIAL NUMBER SERIENNUMMER NUMERO DE SERIE NÚMERO DE SERIE NUMERO
THIS CHECKLIST HAS BEEN AMENDED TO INCLUDE ONLY LEVEL ONE CRITERIA AS REQUESTED BY TIR REAL PROPERTY. As such it does not form a complete Checklist.
 Nova Scotia Building Accessibility Checklist Note OTE THIS CHECKLIST HAS BEEN AMENDED TO INCLUDE ONLY LEVEL ONE CRITERIA AS REQUESTED BY TIR REAL PROPERTY. As such it does not form a complete Checklist.
Understanding Accessibility Features to Meet Housing Needs
 Understanding Accessibility Features to Meet Housing Needs For more information about the K-W VisitAble Housing initiative: www.waterlooregion.org/visitable spckw@waterlooregion.org 519-579-1096 X *3006
System furniture. Essentiel BENCH
 System furniture Essentiel BENCH Features Shared and individual workspaces organised around a single coherent design aesthetic. Essentiel bench offers a highly optimised solution to the fitting out of
USER MANUAL EN IN Table Tennis Table insportline Rokito
 USER MANUAL EN IN 12947 Table Tennis Table insportline Rokito CONTENTS RECOMMENDATION OF USE AND PRECAUTIONS... 3 PARTS INDENTIFIER... 3 ASSEMBLY INSTRUCTIONS... 4 STEP 1... 4 STEP 2... 5 STEP 3... 5 STEP
BUILDING CODE INTERPRETATION
 BUILDING CODE INTERPRETATION March 2008 06-BCI-010 Page 1 of 9 ADAPTABLE DWELLING UNITS DISCUSSION This STANDATA has been developed to clarify the requirements for adaptable dwelling units in residential
WELCOME TO PORSÖGÅRDARNA
 WELCOME TO PORSÖGÅRDARNA You will become our tenant and we hope you will enjoy your stay here. Make sure that you have read this information carefully. If you have other questions, please feel free to
MaxLite LED VAPOR TIGHT LINEAR FIXTURES
 General Safety Information To reduce the risk of death, personal injury or property damage from fire, electric shock, falling parts, cuts/abrasions, and other hazards read all warnings and instructions
home pay register sign in services site map Winning bid: EUR 3, (Approximately US $4,677.48) Mar :09:36 PST
 Mar :09:36 PST") ebay item 4977642304 (Ends Mar-28-05 08:09:36 PST) - Omega S... http://cgi.ebay.com/ws/ebayisapi.dll?viewitem&item=497764230... home pay register sign in services site map Start new search Search Advanced
ebay item 4977642304 (Ends Mar-28-05 08:09:36 PST) - Omega S... http://cgi.ebay.com/ws/ebayisapi.dll?viewitem&item=497764230... home pay register sign in services site map Start new search Search Advanced
E-Flash & RedFlash Models: E , E , E-1824 R , R , R-1824
 ASSEMBLY / INSTRUCTION MANUAL FOR E-Flash & RedFlash Models: E-18-120, E-18-240, E-1824 R-18-120, R-18-240, R-1824 This manual contains the following documents: 1. 01-03-011 (Leg Assembly Parts List) 2.
The Benefits Of Using Bluewood Letting
 The Benefits Of Using Bluewood Letting Introduction to Our Rental Services There are many benefits to using Bluewood Letting, we have outlined some below. Please read through this information pack as it
Ported Fuel Rail Fitting GM 6.6L Duramax LLY/LBZ/LMM
 PPEdiesel.com GM 6.6L Duramax 2004.5-2010 LLY/LBZ/LMM (113071000) Installation Guide Technical Support (714) 985-4825 Rev: 08/15/19 v14b DISCLAIMER OF LIABILITY Performance products can increase horsepower
BDCSFL20.
 www.blackanddecker.eu BDCSFL20 9 3 6 5 6a 3 2 4 5 A B 1 7 1 C 7 8 D 2 4 8 6 E 5 F 2 3 ENGLISH (Original instructions) (Original instructions) ENGLISH Intended use Your BLACK+DECKER BDCSFL20 flashlight
Accessible Accommodation There are nine adapted accommodation units at Longleat:
 Accommodation Accessible Accommodation There are nine adapted accommodation units at Longleat: 36 1 bedroom Executive Apartment 109 3 bedroom Executive Lodge 114 3 bedroom Executive Lodge 241 3 bedroom
INSTALLATION OPERATION MAINTENANCE WARRANTY INFORMATION
 CEILING FAN MANUAL INSTALLATION OPERATION MAINTENANCE WARRANTY INFORMATION LUCCI AIRFUSION CLIMATE II DC CEILING FAN Version 1.0-Muti Last updated on May 3, 2012 Copyright 2012 LUCCI CONTENTS GB Installation
V-Line Gen5 LTE S2195. Installation Guide
 V-Line Gen5 LTE S2195 Installation Guide Thank you for purchasing the V-Line Gen5 LTE LED Fixture! 1 Support If you have questions after reading this information or would like our advice on your project,
Understanding Accessibility Features to Meet Housing Needs
 Understanding Accessibility Features to Meet Housing Needs For more information about the K-W VisitAble Housing initiative: www.waterlooregion.org/visitable trudy@waterlooregion.org 519-579-1096 X *3006
Kitchen Surplus Installation Instructions: Solid Wood Worktops
 Kitchen Surplus Installation Instructions: Solid Wood Worktops Introduction: Wood is a natural material. As such, moisture, heat and humidity are important variables to consider. For example, wood expands
CAS PAR. Comprehensive Assessment and Solution Process For Aging Residents INTRODUCTION MATERIALS NEEDED 1 CASPAR
 CAS PAR Comprehensive Assessment and Solution Process For Aging Residents INTRODUCTION CASPAR consists of 6 sections.the suggested order of completing the protocol is as follows:. Contact Information.
TIN KNOCKER TK BAR FOLDER INSTRUCTIONS & PARTS DIAGRAM TK BAR FOLDER
 1 TIN KNOCKER TK BAR FOLDER INSTRUCTIONS & PARTS DIAGRAM TK BAR FOLDER Sheet Metal Equipment Sales Inc. Dean P. O'Connell, President Green Bay, Wisconsin Phone - (920)-662-9966 Fax - (920)-662-9969 Website:
Renovations Information
 Renovations Information Renovations to a Lot When proposing to undertake renovations to a lot, the lot owners should review this factsheet and we suggest you complete an application form and checklist.
USER MANUAL EN IN Portable Basketball System insportline Phoenix
 USER MANUAL EN IN 10666 Portable Basketball System insportline Phoenix TWO ADULTS 1 CONTENTS SAFETY INSTRUCTIONS... 3 PARTS LIST... 4 PRECAUTIONS... 7 ASSEMBLY... 7 TRANSPORT... 12 TERMS AND CONDITIONS
T20. OWNER'S MANUAL 2-10 BETRIEBSANLEITUNG MODE D'EMPLOI HANDLEIDING MANUALE D'USO MANUAL DEL USUARIO 48-56
 T20 OWNER'S MANUAL 2-10 BETRIEBSANLEITUNG 11-19 MODE D'EMPLOI 20-29 HANDLEIDING 30-38 MANUALE D'USO 39-47 MANUAL DEL USUARIO 48-56 BRUKSANVISNING 57-64 KÄYTTÖOHJE 65-72 SERIAL NUMBER SERIENNUMMER NUMERO
Jürg KAUFMANN, Urs FLÜCKIGER and Peter BÄNNINGER, Switzerland
 Cadastre 2014: The Practical Realization of a Comprehensive Documentation of the Complex Legal Situation of Land Using a Simple Data Model and Sophisticated Information Technology Jürg KAUFMANN, Urs FLÜCKIGER
USER MANUAL EN IN 7536 Power Tower insportline PT80
 USER MANUAL EN IN 7536 Power Tower insportline PT80 CONTENTS SAFETY INSTRUCTIONS... 3 EXPLODED DRAWING... 4 PARTS LIST... 5 ASSEMBLY INSTRUCTIONS... 8 TERMS AND CONDITIONS OF WARRANTY, WARRANTY CLAIMS...
RENTING AN APARTMENT. Information and tips for you who live in accommodation with right of tenancy
 RENTING AN APARTMENT Information and tips for you who live in accommodation with right of tenancy In this brochure, we present important information and tips for you who live in accommodation with right
Property. Introduction
 This access statement does not contain personal opinions as to our suitability for those with access needs, but aims to accurately describe the facilities and services that we offer all our guests/visitors
ADAPTATIONS POLICY 2012
 ADAPTATIONS POLICY 2012 1.0 INTRODUCTION Adaptations make properties more accessible and useable for people with a medical condition or disability and thereby enable them to maximise their independence
Arriving and Getting In
 Waldorf St Martins Apartment Hotel Accessibility Report - 8/6/18 Waldorf St Martins offers 4 x One Bedroom Accessible Apartments for short term accommodation, in Auckland CBD, close to all central attractions
CENTRALLY LOCATED, EASY TO REACH, POPULAR.
 COURTEOUS LIVING CENTRALLY LOCATED, EASY TO REACH, POPULAR. 66 Time for yourself is getting harder and harder to come by. 5 A quick shopping trip or some quality time with friends in the city center.
Information contained
 www.lpi.nsw.gov.au No: 2011/07 Date: October 2011 Defining who is responsible for items and areas in a Strata Scheme Land and Property Information, a division of the Department of Finance and Services
USER MANUAL EN IN 7147 Doorway Gym Bar insportline
 USER MANUAL EN IN 7147 Doorway Gym Bar insportline 1 CONTENTS ASSEMBLY INSTRUCTIONS... 3 INSTRUCTIONS OF USE... 3 TERMS AND CONDITIONS OF WARRANTY, WARRANTY CLAIMS... 4 2 PAY ATTENTION TO FOLLOWING POINTS
Ontario s 2012 Building Code Barrier-Free Design Amendments Ontario Regulation 332/12 Amended by O. Regs. 368/13 and 191/14
 Ontario s 2012 Building Code Barrier-Free Design Amendments Ontario Regulation 332/12 Amended by O. Regs. 368/13 and 191/14 Notice: This E Learning module is intended for general information purposes only.
Living in Germany Partner interview
 Living in Germany Partner interview Have a look at the map below. Tell your partner about the town and the region you live in. Include information such as - its population - the population density - its
U.S. Department of Housing and Urban Development Office of Public and Indian Housing. A Good Place to Live!
 U.S. Department of Housing and Urban Development Office of Public and Indian Housing A Good Place to Live! Introduction Having a good place to live is important. Through your Public Housing Agency (or
User Manual Benutzerhandbuch Manuel de l utilisateur Manuale per l utente Manual del Usuario Manual do Usuário _
 User Manual Benutzerhandbuch Manuel de l utilisateur Manuale per l utente Manual del Usuario Manual do Usuário _ Model Classification EN 60601-1 Classification 93/42 EEC Mode of Operation Power Source
PMD DRIVER RELOCATION KIT For Chevy 6.5L Diesel Trucks
 19 June 2009 PMD Driver Relocation Kit (P/N# 1036520) - 1 - PMD DRIVER RELOCATION KIT For 1994-2000 Chevy 6.5L Diesel Trucks Part# 1036520 -- Installation Instructions -- PLEASE READ ALL INSTRUCTIONS CAREFULLY
Hellan Strainer Installation & Operations Manual Hellan Strainer Manual Self-Cleaning Strainers
 Hellan Strainer Installation & Operations Manual Hellan Strainer Manual Self-Cleaning Strainers Models: DH, TSH, AH, QH, HH Hellan Strainer 3249 E. 80 th Street Cleveland, OH 44104 Phone: 888-443-5526
Deck Mounted Basin Mixer
 Deck Mounted Basin Mixer Installation Guide TSP131 Attention Before Installation 1. Inspect this product to ensure you have all parts as shown that are required for proper installation. 2. The valve cartridge
RSIC-1 EXT04 INSTALLATION GUIDE
 Furring Channel: Recomended: 25 gauge, hemmed edge detail required on all 25 gauge furring channel. Meets or exceeds SSMA min. requirements. Optional: 22 Gauge (no hemmed edge required with 22 gauge) Depth:
Accessibility Guide for Buttermere Cottage
 Accessibility Guide for Buttermere Cottage Email: buttermerecottage@gmail.com Telephone: 01466 780471 Website: www.buttermerecottage.com Contact: Rachel Nowak Welcome At Buttermere Cottage we want to make
USER MANUAL EN IN Pedometer insportline Pallete
 USER MANUAL EN IN 11144 Pedometer insportline Pallete 1 CONTENTS HOW TO WEAR... 3 HOW TO USE... 3 WARNING!... 3 TERMS AND CONDITIONS OF WARRANTY, WARRANTY CLAIMS... 3 2 HOW TO WEAR Clip the pedometer securely
SEMI-AUTOMATIC CO 2 STEEL BB PISTOL
 1911 SEMI-AUTOMATIC CO 2 STEEL BB PISTOL OWNERS MANUAL: HANDLING & SAFETY INSTRUCTIONS W WARNING READ THE INSTRUCTIONS AND WARNINGS IN THIS MANUAL CAREFULLY BEFORE USING THIS CO 2 AIRGUN; DO NOT DISCARD
18 V CORDLESS HYDRAULIC CRIMPING TOOL B500E KV
 1 18 V CORDLESS HYDRAULIC CRIMPING TOOL B500E KV VERSION ISOLATED also available for Power Supply Companies 18 V cordless hydraulic crimping tool, lightweight and balanced for single hand operation. The
General Operating Instructions
 VT-155VCM-GR 155 General Operating Instructions Remove all external and internal packaging from your appliance. Be sure that all parts have been included before discarding any packaging materials. You
Jurys Inn Nottingham. Property. Introduction. Pre-Arrival
 This access statement does not contain personal opinions as to our suitability for those with access needs, but aims to accurately describe the facilities and services that we offer all our guests/visitors
Kommunstyrelsen Diarium
 Kommunstyrelsen Diarium Från: Ulf Olsson Skickat: den 3 maj 2018 09:50 Till: Kommunstyrelsen Diarium Ämne: Fwd: Letter to key stakeholders in Sweden Bifogade filer: Vonovia announces public cash offer
EXTERIOR BRANDING & SIGNAGE PROGRAM. August personasigns.com
 EXTERIOR BRANDING & SIGNAGE PROGRAM August 2018 800.843.9888 personasigns.com LED Channel Letters Individual Mount Subway 2018 Program Signage Raceway Mount Version 1.0 Sizes and Configurations subject
The Building Manager also provides advice on building defects and basic maintenance and repair services for common areas. ANTIAS OWNERS MANUAL
 OWNERS CORPORATION antias 1 st October 2017 WELCOME LETTER FOR ALL RESIDENTS OF ANTIAS APARTMENTS. The Owner s Corporation of Antias Apartments would like to take this opportunity to welcome you. We hope
Owner s Manual. TriPoint Lock Box. Item No
 Owner s Manual TriPoint Lock Box Item No. 98152 READ THIS FIRST Warning: NEVER store a loaded firearm in the Hornady Security TriPoint lock box under any circumstances. The risks associated with storage
Werbeflächen für Sponsoren und Aussteller des DGGG 2018
 Werbeflächen für Sponsoren und Aussteller des DGGG 2018 Advertising Spaces at the CityCube Berlin Indoors and Outdoors 2 CityCube Berlin Site Map 3 CityCube Berlin Entrance Messedamm: Outdoors Advertising
1.0. Picket Gates. Vinyl Fence Framed Gate Kits BOM V1 1/14. Owner's Manual Assembly and Installation Instructions.
 Vinyl Fence Framed Gate Kits 34107034BOM V1 1/14 Owner's Manual Assembly and Installation Instructions PLEASE READ OWNER'S MANUAL COMPLETELY BEFORE ASSEMBLING YOUR GATE. Picket Gates To register your product,
DECORI LUXE decorations / décors / Dekore / decoraciones
 LUXE Unità d ordine / order unit / unité de commande / bestelleinheit / unidad de pedido: 3,73 m 2 /sqm (40.10 SF) 129,1 cm SM 90 ORO BIS 10.2 ORO BIS 10.1 VTC 10.97 VTC 10.12 VTC 10.16 VTC 10.13 VTC 10.14
OPERATING GUIDE PLEASE READ THIS ENTIRE GUIDE BEFORE BEGINNING MANUEL D UTILISATION VEUILLEZ LIRE CE MANUEL EN ENTIER AVANT DE COMMENCER
 OPERATING GUIDE PLEASE READ THIS ENTIRE GUIDE BEFORE BEGINNING MANUEL D UTILISATION VEUILLEZ LIRE CE MANUEL EN ENTIER AVANT DE COMMENCER GEBRUIKSAANWIJZING GELIEVE DEZE GIDS VOLLEDIG DOOR TE LEZEN VOORDAT
Guide for Landlords. Preparing the Property
 Guide for Landlords Before a property can be let, there are several matters which the owner will need to deal with to ensure that the tenancy runs smoothly, and also that they comply with the law. We provide
Hurrican Castelver Veyrier / CH. Auteurs: Bruno Cathala & Ludovic Maublanc
 Hurrican Castelver 4 1255 Veyrier / CH www.hurricangames.com Auteurs: Bruno Cathala & Ludovic Maublanc Ein Detektiv-Spiel für 2 Spieler ab 14 Jahren von Bruno Cathala und Ludovic Maublanc Vorbemerkung
FME360
 3 2 1 www.stanley.eu FME360 (Original instructions) ENGLISH A B D 2 4 3 2 1 C E Intended use Your Stanley Fat Max FME360 hand-held reciprocating saw has been designed for sawing wood, plastics and sheet
THEATER EVACUATION AND EMERGENCY SITUATION GUIDELINES THEATER EVACUATION
 As a volunteer RedCoat, you have a unique role in the safety of guests who attend shows at Playhouse Square. We ask that you take this role very seriously. In an emergency, our primary responsibility is
USER INSTRUCTIONS. CleanSpace EX PAF CleanSpace Ultra PAF
 www.cleanspacetechnology.com USER INSTRUCTIONS CleanSpace EX PAF-0060 CleanSpace Ultra PAF-0070 Contents - Languages English 2-31 Danish..32-63 Estonia.64-95 Finnish 96-128 French..129-162 German 163-197
975 Air Shield. Installation Instructions
 975 Air Shield Installation Instructions 00809-0700-4975 Legal Notice The Flame Detector described in this document is the property of Rosemount. No part of the hardware, software, or documentation may
Access to and use of buildings
 The Building Regulations 2010 Access to and use of buildings APPROVED DOCUMENT M Volume 1: Dwellings M4(1) Category 1: Visitable dwellings M4(2) Category 2: Accessible and adaptable dwellings M4(3) Category
C35. OWNER S MANUAL 2-6 BETRIEBSANLEITUNG 7-12 MODE D EMPLOI HANDLEIDING MANUALE D USO MANUAL DEL USUARIO 30-34
 C35 OWNER S MANUAL 2-6 BETRIEBSANLEITUNG 7-12 MODE D EMPLOI 13-18 HANDLEIDING 19-24 MANUALE D USO 25-29 MANUAL DEL USUARIO 30-34 BRUKSANVISNING 35-39 KÄYTTÖOHJE 40-44 Serial number Seriennummer Numero
TECHNICAL ELECTRICAL SAFETY POLICY AUGUST 2017 AUGUST 2022
 TECHNICAL ELECTRICAL SAFETY POLICY AUGUST 2017 AUGUST 2022 1 Policy on : Electrical safety in domestic properties 5. Repairs, maintenance and improvements Compliant with Charter : Tenants homes are well
TENANT DESIGN MANUAL UPDATED DECEMBER 2018
 TENANT DESIGN MANUAL UPDATED DECEMBER 2018 PROJECT OVERVIEW South Hills Village is located at US 19 (Washington Road) and Ft. Couch Road, in the Bethel Park suburb of Pittsburgh. 2 PROJECT OVERVIEW Anchored
USER MANUAL EN Trampoline Froggy PRO Safety Net
 USER MANUAL EN Trampoline Froggy PRO Safety Net *The photo is for illustration purposes only. 1 CONTENTS PARTS LIST... 3 DIAGRAM OF PARTS... 3 ASSEMBLY INSTRUCTIONS... 4 GENERAL SAFETY ADVICE... 5 USING
HIPOWER LOAD CENTER DESCRIPTION
 HIPOWER LOAD CENTER DESCRIPTION The main function of the Hipower Load Center / Shore Power box is to take electricity supplier by the generator and distribute it throughout the Generator set interior accessories.
24/13 J. I. Kraszewskiego s Street, Kraków, Poland. FRØPT s designed fronts for IKEA s furniture (hereinafter called Fronts )
") Dear Customer, Hereunder are the Terms and Conditions of the FRØPT online store (hereinafter called the FRØPT store ). Please read these Terms and Conditions carefully before making an order. 1. The Controller
Dear Customer, Hereunder are the Terms and Conditions of the FRØPT online store (hereinafter called the FRØPT store ). Please read these Terms and Conditions carefully before making an order. 1. The Controller
SunPower Frequently Asked Questions
 SunPower Frequently Asked Questions How Your SunPower System Works 1 How do I turn on or restart my SunPower System? 2 How do I know if my system is working? 3 Does my system work at night? 4 Will it work
NELA USA Terms and Conditions of Sale
 NELA USA Terms and Conditions of Sale ACCEPTANCE The following terms and conditions of sale are applicable to all quotations and purchase orders and are the only terms and conditions applying for the sale
Trademarks used in this document: The ETS-Lindgren logo is a registered trademark and Calibration Services Plus! is a trademark of ETS-Lindgren Inc.
 ETS-Lindgren Inc. reserves the right to make changes to any products herein to improve functioning or design. Although the information in this document has been carefully reviewed and is believed to be