3.6V CORDLESS SCREWDRIVER GS36USB
|
|
|
- Hector Peters
- 5 years ago
- Views:
Transcription

1 3.6V CORDLESS SCREWDRIVER GS36USB 3,6 V ACCUSCHROEVENDRAAIER TOURNEVIS SANS FIL 3,6 V AKKUSCHRAUBER, 3,6 V AVVITATORE A BATTERIA GMC 3,6 V ATORNILLADOR INALÁMBRICO 3,6 V Version date:

2


3 A 4 3 B


4 C D 1 2 E
5 3.6V CORDLESS SCREWDRIVER GS36USB English 6 Nederlands 12 Français 18 Deutsch 24 Italiano 30 Español 36 Polski 42
6 Original Instructions GB Introduction Thank you for purchasing this GMC tool. This manual contains information necessary for safe and effective operation of this product. This product has unique features and, even if you are familiar with similar products, it is necessary to read this manual carefully to ensure you fully understand the instructions. Ensure all users of the tool read and fully understand this manual. Description of Symbols The rating plate on your tool may show symbols. These represent important information about the product or instructions on its use. Wear hearing protection Wear eye protection Wear breathing protection Wear head protection Wear hand protection Read instruction manual Caution! Do not incinerate batteries DO NOT use in rain of damp environments Conforms to relevant legislation and safety standards Environmental Protection Waste electrical products and batteries, including Li-ion batteries, should not be disposed of with household waste. Please recycle where facilities exist. Check with your local authority or retailer for recycling advice For indoors use only (battery charger and PSU) Technical Abbreviations Key V Specification Model Power 3.6V GS36USB No load speed 210min -1 Max torque Ingress protection Dimensions (L x W x H) Weight Built-in battery: Cell type Voltage Capacity Charging time Battery charger: Input Voltage Power output Protection class 4.5Nm IPX0 230 x 60 x 48mm 0.40kg (including battery) Li-ion 3.6V, DC 1.3Ah Cable length 1.8m USB charging cable: Cable length *Charging time approximate Mains 3 5hrs & USB 2hrs* V~ 50/60Hz, 0.2A, 6W 5.5V DC, 600mA 1m As part of our ongoing development, specifications of GMC products may alter without notice. Sound & vibration information: Sound pressure L PA Sound power LW A Uncertainty K 57.5dB(A) 68.5dB(A) 3dB(A) Weighted vibration a h 0.399m/s 2 Uncertainty K Volts ~, AC Alternating current A, ma Ampere, milli-amp Ah n0 n Nm Amp hours (battery capacity) No load speed Rated speed Degrees Ø Newton metres (torque) Diameter 1.5m/s2 The sound intensity level for the operator may exceed 85dB(A) and sound protection measures are necessary. Hz Hertz, DC Direct current W, kw Watt, kilowatt /min or min -1 rpm F Operations per minute Revolutions per minute Farad (capacitance) db(a) Decibel sound level (A weighted) m/s 2 Metres per second squared (vibration magnitude) 6
7 WARNING: Always wear ear protection where the sound level exceeds 85dB(A) and limit the time of exposure if necessary. If sound levels are uncomfortable, even with ear protection, stop using the tool immediately and check the ear protection is correctly fitted and provides the correct level of sound attenuation for the level of sound produced by your tool. WARNING: User exposure to tool vibration can result in loss of sense of touch, numbness, tingling and reduced ability to grip. Long-term exposure can lead to a chronic condition. If necessary, limit the length of time exposed to vibration and use anti-vibration gloves. Do not operate the tool with hands below a normal comfortable temperature, as vibration will have a greater effect. Use the figures provided in the specification relating to vibration to calculate the duration and frequency of operating the tool. Sound and vibration levels in the specification are determined according to international standards. The figures represent normal use for the tool in normal working conditions. A poorly maintained, incorrectly assembled, or misused tool, may produce increased levels of noise and vibration. provides information on sound and vibration levels in the workplace that may be useful to domestic users who use tools for long periods of time. General Safety (Power tool Safety) WARNING: Read all safety warnings, instructions, illustrations and specifications provided with this power tool. Failure to follow all instructions listed below may result in electric shock, fire and/or serious injury. Save all warnings and instructions for future reference. The term power tool in the warnings refers to your mains-operated (corded) power tool or battery-operated (cordless) power tool. 1) Work area safety a) Keep work area clean and well lit. Cluttered or dark areas invite accidents. b) Do not operate power tools in explosive atmospheres, such as in the presence of flammable liquids, gases or dust. Power tools create sparks which may ignite the dust or fumes. c) Keep children and bystanders away while operating a power tool. Distractions can cause you to lose control. 2) Electrical safety a) Power tool plugs must match the outlet. Never modify the plug in any way. Do not use any adapter plugs with earthed (grounded) power tools. Unmodified plugs and matching outlets will reduce risk of electric shock. b) Avoid body contact with earthed or grounded surfaces, such as pipes, radiators, ranges and refrigerators. There is an increased risk of electric shock if your body is earthed or grounded. c) Do not expose power tools to rain or wet conditions. Water entering a power tool will increase the risk of electric shock. d) Do not abuse the cord. Never use the cord for carrying, pulling or unplugging the power tool. Keep cord away from heat, oil, sharp edges or moving parts. Damaged or entangled cords increase the risk of electric shock. e) When operating a power tool outdoors, use an extension cord suitable for outdoor use. Use of a cord suitable for outdoor use reduces the risk of electric shock. f) If operating a power tool in a damp location is unavoidable, use a residual current device (RCD) protected supply. Use of an RCD reduces the risk of electric shock. 3) Personal safety a) Stay alert, watch what you are doing and use common sense when operating a power tool. Do not use a power tool while you are tired or under the influence of drugs, alcohol or medication. A moment of inattention while operating power tools may result in serious personal injury. b) Use personal protective equipment. Always wear eye protection. Protective equipment such as a dust mask, non-skid safety shoes, hard hat or hearing protection used for appropriate conditions will reduce personal injuries. c) Prevent unintentional starting. Ensure the switch is in the OFF-position before connecting to power source and/or battery pack, picking up or carrying the tool. Carrying power tools with your finger on the switch or energising power tools that have the switch ON invites accidents. d) Remove any adjusting key or wrench before turning the power tool ON. A wrench or a key left attached to a rotating part of the power tool may result in personal injury. e) Do not overreach. Keep proper footing and balance at all times. This enables better control of the power tool in unexpected situations. f) Dress properly. Do not wear loose clothing or jewellery. Keep your hair and clothing away from moving parts. Loose clothes, jewellery or long hair can be caught in moving parts. g) If devices are provided for the connection of dust extraction and collection facilities, ensure these are connected and properly used. Use of dust collection can reduce dust-related hazards. h) Do not let familiarity gained from frequent use of tools allow you to become complacent and ignore tool safety principles. A careless action can cause severe injury within a fraction of a second. 4) Power tool use and care a) Do not force the power tool. Use the correct power tool for your application. The correct power tool will do the job better and safer at the rate for which it was designed. b) Do not use the power tool if the switch does not turn it ON and OFF. Any power tool that cannot be controlled with the switch is dangerous and must be repaired. c) Disconnect the plug from the power source and/or remove the battery pack, if detachable, from the power tool before making any adjustments, changing accessories, or storing power tools. Such preventive safety measures reduce the risk of starting the power tool accidentally. d) Store idle power tools out of the reach of children and do not allow persons unfamiliar with the power tool or these instructions to operate the power tool. Power tools are dangerous in the hands of untrained users. e) Maintain power tools and accessories. Check for misalignment or binding of moving parts, breakage of parts and any other condition that may affect the power tool s operation. If damaged, have the power tool repaired before use. Many accidents are caused by poorly maintained power tools. f) Keep cutting tools sharp and clean. Properly maintained cutting tools with sharp cutting edges are less likely to bind and are easier to control. g) Use the power tool, accessories and tool bits, etc. in accordance with these instructions, taking into account the working conditions and the work to be performed. Use of the power tool for operations different from those intended could result in a hazardous situation. h) Keep handles and grasping surfaces dry, clean and free from oil and grease. Slippery handles and grasping surfaces do not allow for safe handling and control of the tool in unexpected situations. 5) Battery tool use and care a) Recharge only with the charger specified by the manufacturer. A charger that is suitable for one type of battery pack may create a risk of fire when used with another battery pack. b) Use power tools only with specifically designated battery packs. Use of any other battery packs may create a risk of injury and fire. c) When battery pack is not in use, keep it away from other metal objects, like paper clips, coins, keys, nails, screws or other small metal objects, that can make a connection from one terminal to another. Shorting the battery terminals together may cause burns or a fire. d) Under abusive conditions, liquid may be ejected from the battery; avoid contact. If contact accidentally occurs, flush with water. If liquid contacts eyes, additionally seek medical help. Liquid ejected from the battery may cause irritation or burns. e) Do not use a battery pack or tool that is damaged or modified. Damaged or modified batteries may exhibit unpredictable behaviour resulting in fire, explosion or risk of injury. f) Do not expose a battery pack or tool to fire or excessive temperature. Exposure to fire or temperature above 130 C may cause explosion. g) Follow all charging instructions and do not charge the battery pack or tool outside the temperature range specified in the instructions. Charging improperly or at temperatures outside the specified range may damage the battery and increase the risk of fire. 6) Service a) Have your power tool serviced by a qualified repair person using only identical replacement parts. This will ensure that the safety of the power tool is maintained. b) Never service damaged battery packs. Service of battery packs should only be performed by the manufacturer or authorised service providers. GB 7
8 GB Battery Safety WARNING: If Li-ion batteries are incorrectly used, stored or charged, they could become a fire, burn and explosion hazard. Keep the battery out of the reach of children Only charge Li-ion batteries using the charger provided or designed specifically for your product Only use Li-ion batteries provided with a product or specifically designed to be compatible Allow batteries to cool for 15 minutes after charging or heavy use. Failure to follow these instructions may cause overheating or fire When not in use, batteries should be stored at room temperature (approximately 20 C) Ensure that battery contacts cannot accidentally short in storage. Keep batteries clean; foreign objects or dirt may cause a short. Keep away from other metal objects, for example paperclips, coins, keys, nails and screws Under abusive conditions, liquid may be ejected from the battery. This liquid may cause skin irritation or burns. Avoid contact. If contact accidentally occurs, flush with water. If liquid contacts eyes, seek medical help Do not open, disassemble, crush, heat above 60 C or incinerate. Do not dispose of in fire or similar Mini Screwdriver Safety Hold the power tool by insulated gripping surfaces only when performing tasks where the tool bit comes within close proximity or may contact hidden wiring. Fasteners or cutting accessories contacting a live power source may make exposed metal parts of the power tool live and could give the operator an electric shock Hold the tool with a firm grip. Impact screwdrivers can provide instantaneous high levels of torque while driving fasteners, which could easily be transferred to the operator Use the auxiliary handle(s), if provided. Loss of control can cause harm to the operator Always ensure the workpiece is secured. A properly secured workpiece using a vice or other clamping equipment is held more secure than by hand Always wait until the machine has come to a complete stop before setting the tool down. The tool insert can jam, leading to a loss of control over the power tool Additional Safety for Battery-Operated Drills WARNING: It is imperative to follow all national safety regulations concerning installation, operation and maintenance. a) DO NOT allow anyone under the age of 18 years to use this tool, and ensure that operators are qualified and familiar with the operating and safety instructions. b) Battery chargers are for indoors use only. Ensure that the power supply and charger are protected against moisture at all times. c) When using the drill, use safety equipment including safety glasses or shield, ear defenders, and protective clothing including safety gloves. Wear respiratory protection suitable for the work being undertaken. A minimum rating of FFP2 is recommended. If operating the tool causes discomfort in any way, stop immediately and review your method of use. d) Use metal and voltage detectors to locate concealed electric, water or gas lines. Avoid touching live components or conductors. e) Ensure that the lighting is adequate. f) Ensure that the drill bit is securely fixed in the chuck. Insecure drill bits can be ejected from the machine causing a hazard. g) Ensure that the drill bit is not in contact with the workpiece prior to starting up the tool. h) Before drilling, check that there is sufficient clearance for the drill bit under the workpiece. i) DO NOT exert pressure on to the tool. To do so would shorten its service life. j) Drill bits get hot during operation, allow to cool prior to handling them. k) NEVER use your hands to remove sawdust, chips or waste close by the bit. l) If you are interrupted when operating the drill, complete the process and switch off before looking up. m) Where possible, use clamps or a vice to hold your work. n) Examine the chuck regularly for signs of wear or damage. Have damaged parts repaired by a qualified service centre. o) ALWAYS wait until the drill has come to a complete stop before putting it down. p) Periodically check all nuts, bolts and other fixings and tighten where necessary. Product Familiarisation 1. Bit Holder 2. Torque Selector 3. LED Charge Indicator 4. Handle Adjustment Button 5. Forward/Trigger Lock/Reverse 6. Handle 7. Charging Socket 8. LED Torch 9. Torch ON/OFF Switch 10. Trigger 11. LED Work Light 12. Charging Plug 13. Charge Connector 14. USB Charging Cable 15. Carry Case 16. Accessories Intended Use Battery-powered mini screwdriver with adjustable two-position body for light duty screwdriving, fastening, and pilot-hole drilling to a minimal torque level. Handle doubles as an LED torch. Unpacking Your Tool Carefully unpack and inspect your new tool. Familiarise yourself with all its features and functions Ensure that all parts of the tool are present and in good condition. If any parts are missing or damaged, have such parts replaced before attempting to use this tool Before Use WARNING: Ensure the Charge Connector (13) is disconnected from the tool before use. WARNING: Before attaching or changing any accessories or making any adjustments, ensure the Forward/Trigger Lock/Reverse (5) is set to the middle Trigger Lock position, which prevents depressing the trigger and powering the tool. Setting the trigger lock or drill/drive direction The Forward/Trigger Lock/Reverse (5) button has three positions that affects the Trigger (10) and the direction of Bit Holder (1) rotation To lock the Trigger, set the Forward/Trigger Lock/Reverse button to the middle position Press the Forward/Trigger Lock/Reverse button into the handle for the desired direction of the Bit Holder rotation, clockwise or anti-clockwise Visually check the bit holder rotation before connecting with the screw/fastener or workpiece WARNING: Always set the Trigger to lock position when using the torch, changing bits, or when the tool is not in use. 8
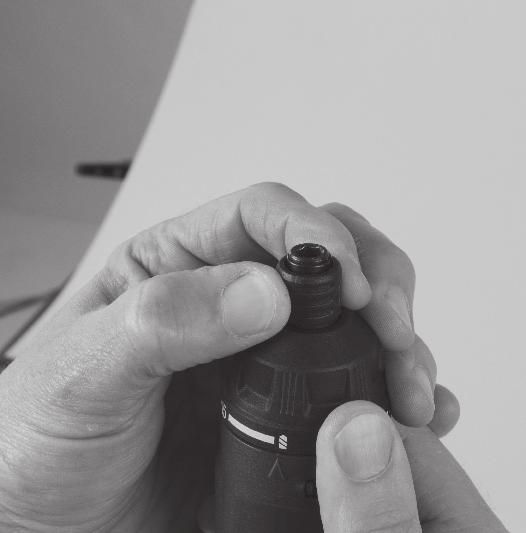
9 Checking the battery charge level Set the tool to forward or reverse mode then pull the Trigger (10) briefly to illuminate the charge level on LED Charge Indicator (3)(Image A) Alternatively, plug the Charge Connector (13) into the Charging Socket (7) and connect the Charging Plug (12)/USB Charging Cable (14) into a power source to illuminate the LED Charge Indicator The LED Charge Indicator displays three colours that indicate the charge level: green, yellow, and red If all three colours are illuminated, the tool has full/near full charge; if only yellow and red are illuminated, the tool has mid-charge; and if only the red is illuminated, the tool has low-charge and will need charging Note: Performance of the tool may gradually decline as the battery depletes. Charging the battery The tool s internal battery should be charged at 20 C (room temperature) 1. Plug the Charge Connector (13) into the Charging Socket (7) and connect the Charging Plug (12)/USB Charging Cable (14) into a power source, which will illuminate the LED Charge Indicator 2. When the tool s internal battery is fully-charged, the LED Charge Indicator (3) will display the three colours: red, yellow, and green 3. Disconnect the Charging Plug or USB Cable from the power source and disconnect the Charge Connector from the Charging Socket WARNING: DO NOT leave the tool charging for an extended amount of time once it has reached full charge. Doing so could damage the internal battery and could cause a fire hazard. WARNING: The battery will gradually lose charge in storage. Do not store the screwdriver for long periods whilst discharged. Always charge the battery before long-term storage. IMPORTANT: Failure to follow the correct procedure when charging the battery will result in permanent damage. You must follow the correct procedure. Changing the handle configuration For straight handle configuration This configuration is best for straight driving and torch mode 1. Set the Trigger (10) to lock 2. Grip the tool with two hands (Image B) 3. Press the Handle Adjustment Button (4) (Image A) and simultaneously begin to rotate the Handle (6) upwards until the tool is straight and the Handle Adjustment Button clicks into place For pistol grip configuration This configuration is best for regular drill/driving Follow the procedure above but rotate the handle downwards in the reverse action in Image B Fitting a screwdriver bit Fit the hex type screwdriver bits directly into the hex Bit Holder (1), or use the additional bit holder (supplied) To remove the bit, pull back the sheath on the Bit Holder (Image C) and remove the bit from the Bit Holder Adjusting the torque selector The Torque Selector (2) has 15 torque settings plus pilot-drill mode Rotate the Torque Selector to pilot-drill mode or the desired torque setting by lining up the drill symbol or desired torque number with the triangle marker (Image D) Note: A small hex-shank drill bit (not supplied) can be used in pilot-drill mode to drill pilot holes before driving screws. This mode is for drilling into soft woods and similar materials, but this mode is not a substitute for a more powerful cordless drill driver. Using this mode for drilling into tough materials will place the tool under excessive stress and may damage the tool. Operation IMPORTANT: Ensure the battery is fully charged before use. (See Checking the battery charge level.) WARNING: ALWAYS set the Trigger (10) to lock before inserting, removing or changing bits. This will prevent accidental powering of the tool and personal injury. Note: The LED Work Light (11) will automatically power every time the Trigger (10) is pulled and the tool is powered. The work light will not work when the Trigger is locked. Driving 1. Insert the chosen bit into the Bit Holder (1) 2. Set the Forward/Trigger Lock/Reverse (5) button to either forward or reverse 3. Select the desired torque setting 4. Connect the bit to the end of the screw/fastener and pull the Trigger (10) to power the tool 5. Release the Trigger when the screw/fastener has reached the desired depth or has been removed from the workpiece Note: It is recommended that a pilot hole be used when driving screws/fasteners. WARNING: Do not use the pilot-drill mode for driving. Doing so could damage the workpiece and/or strip the head of the screw/fastener, which would make it difficult to remove if required. Begin with a lower torque setting and increase to the setting until the appropriate torque level is reached. Pilot-hole drilling 1. Insert a hex-shank drill bit (not supplied) or alternative compatible drill bit set up into the Bit Holder (1) 2. Set the Forward/Trigger Lock/Reverse (5) button to forward, clockwise rotation 3. Set the Torque Selector (2) to 4. Place the drill bit s tip in contact with the workpiece, in position where the pilot hole is required 5. Pull the Trigger (10) to power the tool; control the drilling motion to the desired hole depth 6. Keep the tool powered until the drill bit is removed and clear from the hole in the workpiece Operating the LED torch The LED Torch (8) is best operated when the tool is configured with the straight handle set up (Image B), and with the Trigger (10) locked To operate the LED Torch, push the Torch ON/OFF Switch (9) to the ON position (Image E) To switch OFF, push the Torch ON/OFF Switch to the OFF position WARNING: NEVER shine the LED Torch into the eyes of a person or animal. Accessories A range of accessories, including bits and fasteners, is available from your GMC stockist. Spare parts can be purchased from toolsparesonline.com GB 9
10 Maintenance WARNING: Ensure the Trigger (10) is locked before performing maintenance. GB General inspection Regularly check that all the fixing screws are tight Inspect the supply cord of the tool s charger, prior to each use, for damage or wear. Repairs should be carried out by an authorised GMC service centre. This advice also applies to extension cords used with this tool Cleaning Keep your tool clean at all times. Dirt and dust will cause internal parts to wear quickly, and shorten the machine s service life. Clean the body of your machine with a soft brush, or dry cloth. If available, use clean, dry, compressed air to blow through the ventilation holes Clean the tool casing with a soft damp cloth using a mild detergent. Do not use alcohol, petrol or strong cleaning agents Never use caustic agents to clean plastic parts Lubrication Slightly lubricate all moving parts at regular intervals with a suitable spray lubricant Storage Set the Forward/Trigger Lock/Reverse (5) to the Trigger Lock (middle) position before storing Store the tool with a full battery charge. Recharge the tool every 3 months if stored long term and not used, which will preserve the battery life Store this tool and its accessories in its case carefully in a secure, dry place out of the reach of children Store out of direct sunlight Disposal Always adhere to national regulations when disposing of power tools that are no longer functional and are not viable for repair. Do not dispose of power tools or other waste electrical and electronic equipment (WEEE) with household waste Contact your local waste disposal authority for information on the correct way to dispose of power tools 10
11 GB Guarantee To register your guarantee visit our web site at and enter your details*. Your details will be included on our mailing list (unless indicated otherwise) for information on future releases. Details provided will not be made available to any third party. Purchase Record Date of Purchase: Model: GS36USB Serial Number: (located on motor housing) Retain your receipt as proof of purchase. If registered within 30 days of purchase GMC guarantees to the purchaser of this product that if any part proves to be defective due to faulty materials or workmanship within 24 MONTHS from the date of original purchase, GMC will repair or, at its discretion, replace the faulty part free of charge. This guarantee does not apply to commercial use nor does it extend to normal wear and tear or damage as a result of accident, abuse or misuse. * Register online within 30 days of purchase. Terms & conditions apply. This does not affect your statutory rights. CE Declaration of Conformity The undersigned: Mr Darrell Morris as authorised by: GMC Tools Declares that This declaration has been issued under the sole responsibility of the manufacturer. The object of the declaration is in conformity with the relevant Union harmonisation Legislation. Identification code: Description: 3.6V Cordless Screwdriver Conforms to the following directives and standards: Machinery Directive 2006/42/EC EMC Directive 2014/30/EU RoHS Directive 2011/65/EU EN :2009/A11:2010 EN :2010 EN :2006/A2:2011 EN :1997/A2:2008 Notified body: TÜV SÜD The technical documentation is kept by: GMC Date: 10/04/2017 Signed: Mr Darrell Morris Managing Director Name and address of the manufacturer: Powerbox International Limited, Company No Registered address: Powerbox, Boundary Way, Lufton Trading Estate, Yeovil, Somerset BA22 8HZ, United Kingdom. 11
12 Vertaling van de originele instructies NL Inleiding Hartelijk dank voor de aanschaf van dit GMC- gereedschap. Deze instructies bevatten informatie die u nodig hebt voor een veilige en doeltreffende bediening van dit product. Dit product heeft unieke kenmerken. Zelfs als u bekend bent met gelijksoortige producten dient u deze handleiding zorgvuldig door te lezen, zodat u in staat bent alle voordelen te benutten. Houd deze handleiding bij de hand en zorg ervoor dat alle gebruikers van dit gereedschap de handleiding hebben gelezen en volledig hebben begrepen. Beschrijving symbolen Op het gegevensplaatje van uw gereedschap kunnen zich symbolen bevinden. Deze vertegenwoordigen belangrijke productinformatie en gebruiksinstructies. Draag oorbescherming Draag oogbescherming Draag ademhalingsbescherming Draag hoofdbescherming Draag handbescherming Lees de gebruikshandleiding Opgepast! Verbrand NOOIT batterijen NIET gebruiken in de regen of in een vochtige omgeving Voldoet aan de van kracht zijnde wetgeving en veiligheidsnormen Milieubescherming Elektrische producten en batterijen, met inbegrip van Li-ion batterijen mogen niet met het normale huisvuil worden weggegooid. Gelieve te recycleren indien deze mogelijkheid bestaat. Vraag de plaatselijke autoriteiten of de verkoper om advies betreffende de recyclagemogelijkheden Enkel voor binnengebruik (batterijlader en PSU) Technische afkortingen en symbolen V Volt ~, AC Wisselspanning A, ma Ampere, milli-amp Ah n 0 n Nm Graden Amp.uren (capaciteit van de accu) Onbelaste snelheid Nominale snelheid Newton.meter(koppel/ moment) Specificaties Model Vermogen GS36USB 3,6 V Onbelaste snelheid 210 min -1 Max. koppel Beschermingsgraad Afmetingen (L x B x H): Gewicht Ingebouwde batterij Celtype Spanning Capaciteit 4,5 Nm IPX0 Ø Hz Diameter Hertz, DC Gelijkspanning W, kw Watt, kilowatt /min or min -1 rpm F 230 x 60 x 48 mm db(a) m/s 2 0,40 kg (met inbegrip van batterij) Li-ion 3,6 V DC 1,3 Ah Laadtijd Netspanning 3-5 u en USB 2 u* Batterijlader: Ingangsspanning Afgegeven vermogen Beschermingsklasse Snoerlengte USB-laadkabel: Snoerlengte *Benaderde laadtijd V~ 50/60 Hz, 0,2 A, 6 W 5,5 V DC, 600 ma 1,8 m 1 m Bewerkingen per minuut Toeren per minuut Farad (capaciteit) Geluidsniveau decibel (A-gewogen) Meter per seconde² (trillingsmagnitude) In het kader van onze voortgaande ontwikkeling kunnen de specificaties van GMC-producten zonder voorafgaande kennisgeving worden gewijzigd. Geluids- & trillingsgegevens: Geluidsdruk L PA Geluidsvermogen L WA Onzekerheid K 57,5 db(a) 68,5 db(a) 3 db(a) Gewogen trilling a h : 0,399 m/s 2 Onzekerheid K 1,5 m/s 2 De geluidsintensiteit voor de bediener kan 85 db(a) overschrijden en de gehoorbescherming is noodzakelijk. 12
13 WAARSCHUWING: Bij een geluidsintensiteit van 85 db(a) of hoger is het dragen van gehoorbescherming en het limiteren van de blootstellingstijd vereist. Bij oncomfortabel hoge geluidsniveaus, zelfs met het dragen van gehoorbescherming, stopt u het gebruik van de machine onmiddellijk. Controleer de pasvorm en het geluiddempingsniveau van de bescherming. WAARSCHUWING: Blootstelling aan trilling resulteert mogelijk in gevoelloosheid, tinteling en een vermindert gripvermogen. Langdurige blootstelling kan leiden tot chronische condities. Limiteer de blootstellingsduur en draag anti-vibratie handschoenen. Vibratie heeft een grotere invloed op handen met een temperatuur lager dan een normale, comfortabele temperatuur. Maak gebruik van de informatie in de specificaties voor het bereken van de gebruiksduur en frequentie van de machine. Geluids- en trillingsniveaus in de specificaties zijn bepaald in overeenstemming met internationale normen. De waarden gelden voor een normaal gebruik in normale werkomstandigheden. Een slecht onderhouden, onjuist samengestelde of onjuist gebruikte machine produceert mogelijk hogere geluids- en trillingsniveaus. europa.eu biedt informatie met betrekking tot geluids- en trillingsniveaus op de werkplek wat mogelijk nuttig is voor regelmatige gebruikers van machines. Algemene veiligheid (Powertool Safety) WAARSCHUWING: Lees alle veiligheidswaarschuwingen, instructies, illustraties, en specificaties die met dit elektrisch gereedschap meegeleverd werden. Het niet naleven van de onderstaande instructies kan resulteren in elektrische schokken, brand en/of ernstig letsel. Bewaar alle waarschuwingen en instructies voor toekomstig gebruik. De term "elektrisch gereedschap" in de waarschuwingen verwijst naar uw elektrisch gereedschap dat op een elektrisch netwerk is aangesloten (met een snoer) of dat met behulp van een batterij wordt gevoed (snoerloos). 1) Veiligheid werkruimte a) Houd de werkruimte zuiver en goed verlicht. Rommelige en donkere ruimtes geven dikwijls aanleiding tot ongelukken. b) Werk niet met elektrisch gereedschap in explosieve omgevingen, bijvoorbeeld indien er ontvlambare vloeistoffen, gassen, of stof aanwezig zijn. Elektrisch gereedschap creëert vonken die stof of dampen kunnen doen ontbranden. c) Houd kinderen en omstanders uit de buurt wanneer u elektrisch gereedschap gebruikt. Door afleiding kunt u de controle over het gereedschap verliezen. 2) Elektrische veiligheid a) De stekkers van het elektrisch gereedschap moeten afgestemd zijn op het stopcontact. Pas de stekker nooit aan. Gebruik geen adapterstekkers in combinatie met geaard elektrisch gereedschap. Het gebruik van ongewijzigde stekkers en passende stopcontacten beperkt het risico op elektrische schokken. b) Vermijd lichamelijk contact met geaarde oppervlakken zoals buizen, radiatoren, fornuizen en koelkasten. Het risico op een elektrische schok neemt toe wanneer uw lichaam geaard is. c) Stel elektrisch gereedschap niet bloot aan regen of aan natte omstandigheden. Water dat elektrisch gereedschap binnendringt, verhoogt het risico op elektrische schokken. d) Beschadig het snoer niet. Gebruik het snoer nooit om het elektrisch gereedschap te dragen, voort te trekken, of om de stekker uit het stopcontact te trekken. Houd het snoer uit de buurt van hitte, olie, scherpe randen of bewegende delen. Een beschadigd of in de knoop geraakt snoer verhoogt het risico op elektrische schokken. e) Wanneer u elektrisch gereedschap buiten gebruikt, maak dan gebruik van een verlengsnoer dat geschikt is voor gebruik buitenshuis. Gebruik een verlengsnoer dat geschikt is voor gebruik buitenshuis om het risico op elektrische schokken te beperken. f) Indien het onvermijdelijk is om elektrisch gereedschap te gebruiken in een vochtige omgeving, gebruik dan een voeding waarop een aardlekbeveiliging (Residual Current Device - RCD) is voorzien. Het gebruik van een RCD beperkt het risico op elektrische schokken. 3) Persoonlijke veiligheid a) Blijf alert, let op wat u doet, en gebruik uw gezond verstand wanneer u elektrisch gereedschap gebruikt. Gebruik elektrisch gereedschap nooit wanneer u vermoeid bent of onder de de invloed bent van drugs, alcohol of geneesmiddelen. Onoplettendheid tijdens het gebruik van elektrisch gereedschap kan aanleiding geven tot ernstig persoonlijk letsel. b) Gebruik persoonlijke beschermingsuitrusting. Draag steeds oogbescherming. Beschermende uitrusting, aangepast aan de omstandigheden, zoals een stofmasker, antislip veiligheidsschoenen, een helm, of gehoorbescherming beperkt het risico op persoonlijk letsel. c) Zorg ervoor dat het apparaat niet per ongeluk wordt gestart. Zorg ervoor dat de schakelaar in de uit-stand staat alvorens u de stekker in het stopcontact steekt en/of de batterij aanbrengt, het gereedschap opneemt of draagt. Het dragen van elektrisch gereedschap met uw vinger op de schakelaar of het aansluiten van het gereedschap op een voeding wanneer de schakelaar is ingeschakeld, kan aanleiding geven tot ongelukken. d) Verwijder alle stel- of moersleutels voordat u het elektrisch gereedschap inschakelt. Een moer- of stelsleutel die is achtergelaten op of in een roterend onderdeel van het elektrisch gereedschap kan aanleiding geven tot persoonlijk letsel. e) Reik niet te ver. Zorg ervoor dat u steeds stabiel staat. en in evenwicht blijft Zo houdt u meer controle over het elektrisch gereedschap in onverwachte situaties. f) Draag geschikte kleding. Draag geen loshangende kleding of sieraden. Houd haren en kleding uit de buurt van bewegende delen. Loshangende kleding, sieraden en lange haren kunnen gegrepen worden door bewegende onderdelen. g) Als er inrichtingen voorzien zijn voor het afvoeren of het verzamelen van stof, zorg er dan voor dat deze op de correcte wijze aangesloten en gebruikt worden. Het gebruik van inrichtingen voor het verzamelen van stof kan het risico op brand of op gerelateerde ongelukken beperken. h) Het is niet omdat u gewend bent om de apparaten regelmatig te gebruiken dat u onoplettend mag worden en de veiligheidsprincipes van het apparaat mag verwaarlozen. Een onoplettendheid kan in een fractie van een seconde aanleiding geven tot ernstig letsel. 4) Gebruik en onderhoud van elektrisch gereedschap a) Forceer elektrisch gereedschap nooit. Gebruik elektrisch gereedschap dat geschikt is voor het werk dat u wilt uitvoeren. Geschikt elektrisch gereedschap werkt beter en veiliger op een snelheid waarvoor het werd ontworpen. b) Gebruik het elektrisch gereedschap niet indien de schakelaar het apparaat niet in- en uitschakelt. Elektrisch gereedschap dat niet met behulp van de schakelaar kan bediend worden, is gevaarlijk en moet hersteld worden. c) Haal de stekker uit het stopcontact en/of verwijder de batterij uit het elektrisch gereedschap alvorens u instellingen aanpast, accessoires vervangt of het gereedschap opbergt. Dergelijke voorzorgsmaatregelen verminderen het risico op het per ongeluk starten van het elektrisch gereedschap. d) Berg elektrisch gereedschap dat niet in gebruik is op buiten het bereik van kinderen, en laat personen die niet bekend zijn met het elektrisch gereedschap of met deze instructies het elektrisch gereedschap niet bedienen. Elektrisch gereedschap is gevaarlijk indien het gebruikt wordt door onervaren gebruikers. e) Onderhoud elektrische gereedschap en accessoires Controleer een eventuele foutieve uitlijning of het vastzitten van bewegende delen, eventuele gebroken onderdelen, en welke andere afwijkingen dan ook die de werking van het elektrisch gereedschap zouden kunnen beïnvloeden. Indien het elektrisch gereedschap beschadigd is, dient het gerepareerd te worden alvorens u het opnieuw gebruikt. Vele ongelukken worden veroorzaakt door slecht onderhouden elektrisch gereedschap. f) Houd snijwerktuigen scherp en schoon. Goed onderhouden snijwerktuigen met scherpe snijranden slaan minder snel vast en zijn gemakkelijker te bedienen en te controleren. g) Gebruik het elektrisch gereedschap, accessoires en onderdelen volgens deze instructies en in overeenstemming met de werkomstandigheden en met het uit te voeren werk. Het gebruik van het elektrisch gereedschap voor werkzaamheden die verschillen van deze waarvoor het apparaat bedoeld is, kan aanleiding geven tot gevaarlijke situaties. h) Houd de grepen droog, schoon, en vrij van olie en vet Gladde handgrepen maken een veilige manipulatie en controle van het apparaat onmogelijk in onverwachte situaties. 5) Gebruik en onderhoud van gereedschap met batterijen a) Laad batterijen enkel op met de lader die door de producent wordt gespecificeerd. Een lader die geschikt is voor een welbepaald type batterij kan een risico creëren op brand wanneer hij gebruikt wordt met een andere batterij. b) Gebruik elektrisch gereedschap enkel met specifiek vermelde batterij-eenheden. Het gebruik van welke andere batterij dan ook kan een risico inhouden en aanleiding geven tot letsel en brand. c) Wanneer de batterijen niet gebruikt worden, houd ze dan verwijderd van andere metalen voorwerpen zoals paperclips, munten, sleutels, spijkers, schroeven, of andere kleine metalen voorwerpen die de batterijklemmen met elkaar zouden kunnen verbinden. Het kortsluiten van de batterijklemmen kan aanleiding geven tot brandwonden of tot brand. d) Onder extreme omstandigheden kan vloeistof worden uitgestoten uit de batterij, vermijd het contact daarmee. Indien er per ongeluk toch contact wordt gemaakt, spoel dan overvloedig met water. Indien vloeistof in de ogen terechtkomt, roep dan onmiddellijk medische hulp in. Vloeistof uit de batterij of accu kan irritaties of brandwonden veroorzaken. e) Gebruik geen batterijen of gereedschappen die beschadigd of gemodificeerd zijn. Beschadigde of gemodificeerde batterijen kunnen een onvoorspelbaar gedrag vertonen en kunnen aanleiding geven tot brand, explosie, of risico op lichamelijk letsel f) Stel batterijen of gereedschappen niet bloot aan vuur of aan buitensporige temperaturen. Blootstelling aan vuur of aan temperaturen hoger dan 130 C kan aanleiding geven tot een explosie. g) Volg de laadinstructies op en laad de batterijen of het gereedschap niet op buiten het temperatuursbereik dat in de instructies vermeld wordt. Verkeerd opladen of opladen bij temperaturen buiten het gespecificeerde bereik kan de batterij beschadigen en het risico op brand vergroten. NL 13
14 NL 6) Onderhoud a) Laat uw elektrisch gereedschap onderhouden door een gekwalificeerde persoon en maak enkel gebruik van identieke vervangstukken. Zo bent u ervan verzekerd dat de veiligheid van het elektrisch gereedschap gewaarborgd blijft. b) Repareer beschadigde batterijen of accu s nooit. Reparaties van batterijen en accu s mogen enkel gebeuren door de fabrikant of door geautoriseerde servicecentra. Batterijveiligheid WAARSCHUWING: Li-ion batterijen geven aanleiding tot brand- en explosiegevaar wanneer ze niet correct gebruikt, opgeslagen, of opgeladen worden. Houd batterijen buiten het bereik van kinderen. Laad Li-ion batterijen ENKEL op met behulp van de meegeleverde lader of met behulp van een lader die specifiek is ontwikkeld voor uw product. Gebruik ENKEL Li-ion batterijen die samen met uw product geleverd werden of die speciaal ontworpen werden zodat ze compatibel zijn. Laat batterijen gedurende 15 minuten afkoelen na ze te hebben opgeladen of na zwaar gebruik. Het niet naleven van deze instructies kan een oververhitting of brand veroorzaken Wanneer batterijen niet gebruikt worden, dienen ze opgeslagen te worden bij kamertemperatuur (ongeveer 20 C) Zorg ervoor dat de batterijklemmen tijdens de opslag niet per ongeluk kortgesloten kunnen worden. Houd de batterijen zuiver; vreemde voorwerpen of vuil kunnen een kortsluiting veroorzaken. Houd batterijen verwijderd van andere metalen voorwerpen, bijvoorbeeld paperclips, munten, sleutels, spijkers, en schroeven. Onder extreme omstandigheden kan vloeistof worden uitgestoten uit de batterij. Deze vloeistof kan huidirritaties of brandwonden veroorzaken. Vermijd contact. Indien er per ongeluk toch contact wordt gemaakt, spoel dan overvloedig met water. Indien vloeistof in de ogen terechtkomt, roep dan onmiddellijk medische hulp in. Open geen batterijen, haal ze niet uit elkaar, plet ze niet, verwarm ze niet tot boven 60 C, en verbrand ze niet. Tracht batterijen niet te verbranden of zich op een gelijkaardige wijze ervan te ontdoen. Veiligheid mini-schroevendraaier Houd het elektrisch gereedschap enkel vast bij de geïsoleerde handgrepen wanneer u werkzaamheden uitvoert waarbij het gereedschap in de buurt of in contact kan komen met verborgen bedrading. Indien vastzetmiddelen of snij-accessoires contact maken met een onder spanning staande draad, kunnen de metalen onderdelen van het apparaat eventueel onder spanning komen te staan, wat de gebruiker van het gereedschap een elektrische schok kan geven. Houd het gereedschap stevig vast. Elektrische schroevendraaiers kunnen ogenblikkelijke hoge koppels afgeven wanneer bevestigingsmiddelen worden aangebracht, en deze kunnen gemakkelijk overgedragen worden naar de gebruiker van het gereedschap. Gebruik de hulphandgreep/-grepen, indien aanwezig. Het verlies van de controle over het gereedschap kan gevaarlijk zijn voor de gebruiker. Zorg er steeds voor dat het werkstuk veilig is aangebracht. Een met behulp van een bankschroef of van een lijmklem correct vastgezet werkstuk is veiliger dan het werkstuk in de hand houden. Wacht STEEDS tot de machine tot stilstand is gekomen alvorens het gereedschap neer te leggen. Het inzetstuk kan vastlopen, wat aanleiding kan geven tot controleverlies over het elektrisch gereedschap. Bijkomende veiligheid voor batterij-aangedreven boormachines WAARSCHUWING: Het is van het grootste belang om alle nationale veiligheidsregels te volgen met betrekking tot de installatie, de werking, en het onderhoud. a) Laat NOOIT iemand jonger dan 18 jaar dit gereedschap gebruiken en zorg ervoor dat de personen die dat wel doen gekwalificeerd zijn en bekend zijn met de werkings- en veiligheidsinstructies. b) Batterijladers mogen enkel binnen gebruikt worden. Zorg ervoor dat de voeding en de lader te allen tijde beschermd zijn tegen vocht. c) Tijdens het gebruik van de boormachine dient men gebruik te maken van de nodige veiligheidsuitrusting, met inbegrip van veiligheidsbrillen of maskers, oorbeschermers, en beschermende kleding, waaronder veiligheidshandschoenen. Draag ademhalingsbeschermende uitrusting die gecshikt is voor het uit te voeren werk. Een minimale klasse van FFP2 is aan te bevelen. Indien het gebruik van het gereedschap op welke wijze dan ook hinder veroorzaakt, stop dan ogenblikkelijk het gebruik ervan en herbekijk en evalueer de gebruikswijze van het apparaat. 14 d) Gebruik metaal- en spanningsdetectors om verborgen elektrische bedrading en water- of gasbuizen op te sporen. Vermijd het aanraken van onder spanning staande componenten of geleiders. e) Zorg ervoor dat de verlichting voldoende is. f) Zorg ervoor dat het boorbit stevig vastzit in de boorkophouder. Loszittende boorbits kunnen weggeslingerd worden uit de machine, wat gevaarlijk kan zijn. g) Zorg ervoor dat het boorbit geen contact maakt met het werkstuk alvorens het gereedschap te starten. h) Controleer, voordat u begint te boren, of er onder het werkstuk voldoende ruimte aanwezig is voor het boorbit. i) Oefen GEEN druk uit op het gereedschap. Indien u dat wel doet, wordt de levensduur ervan gereduceerd. j) Boorbits worden heet tijdens het gebruik, laat ze afkoelen alvorens ze vast te nemen en te manipuleren. k) Verwijder zaagsel, spanen, of afval nooit met de hand uit de buurt van het bit. l) Indien u wordt onderbroken tijdens het boren, beëindig dan het boorproces en schakel het apparaat uit alvorens op te kijken. m) Indien mogelijk, gebruik klemmen of bankschroeven om het werkstuk te immobiliseren. n) Controleer de boorkophouder regelmatig op eventuele tekenen van slijtage of schade. Laat beschadigde onderdelen repareren door een erkend servicecentrum. o) Wacht STEEDS tot de boormachine tot stilstand is gekomen alvorens ze neer te leggen. p) Controleer regelmatig alle moeren, bouten, en andere fittingen en bevestigingen, en span deze aan indien nodig. Productonderdelen 1. Bithouder 2. Koppelselector 3. LED ladingindicator 4. Knop instelling handgreep 5. Voorwaarts/Vergrendeld/Achterwaarts 6. Hendel 7. Laadcontact 8. LED-lamp 9. Aan/Uit-schakelaar 10. Trekkerschakelaar 11. LED-werklicht 12. Laadstekker 13. Laadconnector 14. USB-laadkabel 15. Draagtas 16. Accessoires Voorzien gebruik Met batterijen gevoede mini-schroevendraaier met in twee posities instelbaar lichaam voor lichte schroefwerkzaamheden, bevestigingen, en voorboren van gaten met een minimum koppel. De handgreep vervult eveneens de functie van lamp. Uw uitrusting uit de verpakking halen Haal uw nieuwe uitrusting voorzichtig uit de verpakking en inspecteer ze. Zorg dat u op de hoogte bent van alle kenmerken en functies ervan. Zorg ervoor dat alle onderdelen van de uitrusting aanwezig zijn en in goede staat verkeren. Indien er onderdelen ontbreken of beschadigd zijn, dienen deze vervangen te worden alvorens de uitrusting te gebruiken
15 Voorafgaand aan het gebruik WAARSCHUWING: Zorg ervoor dat de laadconnector (13) is losgekoppeld van het gereedschap alvorens dit laatste te gebruiken. WAARSCHUWING: Alvorens wel accessoire dan ook aan te brengen of te vervangen, of alvorens aanpassingen door te voeren, dient u ervoor te zorgen dat de Voorwaarts/Vergrendeld/Achterwaarts (5) in de middelste vergrendelpositie is geplaatst waarin verhinder wordt dat de trekkerschakelaar wordt ingedrukt en het apparaat wordt ingeschakeld. Instellen van de trekkervergrendeling of van de boor-/ schroefrichting De Voorwaarts/Vergrendeld/Achterwaarts-knop (5) is in het bezit van drie posities die een effect hebben op de trekkerschakelaar (10) en op de rotatierichting van de bithouder (1). Om de trekkerschakelaar te vergrendelen, plaatst men de Voorwaarts/Vergrendeld/Achterwaarts-knop in de middelste positie. Druk de Voorwaarts/Vergrendeld/Achterwaarts-knop in de handgreep voor de gewenste rotatierichting van de bithouder, in wijzerzin of in tegenwijzerzin. Controleer de rotatie van de bithouder visueel alvorens de verbinding te maken met de schroef/bevestiger of het werkstuk. WAARSCHUWING: Plaats het apparaat steeds in de vergrendelde toestand wanneer u de lamp gebruikt, bits vervangt, of wanneer het apparaat niet gebruikt wordt. Controleren van laadniveau van de batterij Plaats het apparaat in de voorwaartse of achterwaartse modus en druk de trekkerschakelaar (10) kort in om het laadniveau zichtbaar te maken op de LED-indicator (LED) (Afbeelding A) Als alternatief kunt u de laadconnector (13) verbinden met het laadcontact (7) en de laadstekker (12)/ USB-laadkabel (14) met een voedingspunt om de LED-laadindicator te doen oplichten. De LED-laadindicator geeft door middel van drie kleuren het laadniveau aan: groen, geel, en rood Indien de drie kleuren zichtbaar zijn, is het gereedschap volledig of nagenoeg volledig opgeladen; indien enkel geel en rood zichtbaar zijn, is het gereedschap half opgeladen; en indien enkel de rode kleur zichtbaar is, is de batterij nagenoeg leeg en dient zij opgeladen te worden. Opmerking: De werking van het gereedschap kan geleidelijk aan achteruitgaan bij het ontladen van de batterij. Opladen van de batterij De interne batterij van het gereedschap dient opgeladen te worden bij een temperatuuru van 20 C (kamertemperatuur). 1. Verbind de laadconnector (13) met het laadcontact (7) en de laadstekker (12)/USB-laadkabel (14) met een voedingspunt om de LED-laadindicator te doen oplichten. 2. Wanneer de interne natterij van het gereedschap volledig is opgeladen, zal de LED-ladingindicator (3) de drie kleuren aangeven: rood, geel, en groen 3. Koppel de laadstekker of de USB-kabel los van de voedingsbron, en koppel de ladingconnector los van het laadpunt. WAARSCHUWING: Laad het gereedschap niet gedurende langere tijd op wanneer het reeds de volledige laadtoestand bereikt heeft. indien u dat wel doet, kunt u de interne batterij beschadigen en brandgevaar veroorzaken. WAARSCHUWING: de batterij zal tijdens een eventuele opslag geleidelijk aan haar lading verliezen. Berg de schroevendraaier nooit gedurende langere tijden op in de ontladen toestand. Laad de batterij steeds op voorafgaand aan een langdurige opslag van het gereedschap. BELANGRIJK: Indien u de correcte laadprocedure niet volgt bij het opladen van de batterij zal dat aanleiding geven tot permanente schade. U dient de juiste procedure te volgen. Wijzigen van de hendelconfiguratie Voor de rechte hendelconfiguratie Deze configuratie is aangewezen voor recht schroeven en voor lampmodus 1. Plaats de trekkerschakelaar (10) ion de vergrendelpositie 2. Houd het gereedschap vast met beide handen (afbeelding B) 3. Druk de hendelinstelknop (4) (afbeelding A) in en begin tegelijkertijd met het verdraaien van de de handel/ handgreep (6) in de opwaartse richting tot het gereedschap recht is en de hendelinstelknop in positie klikt. Voor pistoolgreepconfiguratie Deze configuratie is aangewezen voor gewoon boren/aanbrengen van schroeven Volg de bovenstaande procedure maar roteer de hendel/handgreep in de neerwaartse richting, tegengesteld aan afbeelding B. Aanbrengen van een schroevendraaierbit Plaats het scrhoevendraaierbit van het zeskantige type rechtstreeks in de bithouder (1), of gebruik de bijkomende bithouder (meegeleverd) Om het bit te verwijderen, trekt u de huls op de bithouder (afbeelding C) terug en verwijdert u het bit uit de bithouder Aanpassen van de koppelinstelling De koppelinstelling (2)voorziet 15 instelposities plus een voorboorpositie Verdraai de koppelinstelling naar voorboormodus of naar de gewenste koppelwaarde door het boorsymbool of het gewenste koppelgetal uit te lijnen met de driehoekige markering (Afbeelding D) Opmerking: Een klein boorbit met zeskantige schacht (niet meegeleverd) kan gebruikt worden in voorboormodus om voor te boren bij het aanbrengen van schroeven. Deze modus is bedoeld om in zachthout en gelijkaardige materialen te boren, maar deze modus mag niet als substituut beschouwd worden voor een krachtigere snoerloze boormachine. Indien u deze modus gebruikt om in harde materialen te boren, creëert u te grote spanningen in het gereedschap waardoor dit laatste kan beschadigd worden. Werking BELANGRIJK: Zorg ervoor de de batterij volledig is opgeladen voorafgaand aan het gebruik. (Zie "Controleren van laadniveau van de batterij"). WAARSCHUWING: Plaats de trekkerschakelaar (10) STEEDS in de vergrendelpositie alvorens bits aan te brengen, te verwijderen, of te vervangen. Dit voorkomt het per ongeluk starten van het gereedschap en voorkomt persoonlijk letsel. Opmerking: Het LED-werklicht (11) zal automatisch ingeschakeld worden, elke keer dat de trekkerschakelaar (10) wordt gebruikt en het gereedschap onder spanning wordt geplaatst. Het werklicht zal niet ingeschakeld worden wanneer de trekkerschakelaar geblokkeerd is. Aandrijving: 1. Plaats het gekozen bit in de bithouder (1) 2. Plaats de Voorwaarts/Vergrendeld/Achterwaarts-knop (5) in de voorwaartse of achterwaartse positie. 3. Selecteer de gewenste koppelinstelling 4. Plaats het bit in de sleuf van de schroef op op het verbindingsmiddel en schakel de trekkerschakelaar (10) in om het apparaat te starten 5. Laat de trekkerschakelaar los wanneer de schroef of het verbindingsmiddel de gewenste diepte heeft bereikt of uit het werkstuk is verwijderd. Opmerking: Het verdient de voorkeur dat er wordt voorgeboord wanneer schroeven/bevestigingsmiddelen worden aangebracht. WAARSCHUWING: Gebruik de voorboormodus niet om schroeven aan te brengen. Indien u dat wel doet, kunt u het werkstuk en/of de kop van de schroef of van het bevestigingsmiddel beschadigen en dit maakt het moeilijk om de schroef of het bevestigingsmiddel opnieuw te verwijderen. Begin met een lagere koppelinstelling en voer deze op tot het gewenste koppel bereikt is. NL 15
RAGE5-S. Original Instructions Instructions Originales Originele Handleiding Original-Anweisungen
 RAGE5-S Original Instructions Instructions Originales Originele Handleiding Original-Anweisungen Written originally in UK English Date Published: 01/07/2016 TABLE OF CONTENTS INTRODUCTION Page 3 Guarantee
18.0 V CORDLESS HYDRAULIC CRIMPING TOOL B1300L CE
 1 18.0 V CORDLESS HYDRAULIC CRIMPING TOOL B1300L CE The next generation of Cembre cordless hydraulic tools represents a significantly advantageous evolution from current models. Born of the renowned B131LN
USER MANUAL EN IN Table Tennis Table insportline Rokito
 USER MANUAL EN IN 12947 Table Tennis Table insportline Rokito CONTENTS RECOMMENDATION OF USE AND PRECAUTIONS... 3 PARTS INDENTIFIER... 3 ASSEMBLY INSTRUCTIONS... 4 STEP 1... 4 STEP 2... 5 STEP 3... 5 STEP
Apeiron LTE+ / E12 Power Box LED Downlight System For Elevators. Installation Guide
 Apeiron LTE+ / E12 Power Box LED Downlight System For Elevators Installation Guide 1 Thank you for purchasing the Apeiron LTE+ LED Fixture and E12 Elevator Power Box! Support If you have questions after
Warranty. Multi-Purpose Battery Chargers Limited Warranty Includes: G750, G1100, G3500, G7200, G See On-Board Battery Chargers Warranty Below
 Warranty Multi-Purpose Battery Chargers Limited Warranty Includes: G750, G1100, G3500, G7200, G26000 See On-Board Battery Chargers Warranty Below The NOCO Company (""NOCO"") warrants that its Battery Charger
INSTRUCTION MANUAL MM-601J. Series FS4-3 General Purpose Liquid Flow Switch
 INSTRUCTION MANUAL MM-601J 246796 Series FS4-3 General Purpose Liquid Flow Switch INSTALLATION STEP 1 - Paddle Sizing Determine the correct paddle length for your installation from the chart below. Pipe
USER MANUAL EN IN 7152 Power Rack insportline Cable Column CC300
 USER MANUAL EN IN 7152 Power Rack insportline Cable Column CC300 CONTENTS IMPORTANT SAFETY PRECAUTIONS... 3 PARAMETERS... 3 PARTS LIST... 4 HARDWARE LIST... 5 ASSEMBLY... 6 USAGE... 14 TERMS AND CONDITIONS
MaxLite LED VAPOR TIGHT LINEAR FIXTURES
 General Safety Information To reduce the risk of death, personal injury or property damage from fire, electric shock, falling parts, cuts/abrasions, and other hazards read all warnings and instructions
Trademarks used in this document: The ETS-Lindgren logo is a registered trademark and Calibration Services Plus! is a trademark of ETS-Lindgren Inc.
 ETS-Lindgren Inc. reserves the right to make changes to any products herein to improve functioning or design. Although the information in this document has been carefully reviewed and is believed to be
TIN KNOCKER TK BAR FOLDER INSTRUCTIONS & PARTS DIAGRAM TK BAR FOLDER
 1 TIN KNOCKER TK BAR FOLDER INSTRUCTIONS & PARTS DIAGRAM TK BAR FOLDER Sheet Metal Equipment Sales Inc. Dean P. O'Connell, President Green Bay, Wisconsin Phone - (920)-662-9966 Fax - (920)-662-9969 Website:
V-Line Gen5 LTE S2195. Installation Guide
 V-Line Gen5 LTE S2195 Installation Guide Thank you for purchasing the V-Line Gen5 LTE LED Fixture! 1 Support If you have questions after reading this information or would like our advice on your project,
USER MANUAL EN W-TEC Motorcycle Helmets
 USER MANUAL EN W-TEC Motorcycle Helmets Before you start using your W-TEC helmet, read the following instructions. W-TEC helmets are made using modern technologies to provide maximum protection for motorcyclists.
USER MANUAL EN IN Fitness Wristband insportline Ego
 USER MANUAL EN IN 10889 Fitness Wristband insportline Ego CONTENTS NOTICE... 3 PRODUCT OVERVIEW... 3 FEATURES... 3 BASIC OPERATION... 4 SMARTPHONE CONNECTION... 4 APP INSTALLATION... 4 TERMS AND CONDITIONS
Hellan Strainer Installation & Operations Manual Hellan Strainer Manual Self-Cleaning Strainers
 Hellan Strainer Installation & Operations Manual Hellan Strainer Manual Self-Cleaning Strainers Models: DH, TSH, AH, QH, HH Hellan Strainer 3249 E. 80 th Street Cleveland, OH 44104 Phone: 888-443-5526
U.S. Department of Housing and Urban Development Office of Public and Indian Housing. A Good Place to Live!
 U.S. Department of Housing and Urban Development Office of Public and Indian Housing A Good Place to Live! Introduction Having a good place to live is important. Through your Public Housing Agency (or
USER MANUAL EN Trampoline Froggy PRO Safety Net
 USER MANUAL EN Trampoline Froggy PRO Safety Net *The photo is for illustration purposes only. 1 CONTENTS PARTS LIST... 3 DIAGRAM OF PARTS... 3 ASSEMBLY INSTRUCTIONS... 4 GENERAL SAFETY ADVICE... 5 USING
Deck Mounted Basin Mixer
 Deck Mounted Basin Mixer Installation Guide TSP131 Attention Before Installation 1. Inspect this product to ensure you have all parts as shown that are required for proper installation. 2. The valve cartridge
adjustable height mechanisms
 adjustable height mechanisms lifts to make worktops height adjustable mechanisms for wall cupboards adaptability create adaptable working environments enable working spaces to suit all users and carers
18 V CORDLESS HYDRAULIC CRIMPING TOOL B500E KV
 1 18 V CORDLESS HYDRAULIC CRIMPING TOOL B500E KV VERSION ISOLATED also available for Power Supply Companies 18 V cordless hydraulic crimping tool, lightweight and balanced for single hand operation. The
TIN KNOCKER FOURPLEX CLEAT FORMER
 1 TIN KNOCKER FOURPLEX CLEAT FORMER INSTRUCTIONS & PARTS DIAGRAM TAAG MACHINERY CO. (Master Distributor) 1257-B Activity Dr. Vista, CA 92081 Tel: (800) 640-0746 Fax: (760) 727-9948 Website: www.tinknocker.com
E-Flash & RedFlash Models: E , E , E-1824 R , R , R-1824
 ASSEMBLY / INSTRUCTION MANUAL FOR E-Flash & RedFlash Models: E-18-120, E-18-240, E-1824 R-18-120, R-18-240, R-1824 This manual contains the following documents: 1. 01-03-011 (Leg Assembly Parts List) 2.
USER MANUAL EN IN Abdominal Trainer insportline AB Lifter Easy
 USER MANUAL EN IN 10505 Abdominal Trainer insportline AB Lifter Easy IMPORTANT! Please read all instructions carefully before using this product. Retain this manual for future reference. 1 CONTENTS IMPORTANT
Saf-T-Bar Conductor Bar C Series
 Saf-T-Bar Conductor Bar C Series P/N 963001 2012.04.24 Rev. 1 SERIES C SAF-T-BAR CONDUCTOR BAR 1 Conductix Incorporated The technical data and images which appear in this manual are for informational purposes
screw fittings - nickel plated brass series MC
 screw fittings - nickel plated brass series MC MC11 MC12 MC13 MC14 MC15 MC16 MC17 MC18 MC19 MC20 MC21 MC22 MC23 MC24 MC27 MC29 MC30 MC31 MC32 MC34 MC36 MC75 171N design connection tube outside diameter
24/13 J. I. Kraszewskiego s Street, Kraków, Poland. FRØPT s designed fronts for IKEA s furniture (hereinafter called Fronts )
") Dear Customer, Hereunder are the Terms and Conditions of the FRØPT online store (hereinafter called the FRØPT store ). Please read these Terms and Conditions carefully before making an order. 1. The Controller
Dear Customer, Hereunder are the Terms and Conditions of the FRØPT online store (hereinafter called the FRØPT store ). Please read these Terms and Conditions carefully before making an order. 1. The Controller
USER MANUAL EN IN Portable Basketball System insportline Phoenix
 USER MANUAL EN IN 10666 Portable Basketball System insportline Phoenix TWO ADULTS 1 CONTENTS SAFETY INSTRUCTIONS... 3 PARTS LIST... 4 PRECAUTIONS... 7 ASSEMBLY... 7 TRANSPORT... 12 TERMS AND CONDITIONS
TECHNICAL ELECTRICAL SAFETY POLICY AUGUST 2017 AUGUST 2022
 TECHNICAL ELECTRICAL SAFETY POLICY AUGUST 2017 AUGUST 2022 1 Policy on : Electrical safety in domestic properties 5. Repairs, maintenance and improvements Compliant with Charter : Tenants homes are well
Double Helix 8x3W RGBW DMX
 Double Helix 8x3W RGBW DMX Ref. nr.: 150.303 INSTRUCTION MANUAL GEBRUIKSAANWIJZING BEDIENUNGSANLEITUNG MANUAL DE INSTRUCCIONES MANUEL D'INSTRUCTIONS INSTRUKCJA OBSŁUGI V1.0 ENGLISH Congratulations to the
PMD DRIVER RELOCATION KIT For Chevy 6.5L Diesel Trucks
 19 June 2009 PMD Driver Relocation Kit (P/N# 1036520) - 1 - PMD DRIVER RELOCATION KIT For 1994-2000 Chevy 6.5L Diesel Trucks Part# 1036520 -- Installation Instructions -- PLEASE READ ALL INSTRUCTIONS CAREFULLY
Prologe 80 Project Architect Location Photographer
 Prologe 80 Project Bureaux d Architectes Luc Spits Architect Luc Spits Architecture Location Berneau, Belgium Photographer Serge Brison Prologe 80 in-line & in-dolma Light delivers mass, depth and form.
TRAVELING WITH BATTERIES
 HD DVR Manual TRAVELING WITH BATTERIES Includes Compatible Memory Storage Recording Duration Chart Introduction Zone Shield HD Introduction Xtreme Life HD Quick Setup Guide Features Setup Playback
USER INSTRUCTIONS. CleanSpace EX PAF CleanSpace Ultra PAF
 www.cleanspacetechnology.com USER INSTRUCTIONS CleanSpace EX PAF-0060 CleanSpace Ultra PAF-0070 Contents - Languages English 2-31 Danish..32-63 Estonia.64-95 Finnish 96-128 French..129-162 German 163-197
TRAMPOLINE LADDER. 250 Lbs 113 Kgs MODEL# 9200TL PRODUCT MANUAL - VERSION Do not use ladder if children under 6 years of age are nearby.
 TRAMPOLINE LADDER PRODUCT MANUAL - VERSION 12.17.05 FOR AGES: 6+ WEIGHT LIMIT: 250 Lbs 113 Kgs ADULT(S) NEEDED: TOOLS NEEDED: WARNING/ADVERTENCIA CUSTOMER SERVICE Do not exceed weight limit of 250lbs.
RENTING AN APARTMENT. Information and tips for you who live in accommodation with right of tenancy
 RENTING AN APARTMENT Information and tips for you who live in accommodation with right of tenancy In this brochure, we present important information and tips for you who live in accommodation with right
USER MANUAL EN IN 6242 Wall holder for boxing bag insportline
 USER MANUAL EN IN 6242 Wall holder for boxing bag insportline CONTENTS SAFETY PRECAUTIONS... 3 PARTS LIST... 3 ASSEMBLY... 3 TERMS AND CONDITIONS OF WARRANTY, WARRANTY CLAIMS... 4 2 SAFETY PRECAUTIONS
THORNDON COURT BODY CORPORATE OPERATIONAL RULES
 THORNDON COURT BODY CORPORATE 62398 OPERATIONAL RULES 1. Interpretation of terms, and rules binding on owners, occupiers, employees, agents, invitees, licencees and tenants. a) Terms defined in the Unit
OPERATING GUIDE PLEASE READ THIS ENTIRE GUIDE BEFORE BEGINNING MANUEL D UTILISATION VEUILLEZ LIRE CE MANUEL EN ENTIER AVANT DE COMMENCER
 OPERATING GUIDE PLEASE READ THIS ENTIRE GUIDE BEFORE BEGINNING MANUEL D UTILISATION VEUILLEZ LIRE CE MANUEL EN ENTIER AVANT DE COMMENCER GEBRUIKSAANWIJZING GELIEVE DEZE GIDS VOLLEDIG DOOR TE LEZEN VOORDAT
Model 3701 Line Probe
 Model 3701 Line Probe User Manual ETS-Lindgren reserves the right to make changes to any products herein to improve functioning or design. Although the information in this document has been carefully reviewed
16 June VP44 Cover Kit Page 1. VP44 Cover Kit. Dodge Cummins 5.9L Pump Cover Kit
 16 June 2009 1050201 - VP44 Cover Kit Page 1 VP44 Cover Kit Dodge Cummins 5.9L Pump Cover Kit I n s t a l l a t i o n M a n u a l READ THIS MANUAL COMPLETELY BEFORE INSTALLING THIS PRODUCT. Printed in
SAI distributor with plug in connection hood: SAI-M
 s SAI distributor with plug in connection hood: SAI-M now also available with plastic thread as an alternative screw or tension clamp no higher than smallest 90 M12 round plug SAI distributors (upgrades
USER MANUAL EN IN Pedometer insportline Pallete
 USER MANUAL EN IN 11144 Pedometer insportline Pallete 1 CONTENTS HOW TO WEAR... 3 HOW TO USE... 3 WARNING!... 3 TERMS AND CONDITIONS OF WARRANTY, WARRANTY CLAIMS... 3 2 HOW TO WEAR Clip the pedometer securely
DOMESTIC ELECTRICAL INSTALLATION PERIODIC INSPECTION REPORT (FOR A SINGLE DWELLING)
") DOMESTIC ELECTRICAL INSTALLATION PERIODIC INSPECTION REPORT (FOR A SINGLE DWELLING) Issued in accordance with British Standard 7671 Requirements for Electrical Installations by an Approved Contractor or
DOMESTIC ELECTRICAL INSTALLATION PERIODIC INSPECTION REPORT (FOR A SINGLE DWELLING) Issued in accordance with British Standard 7671 Requirements for Electrical Installations by an Approved Contractor or
WELCOME TO PORSÖGÅRDARNA
 WELCOME TO PORSÖGÅRDARNA You will become our tenant and we hope you will enjoy your stay here. Make sure that you have read this information carefully. If you have other questions, please feel free to
Endless fun. Eindeloos plezier
 Endless fun Eindeloos plezier MAX&LUUK is a brand that is ideally suited to real outdoors lovers. People who would like to be outside as often as possible. Enjoying all seasons and at the rhythm of every
Ported Fuel Rail Fitting Duramax LLY/LBZ/LMM Cummins 6.7 PORTED FUEL RAIL FITTING INSTALLATION GUIDE
 2004.5-2010 Duramax LLY/LBZ/LMM 2008-2010 Cummins 6.7 PORTED FUEL RAIL FITTING INSTALLATION GUIDE DISCLAIMER OF LIABILITY This is a performance product which can be used with increased horsepower above
HIPOWER LOAD CENTER DESCRIPTION
 HIPOWER LOAD CENTER DESCRIPTION The main function of the Hipower Load Center / Shore Power box is to take electricity supplier by the generator and distribute it throughout the Generator set interior accessories.
Fauna van poelen Soorten, belang en beheer
 Fauna van poelen Soorten, belang en beheer Douwe Schut Korte CV Studie Bos een Natuurbeheer Hogeschool Larenstein Master Biologie Radboud Universiteit Lid NJN (1998-2005) Lid NVL Flora- en faunawerkgroep
USER MANUAL EN IN 7536 Power Tower insportline PT80
 USER MANUAL EN IN 7536 Power Tower insportline PT80 CONTENTS SAFETY INSTRUCTIONS... 3 EXPLODED DRAWING... 4 PARTS LIST... 5 ASSEMBLY INSTRUCTIONS... 8 TERMS AND CONDITIONS OF WARRANTY, WARRANTY CLAIMS...
MODEL HC-1000 DYNAMIC BALANCING MACHINE
 MODEL HC-1000 DYNAMIC BALANCING MACHINE The Hines Industries Model HC-1000 balancing machine is a computer based, dynamic (two plane) or static (single plane) manual load, single station, balancing machine
Invacare Stand Assist
 Invacare Stand Assist RPS350 1E, RPS350 1FR en de es fi fr it nl pt Patient Lift User Manual............................... 3 Aufstehlifter Gebrauchsanweisung........................ 45 Grúa de bipedestación
ARTICLE XI MANUFACTURED AND MOBILE HOME PARKS
 ARTICLE XI MANUFACTURED AND MOBILE HOME PARKS 11.01 General Description Manufactured/Mobile Homes are becoming an increasingly popular form of housing. However, because of their limited size, relative
Ported Fuel Rail Fitting GM 6.6L Duramax LLY/LBZ/LMM
 PPEdiesel.com GM 6.6L Duramax 2004.5-2010 LLY/LBZ/LMM (113071000) Installation Guide Technical Support (714) 985-4825 Rev: 08/15/19 v14b DISCLAIMER OF LIABILITY Performance products can increase horsepower
Landlord Agency Agreement
 Terms & Conditions This Agreement is made between Executive Lets and the Landlord/Owner of the Property or the Landlords/Owners Legally appointed representative. Executive Lets agrees to act as agent for
PROPERTY CONDITION CHECK LIST FOR A LICENCED HMO
 PROPERTY CONDITION CHECK LIST FOR A LICENCED HMO Address of property:... Inspection date:... No of bedrooms desired:... 1. Minimum Bedroom Sizes Depending On Communal Space Bedrooms If the property has
International Gas Union Research Conference 2014 Development of New Model Residential PEMFC micro-chp Systems
 International Gas Union Research Conference 2014 Development of New Model Residential PEMFC micro-chp Systems September 18, 2014 Takayuki Watanabe Residential Fuel Cell Business Development Dept. Tokyo
Kvadrat Soft Cells Installation guide
 Kvadrat Soft Cells Installation guide version 2017.07.03 Introduction Kvadrat Soft Cells are patented panels that control sound absorption. Their design is based on an innovative, aluminium frame, with
Manual READ SAFETY RULES AND INSTRUCTIONS CAREFULLY!
 ChampStick TM 400 High Production - Heavy Duty - Industrial ½ Hot Melt Stick Gun Manual Specification: AC 120V - 400W Glue Stick size: 7/16 x 11 ¾ G25A77-002- clear glue stick general purpose adhesive
The Types of Standard 2 Guidance on the Standards 2 Changes to Legislation 2
 CONTENTS INTRODUCTION 2 The Types of Standard 2 Guidance on the Standards 2 Changes to Legislation 2 SCOTTISH CORE STANDARDS FOR ACCREDITED LANDLORDS 3 1 Communication with the Tenant 3 2 Equality Issues,
STAINLESS STEEL PRODUCTS
 STAINLESS STEEL PROUCTS PROUCT CATALOG FLOOR RAINS General information STAINLESS STEEL PROUCTS All floor and rodding eyes are made from stainless steel V2A (AISI 304) or V4A (AISI 316). The floor drain
Clubhouse User Manual
 Clubhouse User Manual For Round Propel Trampoline Models Assembly, Installation, Care, Maintenance, and User Instructions WARNING READ THESE MATERIALS PRIOR TO ASSEMBLING AND USING THIS TRAMPOLINE CLUBHOUSE
the tenant guide About your tenancy
 About your tenancy 1 the tenant guide This document gives you important information about your tenancy, and helps answer any questions you may have. If you have any further questions or queries, please
CHAPTER 1282 I-1 (WAREHOUSING AND ASSEMBLING)
") CHAPTER 1282 I-1 (WAREHOUSING AND ASSEMBLING) 1282.01 PURPOSE: The I-1 (Warehousing and Assembling) Zoning District has been established to permit warehousing; low to moderate intensity assembling, processing,
CHAPTER 1282 I-1 (WAREHOUSING AND ASSEMBLING) 1282.01 PURPOSE: The I-1 (Warehousing and Assembling) Zoning District has been established to permit warehousing; low to moderate intensity assembling, processing,
Leavitt Land & Investment, Inc., 216 South 200 West, P O Box 1027, Cedar City, UT Phone: (435) Fax: (866)
 Fax: (866)") Leavitt Land & Investment, Inc., 216 South 200 West, P O Box 1027, Cedar City, UT 84721-1027 Phone: (435) 586-1558 Fax: (866) 856-7908 STUDENT HOUSING CONTACT INFO Recipient Last Name Name Middle Initial
Leavitt Land & Investment, Inc., 216 South 200 West, P O Box 1027, Cedar City, UT 84721-1027 Phone: (435) 586-1558 Fax: (866) 856-7908 STUDENT HOUSING CONTACT INFO Recipient Last Name Name Middle Initial
Treating our tenants with respect A code of conduct for contractors
 Treating our tenants with respect A code of conduct for contractors RCT Homes properties are not just bricks and mortar they are tenants homes. Our tenants have a right to expect that they will be treated
USER MANUAL EN IN 7147 Doorway Gym Bar insportline
 USER MANUAL EN IN 7147 Doorway Gym Bar insportline 1 CONTENTS ASSEMBLY INSTRUCTIONS... 3 INSTRUCTIONS OF USE... 3 TERMS AND CONDITIONS OF WARRANTY, WARRANTY CLAIMS... 4 2 PAY ATTENTION TO FOLLOWING POINTS
USER MANUAL EN Massage Tables insportline
 USER MANUAL EN Massage Tables insportline CONTENTS PRECAUTIONARY INSTRUCTIONS... 3 PARTS LIST... 3 ASSEMBLY... 4 STORAGE AND TRANSPORT... 5 TERMS AND CONDITIONS OF WARRANTY, WARRANTY CLAIMS... 5 2 PRECAUTIONARY
USER MANUAL EN IN 7773 VibroGym insportline Pyrio
 USER MANUAL EN IN 7773 VibroGym insportline Pyrio Please read this User Manual carefully before use of this product. 1 CONTENTS SAFETY PRECAUTIONS... 3 PLUG AND POWER CORD... 4 MAIN PARTS AND BUTTONS...
T-MAC CYLINDERS, INC.
 T-MAC CYLINDERS, INC. HEAVY DUTY ALUMINUM CYLINDERS AND ACCESSORIES HIGH QUALITY, DEPENDABLE, NFPA INTERCHANGEABLE CYLINDERS - MADE IN THE USA. 9014 SWANSON DRIVE ROSCOE, IL 61073 PHONE: 815-877-7090 FAX:
LUCAS OTEHA VALLEY ROAD EXTENSION, ALBANY BODY CORPORATE OPERATIONAL RULES BODY CORPORATE NUMBER TO BE ADVISED
 LUCAS 18 18 OTEHA VALLEY ROAD EXTENSION, ALBANY BODY CORPORATE OPERATIONAL RULES BODY CORPORATE NUMBER TO BE ADVISED 1. Interpretation of Terms, and Rules Binding on Owners, Occupiers, Employees, Agents,
Safety in Cleanrooms
 Safety in Cleanrooms Course structure Prepare for safety course Self study: - Cleanroom rules - Rules for working with wet chemistry Theoretical safety course First part of today Wet chemistry course Second
General Contracting Terms and Conditions of Willenbrock Fördertechnik GmbH & Co. KG for Leasing and Associated Servicing
 Postfach 140114 28088 Bremen General Contracting Terms and Conditions of for Leasing and Associated Servicing 1. Scope (1) These General Contracting Terms and Conditions apply to all contracts for leasing
SHIAWASSEE COUNTY ZONING ORDINANCE Article 4 Specific Use Regulations
 SHIAWASSEE COUNTY ZONING ORDINANCE Article 4 Specific Use Regulations Section 4.3.76 Wind Energy Conversion Systems 1. Purpose A. Through this section it is hereby set forth that Shiawassee County promotes
ENFIELD HOUSING AUTHORITY SECTION 8 OFFICE 1 Pearson Way, Enfield, CT Phone: Fax:
 ENFIELD HOUSING AUTHORITY SECTION 8 OFFICE 1 Pearson Way, Enfield, CT 06082 Phone: 860-745-7493 Fax: 860-741-8439 www.enfieldha.org SECTION 8 PROGRAM INFORMATION BOOKLET FOR PROPERTY OWNERS & MANAGERS
Allison 1000, 2000, 2400 series ( ) Installation Guide
 Installation Guide") DEEP Trans Pan Pacific Performance Engineering, Inc. www.ppediesel.com Allison 1000, 2000, 2400 series (1280510) Installation Guide Technical Support (714) 985-4825 Rev: 4/12/13 v8 DEEP Trans Pan DISCLAIMER
DEEP Trans Pan Pacific Performance Engineering, Inc. www.ppediesel.com Allison 1000, 2000, 2400 series (1280510) Installation Guide Technical Support (714) 985-4825 Rev: 4/12/13 v8 DEEP Trans Pan DISCLAIMER
HOUSING CODE CHECKLIST FOR RENTAL INSPECTIONS
 HOUSING CODE CHECKLIST FOR RENTAL INSPECTIONS GENERAL 410.200 Heating facilities must be fully operational and well maintained with facilities capable of heating every room (including bathroom and kitchen).
TITLE 7, CHAPTER 3 TAZEWELL COUNTY
 TITLE 7, CHAPTER 3 TAZEWELL COUNTY WIND FARM ORDINANCE ADOPTED SEPTEMBER 2004 Amendment Dates: February, 2008 March, 2008 February 25, 2009 September 1, 2018 7TCC 3-1. Wind Energy Conversion Systems Purpose.
STANDARDS IN RENTED ACCOMMODATION. Housing Services
 STANDARDS IN RENTED ACCOMMODATION Housing Services Introduction This leaflet describes some of the standards for rented housing. In particular, it outlines the Housing Health and Safety Rating System (or
OBTAINING A CERTIFICATE OF OCCUPANCY FOR UNAPPROVED DWELLING UNITS
 OBTAINING A CERTIFICATE OF OCCUPANCY FOR UNAPPROVED DWELLING UNITS A 2008 City Code amendment requires the owners of all rental dwelling units in the city to have a certificate of occupancy (CO) before
KINGSBURY CONDOMINIUM ASSOCIATION RULES AND REGULATIONS REVISED OCTOBER 2015
 KINGSBURY CONDOMINIUM ASSOCIATION RULES AND REGULATIONS REVISED OCTOBER 2015 These rules and regulations ( rules ) are made for the protection, benefit and comfort of Kingsbury Condominium Association
SUPERFLO VS VARIABLE SPEED PUMP
 SUPERFLO VS VARIABLE SPEED PUMP INSTALLATION GUIDE / INSTALLATIEHANDLEIDING BEDIENUNGSANLEITUNG / GUIDE DE L INSTALLATION GUIA DE INSTALACION / GUIDE ALL INSTALLAZIONE English 2 Italiano 122 Espagnol 98
1.0. Picket Gates. Vinyl Fence Framed Gate Kits BOM V1 1/14. Owner's Manual Assembly and Installation Instructions.
 Vinyl Fence Framed Gate Kits 34107034BOM V1 1/14 Owner's Manual Assembly and Installation Instructions PLEASE READ OWNER'S MANUAL COMPLETELY BEFORE ASSEMBLING YOUR GATE. Picket Gates To register your product,
TECHNICAL GUIDELINES WASTE COLLECTION SERVICES PRIVATE PROPERTY FOR
 TECHNICAL GUIDELINES FOR WASTE COLLECTION SERVICES ON PRIVATE PROPERTY Table of Contents INTRODUCTION... 3 DEFINITIONS... 4 GENERAL WASTE COLLECTION REQUIREMENTS... 6 SITE PLAN REQUIREMENTS (MULTI-RESIDENTIAL
Installation Instructions. HPL worktops THE laminate worktop
 Installation Instructions HPL worktops THE laminate worktop 1 Contents HPL worktops THE laminate worktop Installation Instructions 1 Measuring and planning Page 4 2 Cutting Page 4 3 Drilling Page 5 4 Sealing
M8 / M12 CONNECTOR SYSTEM
 M8 / M12 CONNECTOR SYSTEM EVERY CONNECTION COUNTS TE CONNECTIVITY S M8 / M12 Connector System for machine industrial automation and control applications provides a solution that safely and reliably ensures
ACTIVITIES ON AN EASEMENT POWERLINK QUEENSLAND
 POWERLINK QUEENSLAND ACTIVITIES ON AN EASEMENT Information on activities that can and can t be carried out on, or near, Powerlink easements to ensure the safe and reliable operation of the network 2 An
Information for Tenants in Multi Storey Blocks. Your Guide to Caretaking and Cleaning Services
 Information for Tenants in Multi Storey Blocks Your Guide to Caretaking and Cleaning Services 1 Contents: Page Welcome 2 Cleaning & Caretaking Team 3 Security, Rubbish & Lifts 4 Heating, Electricty & TV
Key West Pride 2018 June Key West Pride Vendor Guidelines Saturday, June 9th, am to 7pm. Set-up 8-10am
 Key West Pride Vendor Guidelines Saturday, June 9th, 2018 10am to 7pm. Set-up 8-10am Producer: Key West Pride Street fair is presented by the Key West Business Guild (305-294-4603). Schedule: This one-day
Underfloor. Heating Kits
 Underfloor Heating Kits INVISIBLE HEAT A natural feeling of warmth with no fans or ducts FULLY PROGRAMMABLE Time AND temperature control in one touch screen unit ON DEMAND Fast to warm up (circa 30 minutes
ARTICLE V SIGN REGULATIONS
 ARTICLE V SIGN REGULATIONS Section 5-1. Purpose The purpose of this Article is to protect the dual interest of the public and the advertiser. The regulations herein are designed to protect public safety
Advice for Private Landlords Management of houses in multiple occupation
 Advice for Private Landlords Management of houses in multiple occupation Plymouth City Council www.plymouth.gov.uk Housing Services Community Services Directorate This leaflet advises people who own, or
Standards of Performance
 Purpose Thousands of estimates and repair orders are written every day that include recycled parts. ARA offers industry participants the opportunity to limit the number of variables associated with the
Tenants Handbook. Essential Information and Advice for Tenants
 Tenants Handbook Essential Information and Advice for Tenants Welcome to your new home We hope you settle in well and enjoy living here. Preston Baker is the Managing Agent for this Property. That means
AM, AP & AL SERIES PUMPS OWNERS MANUAL
 AM, AP & AL SERIES PUMPS OWNERS MANUAL G12-207 2/2/04 SAFETY INSTRUCTIONS This is an industrial component. Only a qualified systems integrator should be allowed to design it into a system. The integrator
B&NES Additional HMO Licensing Conditions
 B&NES Additional HMO Licensing Conditions *The Bath and North East Somerset HMO Licensing Standards referred to in this document are available separately Schedule 1 Mandatory conditions 1. If gas is supplied
Owner s Manual. TriPoint Lock Box. Item No
 Owner s Manual TriPoint Lock Box Item No. 98152 READ THIS FIRST Warning: NEVER store a loaded firearm in the Hornady Security TriPoint lock box under any circumstances. The risks associated with storage
The Benefits Of Using Bluewood Letting
 The Benefits Of Using Bluewood Letting Introduction to Our Rental Services There are many benefits to using Bluewood Letting, we have outlined some below. Please read through this information pack as it
RESIDENTIAL TENANCY AGREEMENT
 RESIDENTIAL TENANCY AGREEMENT (Fixed Term Tenancy) THIS AGREEMENT made in duplicated the day of (month), (year). BETWEEN: on behalf of Flying Stone Canada Ltd Landlord or Landlord s Agent Flying Stone
3M Proptic High-Capacity Optical Distribution Frames
 3M Proptic High-Capacity Optical Distribution Frames The Wheel Concept for Optimized Patching A genuine revolution in the organization and operation of optical fiber distribution frames (ODFs) with: No
Signs along highways shall meet all of the requirements of the zoning districts in which they are located.
 SECTION 39 SIGNS 39.1 INTENT 39.1.1 The intent of this section is to regulate signs as defined hereinafter, to protect the safety of users of the streets and highways, to assure compatibility with uses
Singleton Campus - Tenancy Agreement
 Singleton Campus - Tenancy Agreement PLEASE RETAIN THIS TENANCY AGREEMENT FOR FUTURE REFERENCE. STUDENT NAME: Miss First Name Surname STUDENT NUMBER: 123456 This Tenancy Agreement and the Residence Regulations